|
Storm Damage Page 4
This page was last updated on 14 June 2002
Return
to Page 1
Rebuilding
the Anchor Platform Repairs
to the Foredeck Installing
the New Platform
|
|
Repairing
the Damaged Foredeck
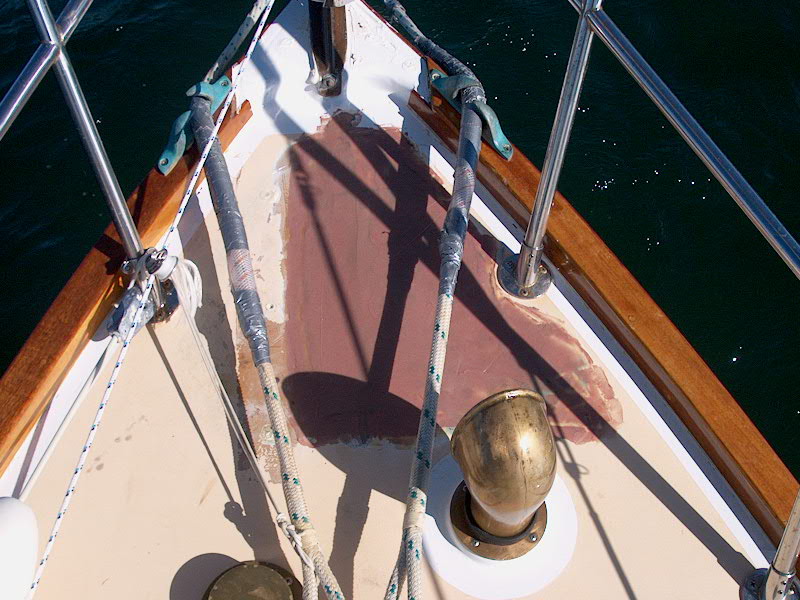
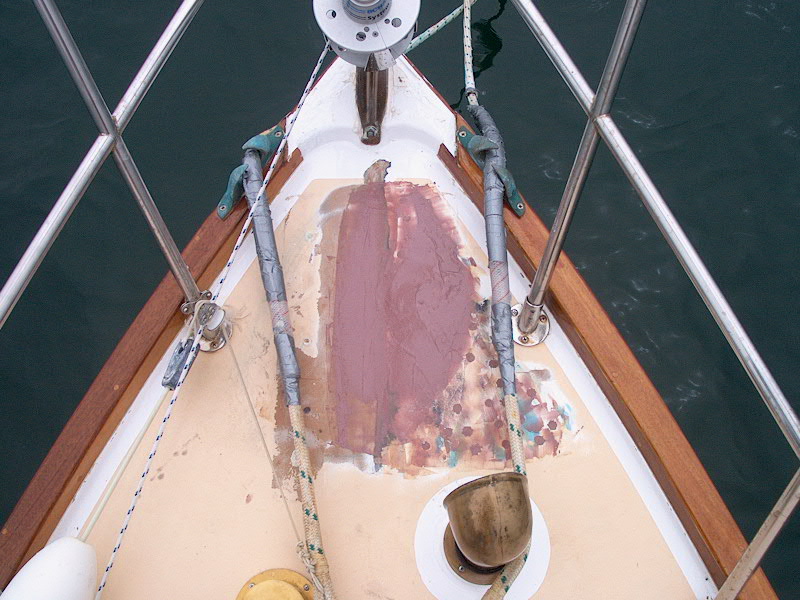
Finally, a good day arrived,
weatherwise, and I prepared to work on the foredeck that was damaged by my
removal of the old anchor platform (as well as some minor delamination).
As early as I could, I was down at the boat in the calm of the morning, and had
it into the dock in short order.
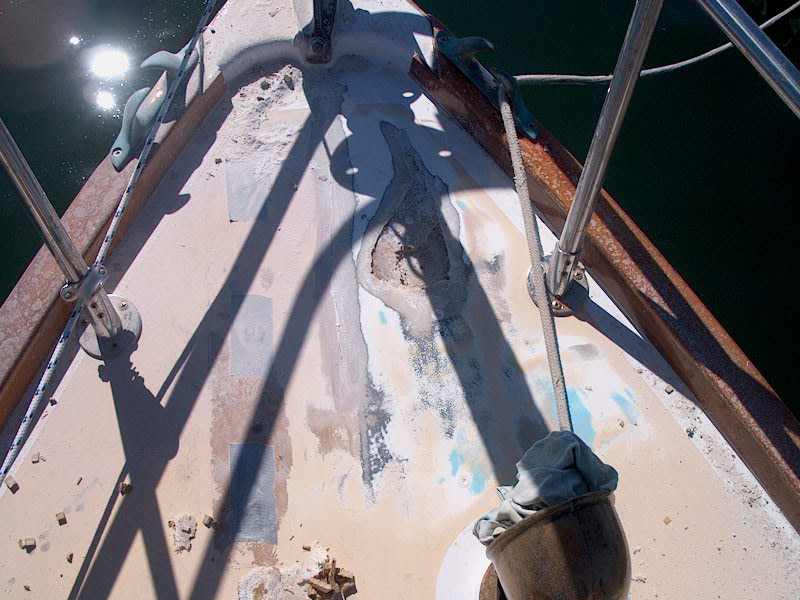 First,
I removed the duct tape over the temporary polysulfide patches I made, and then
scraped off as much of the caulk as I could. Then, armed with my trusty
Porter Cable and some 40 grit discs (ouch!!!), I sanded away the bad material,
some of the deck paint, and beveled the edges as necessary around the broken
areas. The toerail and other parts of the boat were covered with salt
deposits, and of course all the sanding dust stuck perfectly to the salt,
leaving the whole bow of the boat white. Gross! First,
I removed the duct tape over the temporary polysulfide patches I made, and then
scraped off as much of the caulk as I could. Then, armed with my trusty
Porter Cable and some 40 grit discs (ouch!!!), I sanded away the bad material,
some of the deck paint, and beveled the edges as necessary around the broken
areas. The toerail and other parts of the boat were covered with salt
deposits, and of course all the sanding dust stuck perfectly to the salt,
leaving the whole bow of the boat white. Gross!
|
|
 Next,
I chucked up a 1/2" bit and drilled a series of holes through the damaged
area and delaminated area that I found during my removal, in preparation for
filling with epoxy and resecuring the deck. The core came up dry in the
holes, which was good news. Next,
I chucked up a 1/2" bit and drilled a series of holes through the damaged
area and delaminated area that I found during my removal, in preparation for
filling with epoxy and resecuring the deck. The core came up dry in the
holes, which was good news.
|
|
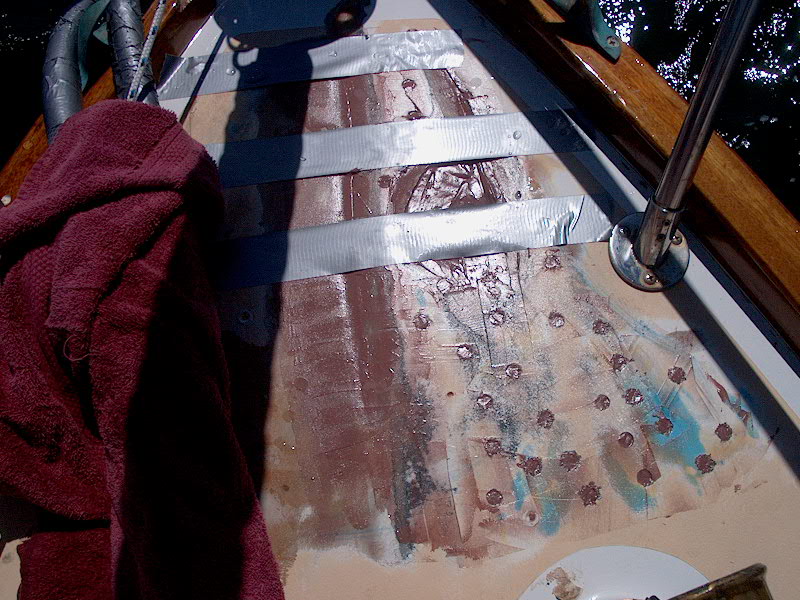 I
spent a bit of time sweeping up the copious amounts of sanding dust and
disposing of it; then, because I can't just hose off the area with all the
exposed core, I sponged off the salty, dusty toerails and other areas that I
wouldn't be able to get with a hose, and then washed the whole deck down from
that point aft. (It needed it anyway.) After cleaning the area to be
patched with acetone, I mixed up a batch of epoxy thickened with silica and my
usual low density filler material and applied it into the holes and other areas
as necessary, sealing the whole area, resecuring damaged areas of the deck
laminate, and filling the holes through the delaminated part of the deck to solidify
it. I also filled a small area where I had removed the core that became
exposed as I ground out the top surfaces--or partly filled it, anyway--it will
require another application, or maybe two. To help hold parts of the top
skin down, I duct taped over the top of the repair. I had to be careful an
hour or two later when I returned to my mooring to make sure I didn't drip water
from the lines all over the new epoxy, so I wrapped the lines in a towel until
things dried out a bit, before moving the second line over to the other side
where it belongs. The epoxy cured quickly in the hot sun, so later in the
day I removed the duct tape. I left it to cure fully before continuing. I
spent a bit of time sweeping up the copious amounts of sanding dust and
disposing of it; then, because I can't just hose off the area with all the
exposed core, I sponged off the salty, dusty toerails and other areas that I
wouldn't be able to get with a hose, and then washed the whole deck down from
that point aft. (It needed it anyway.) After cleaning the area to be
patched with acetone, I mixed up a batch of epoxy thickened with silica and my
usual low density filler material and applied it into the holes and other areas
as necessary, sealing the whole area, resecuring damaged areas of the deck
laminate, and filling the holes through the delaminated part of the deck to solidify
it. I also filled a small area where I had removed the core that became
exposed as I ground out the top surfaces--or partly filled it, anyway--it will
require another application, or maybe two. To help hold parts of the top
skin down, I duct taped over the top of the repair. I had to be careful an
hour or two later when I returned to my mooring to make sure I didn't drip water
from the lines all over the new epoxy, so I wrapped the lines in a towel until
things dried out a bit, before moving the second line over to the other side
where it belongs. The epoxy cured quickly in the hot sun, so later in the
day I removed the duct tape. I left it to cure fully before continuing.
|
|
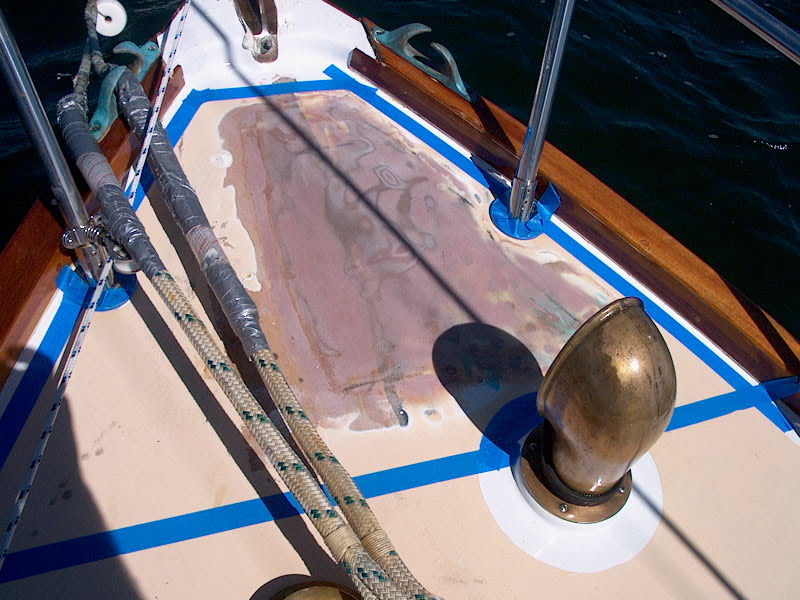
 Several
days later, I arrived to fill the remaining hole with epoxy and level the whole
area out. I intend to install a few layers of cloth over most of the area,
so the smoother the better to begin with. My first step was to scrub the
patches with a Scotchbrite pad and water to remove amine blush, then sand the
initial application with 40 grit (by hand, for convenience). Then, I mixed
up more epoxy goop and troweled it in, smoothing everything out as best as
possible. Several
days later, I arrived to fill the remaining hole with epoxy and level the whole
area out. I intend to install a few layers of cloth over most of the area,
so the smoother the better to begin with. My first step was to scrub the
patches with a Scotchbrite pad and water to remove amine blush, then sand the
initial application with 40 grit (by hand, for convenience). Then, I mixed
up more epoxy goop and troweled it in, smoothing everything out as best as
possible.
After a day off, I returned and
once again scrubbed and sanded the new epoxy. I sanded by hand with 40
grit again, just working to get the high spots sanded and the whole area scuffed
up. Final fairing and such will come a little later on.
With that done, I cut several
layers of fiberglass cloth to cover the patch with. Then, I epoxied them
in place, rolling out the layers and making sure they were properly
saturated. The fiberglass covers the entire area of the patch, including
the small holes drilled in the core, the area that I recored (well, filled the
void with epoxy, really...I didn't bother with a new piece of core), and the
seam on the centerline.
|
|
 The next day, I washed the new
fiberglass, sanded it (by hand) with 40 grit paper, and troweled on a final coat
of fairing putty--enough to fill the weave of the cloth and help taper out the
edges of the fiberglass layers. The whole patch is
contained within the nonskid area, so I didn't have to compromise the white
Awlgripped strips on the edges of the deck. The next day, I washed the new
fiberglass, sanded it (by hand) with 40 grit paper, and troweled on a final coat
of fairing putty--enough to fill the weave of the cloth and help taper out the
edges of the fiberglass layers. The whole patch is
contained within the nonskid area, so I didn't have to compromise the white
Awlgripped strips on the edges of the deck.
|
|
 A
couple days later, I brought the boat back to the dock (for electrical power) on
a beautiful, clear, crisp June day. With my trusty Porter Cable sander and
some 80 grit paper (and subsequently 120 and 220 grit), I sanded the patch
smooth and fair with the surrounding deck areas. I didn't worry about
absolute perfection since most of this area is going to be hidden beneath the
new anchor platform anyway. When I had the whole area sanded to 220 grit
and smooth to my satisfaction, I rinsed off the dust with water (nice being at
the dock) and then, after returning to my mooring, masked off the area I was
going to paint. A
couple days later, I brought the boat back to the dock (for electrical power) on
a beautiful, clear, crisp June day. With my trusty Porter Cable sander and
some 80 grit paper (and subsequently 120 and 220 grit), I sanded the patch
smooth and fair with the surrounding deck areas. I didn't worry about
absolute perfection since most of this area is going to be hidden beneath the
new anchor platform anyway. When I had the whole area sanded to 220 grit
and smooth to my satisfaction, I rinsed off the dust with water (nice being at
the dock) and then, after returning to my mooring, masked off the area I was
going to paint.
|
|
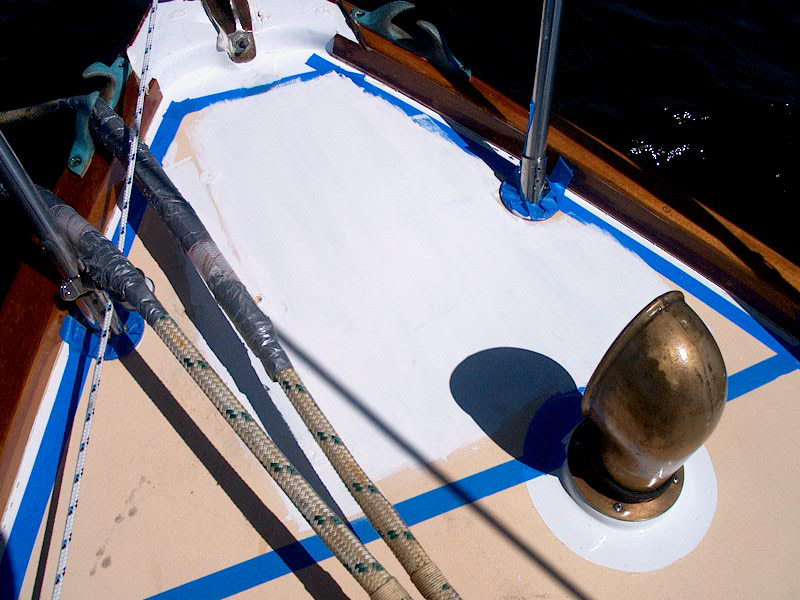
 Then,
I primed the raw epoxy areas with Bright side primer; in the warm sun, I was
able to put two coats on in short order. I didn't prime over the painted
deck areas nearby. This picture, taken in brilliant sunlight, might give
you an idea why painting the decks white would not be a good idea! The
glare is brutal. Then,
I primed the raw epoxy areas with Bright side primer; in the warm sun, I was
able to put two coats on in short order. I didn't prime over the painted
deck areas nearby. This picture, taken in brilliant sunlight, might give
you an idea why painting the decks white would not be a good idea! The
glare is brutal.
|
|
 When
the primer had had a couple hours to dry, I rolled on a coat of Brightside
Bristol Beige (same as the rest of the deck), using leftover mixed paint from
the initial project (including polymeric particles and flattening agent).
After another hour or so, I rolled on a second coat. I used a small roller
with a 3/16" nap mohair roller cover, and a foam brush to cut in a round
the pulpit bases. It was nice to finally see the ugliness covered after
three weeks in transition since the initial damage occurred. When
the primer had had a couple hours to dry, I rolled on a coat of Brightside
Bristol Beige (same as the rest of the deck), using leftover mixed paint from
the initial project (including polymeric particles and flattening agent).
After another hour or so, I rolled on a second coat. I used a small roller
with a 3/16" nap mohair roller cover, and a foam brush to cut in a round
the pulpit bases. It was nice to finally see the ugliness covered after
three weeks in transition since the initial damage occurred.
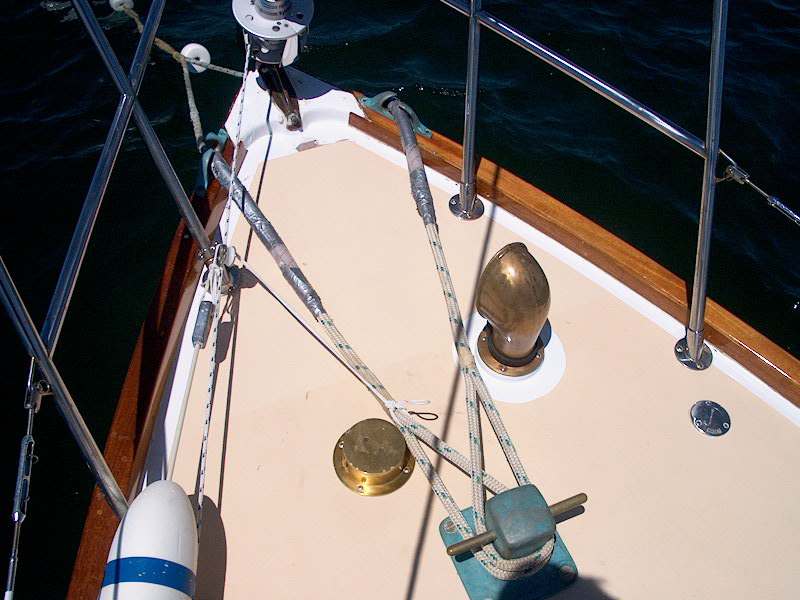
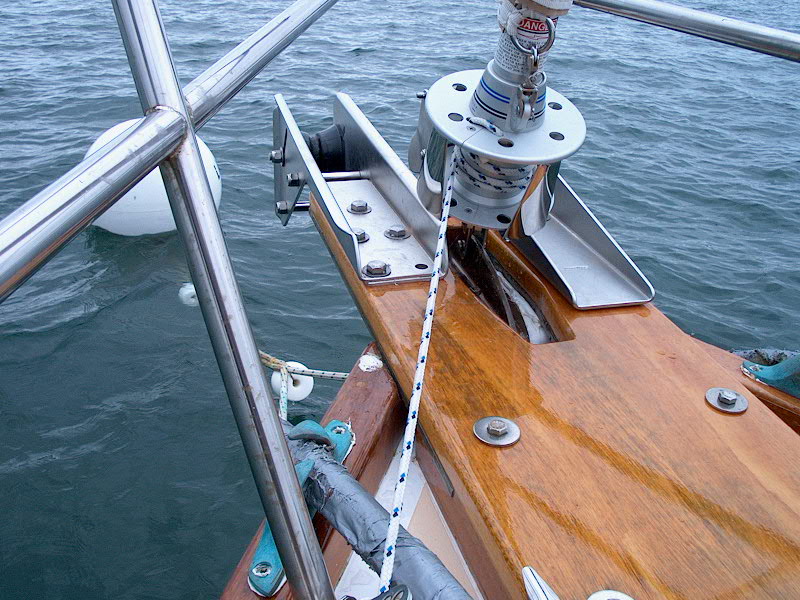
All that remains is installing my
new, heavy duty anchor platform. This thing is heavy!!!
|
|
Installing
the New Platform
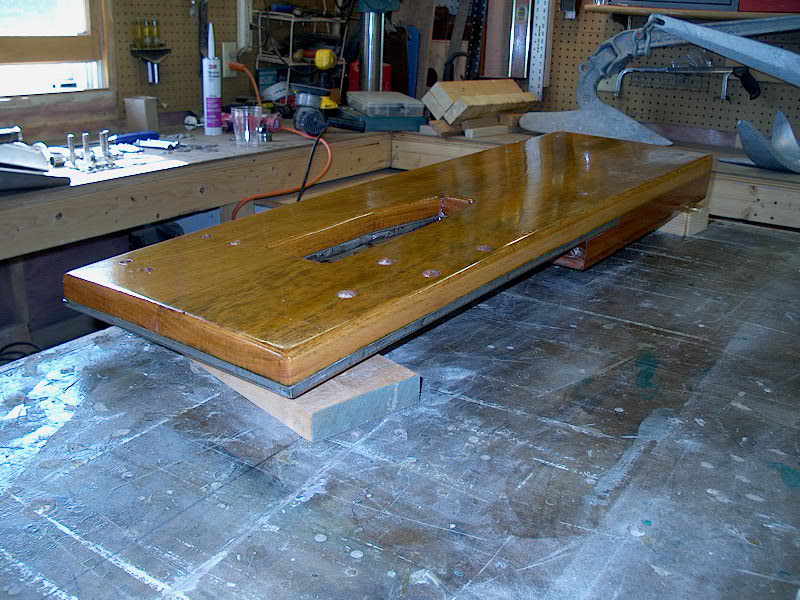 With
the epoxy securing the stainless steel plate to the wooden platform fully cured,
I removed the clamps and sanded the whole thing smooth with 220 grit. I
cleaned up a little excess epoxy spillout with my sander, but I had been careful
when gluing the pieces together to keep excess epoxy off the varnished wooden
platform, so this was a quick process. With
the epoxy securing the stainless steel plate to the wooden platform fully cured,
I removed the clamps and sanded the whole thing smooth with 220 grit. I
cleaned up a little excess epoxy spillout with my sander, but I had been careful
when gluing the pieces together to keep excess epoxy off the varnished wooden
platform, so this was a quick process.
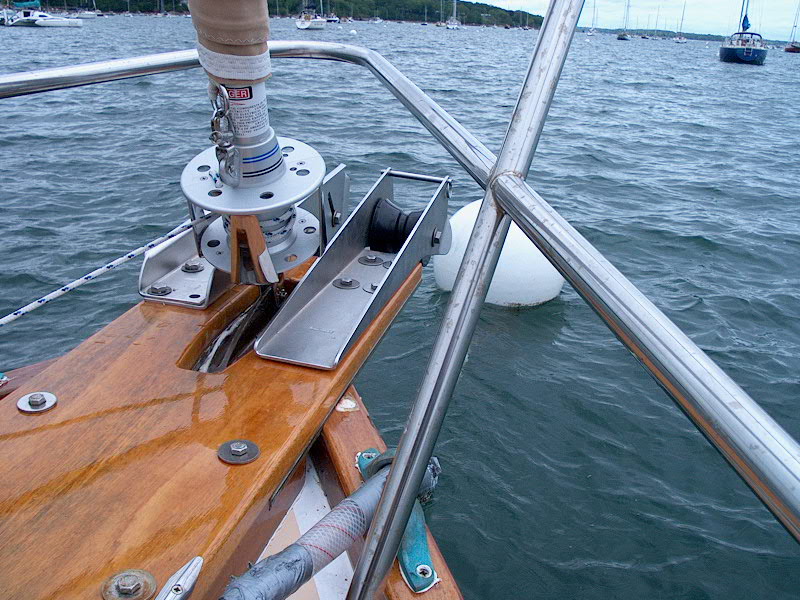
As time allowed, I applied a
number of coats of gloss varnish (Epifanes) to the wooden sections of the
platform. I ended up with 5 or 6 total coats...a little less than I really
want, but I didn't want to hold up completion and installation any longer.
Varnish is an ongoing task regardless, so I'll just do additional coats once the
platform is reinstalled. When the last (for now) coat of varnish dried, I
bolted the two anchor rollers in place, since I figured it would be easier in
the shop than hanging off the bow of the boat later. After hefting the
platform in the workshop, I decided it would be too heavy to install it with the
rollers bolted in place, so I removed them again.
The next
day, I prepared to install the platform on the boat. Installing it is
not as simple as one might expect, since it requires removing the headstay,
which definitely complicates things a bit. I knew that I could not do the
job alone, so I enlisted the help of Nathan Sanborn (Dasein,
#668), who was more than happy to help out. He couldn't make it till the
afternoon, so in the morning I brought the boat to the dock and loaded the very
heavy (30 lb.) platform on board and prepared a few other things for the installation
later in the day. I removed the jib from the headstay and unrove the
furling line so that we could more easily remove the stay when we needed to, and
got all the tools and such ready.
|
|
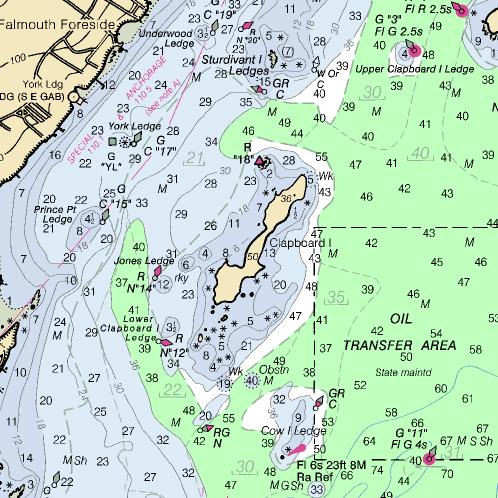 As
the day wore on, a strong southerly breeze began to blow, kicking up quite a
chop in the anchorage--not the best situation for removing stays and working on
the bow. Yuck. I was worried that we would have to postpone the
installation...which I really didn't want to do. In fact, I basically
called it off...but then reconsidered a little later in the afternoon when I
came up with the idea of motoring across the way a mile or so to the lee of
Clapboard Island, where several moorings are installed (in the cove on the left
side of the island on the chart, sort of between the "6" and
"11"; my permanent mooring is near York Ledge, about where the depth
says "28" a little NE of the ledge). With the wind coming from
the direction it was, I thought it might be smooth enough over there to do the
job. Sure enough, the waves were nearly nonexistent, though the wind still
occasionally howled through as the gusts came from more west than south.
But it was OK. Where are the idyllic days of summer, anyway? As
the day wore on, a strong southerly breeze began to blow, kicking up quite a
chop in the anchorage--not the best situation for removing stays and working on
the bow. Yuck. I was worried that we would have to postpone the
installation...which I really didn't want to do. In fact, I basically
called it off...but then reconsidered a little later in the afternoon when I
came up with the idea of motoring across the way a mile or so to the lee of
Clapboard Island, where several moorings are installed (in the cove on the left
side of the island on the chart, sort of between the "6" and
"11"; my permanent mooring is near York Ledge, about where the depth
says "28" a little NE of the ledge). With the wind coming from
the direction it was, I thought it might be smooth enough over there to do the
job. Sure enough, the waves were nearly nonexistent, though the wind still
occasionally howled through as the gusts came from more west than south.
But it was OK. Where are the idyllic days of summer, anyway?
Loosening the backstay as far as
it could go (leaving full threads inside the turnbuckle), we ran the jib halyard
forward to the mooring bit and tensioned it up, pulling the mast forward
somewhat. Then, we unpinned the headstay from the stem and secured it out
of the way temporarily. During the installation, the jib halyard made some
scary sounding creaks and groans as it stretched, so for insurance I ran the
spinnaker halyard up there as well.
|
|
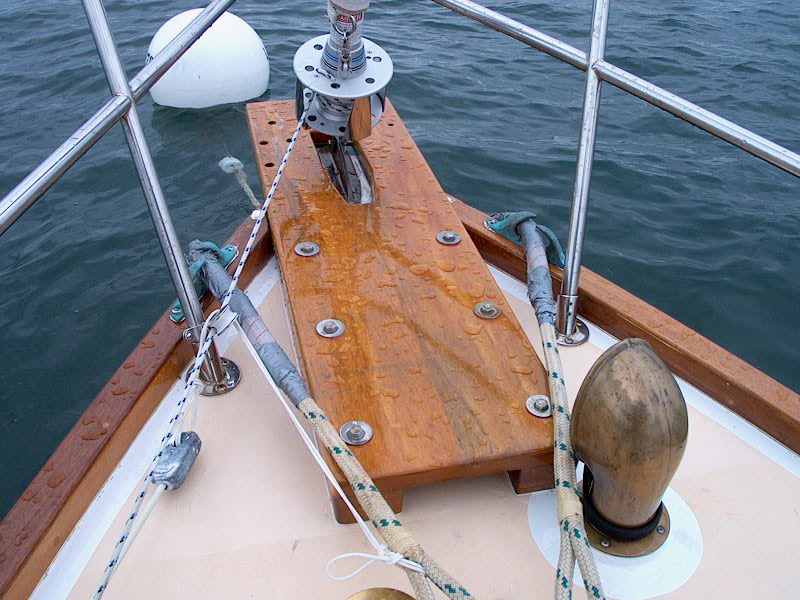
With the headstay out of the way,
I installed the platform to see how it fit and to mark for and drill the
boltholes, as well as mark off the outline of the "feet" so I could
tape around to protect the deck. I had to cut a small bit of the caprail
out so the platform would sit smoothly against the stem, but otherwise the fit
was perfect. (It should have been, since I used the old platform remains
for a template.) Holding it in place, I ran my drill through the predrilled
holes in the platform to mark the deck (after aligning the port side holes with
the existing, but filled, holes in the deck from the old platform) and drew
around the outside of the platform feet with a pencil (obtained from my
handy-dandy pencil rack, of
course). Then, removing the platform again (we had a safety line tied to
it, just in case), I drilled the holes all the way through the deck and taped
off the outline on the deck as well as the platform itself to make caulk cleanup
a little easier.
Using a whole 10 oz. tube of 3M
101 polysulfide caulk, I gooped up the deck beneath the feet, with extra around the
bolt holes, and the flat stem area forward. Then we lowered the platform
into place and pushed a couple of the 3/8" stainless steel bolts through
the holes. At this point, I was getting nervous with the headstay
attached--each wind gust was making the jib halyard creak and groan--so I went
below (with Nathan on deck holding the boltheads) and, squeezing myself into the
chain locker, tightened up the after two bolts on the platform to hold it in
place. Then we reinstalled the headstay, which went fairly smoothly
although we had to crank on the halyard again to pull the mast forward.
|
|
 With the headstay safely back in
place, we finished up by securing the remaining four bolts; I only lost one nut
into the chain locker, which was pretty good since I was juggling fender
washers, lock washers and nuts for each of the bolts. (Yes, of course I
had extras...) With all six bolts secured, I cleaned up the excellent
caulk squeezeout with a putty knife and paint thinner. It cleaned up quite
easily--much nicer to clean up 101 than 5200! Suddenly, it looked like my
boat again. The bow just didn't look the same without the bulk of the
varnished platform up there for the couple weeks since the damage occurred.
I was surprised and pleased at how smoothly everything went. Including
motoring time over to Clapboard, we had pretty much wrapped up the worst of the
project within 1-1/2 - 2 hours. With the headstay safely back in
place, we finished up by securing the remaining four bolts; I only lost one nut
into the chain locker, which was pretty good since I was juggling fender
washers, lock washers and nuts for each of the bolts. (Yes, of course I
had extras...) With all six bolts secured, I cleaned up the excellent
caulk squeezeout with a putty knife and paint thinner. It cleaned up quite
easily--much nicer to clean up 101 than 5200! Suddenly, it looked like my
boat again. The bow just didn't look the same without the bulk of the
varnished platform up there for the couple weeks since the damage occurred.
I was surprised and pleased at how smoothly everything went. Including
motoring time over to Clapboard, we had pretty much wrapped up the worst of the
project within 1-1/2 - 2 hours.
We reinstalled the jib on the
furler, cleaned up the tools, and returned across the way to my mooring, where
we enjoyed a well-deserved cold beer. I am thrilled to have this project behind me; now perhaps I can
concentrate on hiding that ugly scar on my hull.
|
|
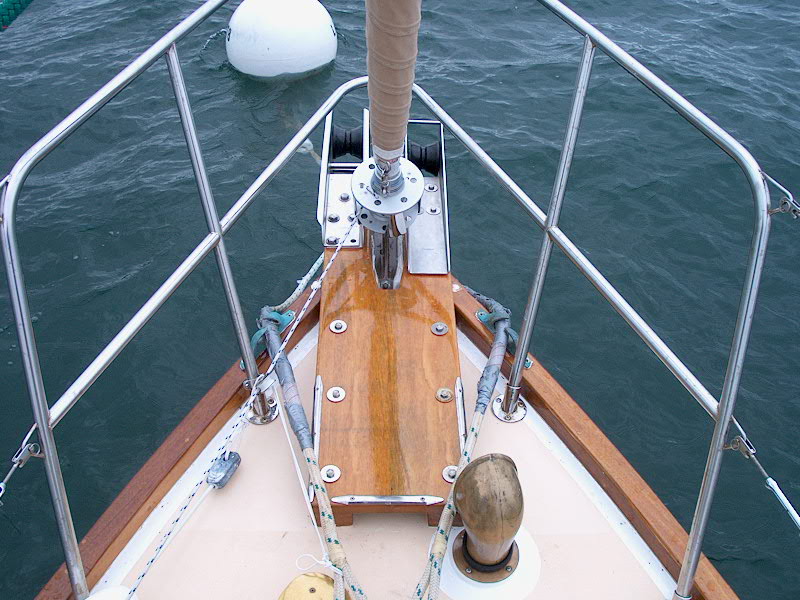
  The
next day, I returned and bolted the two anchor rollers in place. This was
an easy job since the holes were all pre-drilled and ready to go. The
stainless plate on the bottom of the anchor platform acts as a big backing
plate, but I used fender washers and lock washers too. I didn't bring the
anchors back out yet because I didn't feel like bringing the boat into the dock,
but they'll be back on board soon. I reattached the stainless
half-oval molding salvaged from the old platform to protect the platform and the
mooring lines from chafe, and the project was more or less complete. The
next day, I returned and bolted the two anchor rollers in place. This was
an easy job since the holes were all pre-drilled and ready to go. The
stainless plate on the bottom of the anchor platform acts as a big backing
plate, but I used fender washers and lock washers too. I didn't bring the
anchors back out yet because I didn't feel like bringing the boat into the dock,
but they'll be back on board soon. I reattached the stainless
half-oval molding salvaged from the old platform to protect the platform and the
mooring lines from chafe, and the project was more or less complete.
|
|
How will I prevent whatever
happened from happening again? Click here
to see the new anchor storage arrangement.
Click
here to continue with the final repairs to the storm-damaged hull in the bow.
|
|