|
Storm Damage
This page was last updated on 18 May 2002
Rebuilding
the Anchor Platform Repairs
to the Foredeck
|
|
On the night of May 13/14, 2002,
we had a pretty classic nor'easter here on the coast. The system set up in
a winter-type pattern, which gave us heavy rain mixed with sleet at the house,
and building east-northeast winds overnight. The height of the storm
seemed to be between midnight and 4 AM on the 14th.
I awoke at about 0130 when the
power went out, and for the next couple of hours lay there listening to the wind
howl and the rain fall. I estimated the wind gusts at 40 or possibly
higher, based on past experience and the sound of the wind. Obviously, it
was too dark to see anything, and there was nothing I could do at this point to
check the boat. Of course, this meant that I had to lie there while
horrible scenarios played out in my mind. I pictured the mooring lines
chafing through, even though I had chafing gear installed. I pictured some
weak link in the mooring chain, or some other circumstance that threatened to
toss Glissando on the rocky shore like an abandoned child's play
toy. Finally, after forcing myself to relax, I managed to fall into a
fitful sleep for an hour or two.
At first light, I was up and
drove down to check the boat from shore. The wind had slackened somewhat
since the worst part of the storm. The tension in my truck was palpable as
I drove down the yacht club driveway...and there was the boat, right where she
belonged. I nearly collapsed in relief. With my binoculars in hand
(I always keep a set in the truck) I walked down the pier for a better
look. As I looked at the boat, I could see something hanging off the bow
that didn't look right. Try as I might, my lousy binoculars weren't strong
or precise enough for me to really pick out what it was. Finally, I
hypothesized that it must be the chafing gear (reinforced vinyl hose and duct
tape) that had slid forward under the stresses of the waves during the
night. That seemed reasonable enough. In any case, the boat appeared
to be in good shape, so I returned home for the time being to have coffee and
await the beginning of launch service at 0800. (It was now about 0600.)
By 0900, I was back, and rode the
launch out to the boat. By now, the wind had lightened further and shifted
so it was more offshore, so even the waves that had been present at 6 were
pretty flat. As we approached the port side of the boat, I could suddenly
see that the object I had seen hanging from the bow was my 35# CQR anchor.
There was no sign of the anchor roller in which it had been stored. At
first, this made no sense--how in the world did the anchor come out of the
roller, into which it had been securely pinned?
|
|
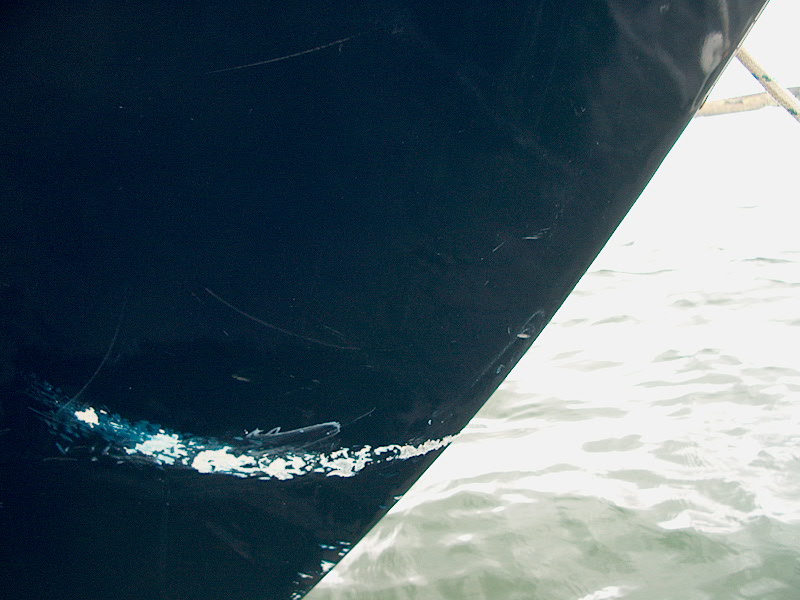 As
the launch came around the bow from the port to the starboard side, I saw a
white "smile" on the hull, and immediately knew that the anchor had
been swinging in an arc and had gouged up the paint on the hull. This was
depressing, obviously, but I could see that the damage was relatively slight and
completely cosmetic. In most places, the swinging anchor had only gone
just through the Awlgrip into the primer and gelcoat beneath, with a couple
areas showing bare laminate. Ugly--yes. But not the end of the
world, all things considered. That scar is about 1-1/2' or 2' long. As
the launch came around the bow from the port to the starboard side, I saw a
white "smile" on the hull, and immediately knew that the anchor had
been swinging in an arc and had gouged up the paint on the hull. This was
depressing, obviously, but I could see that the damage was relatively slight and
completely cosmetic. In most places, the swinging anchor had only gone
just through the Awlgrip into the primer and gelcoat beneath, with a couple
areas showing bare laminate. Ugly--yes. But not the end of the
world, all things considered. That scar is about 1-1/2' or 2' long.
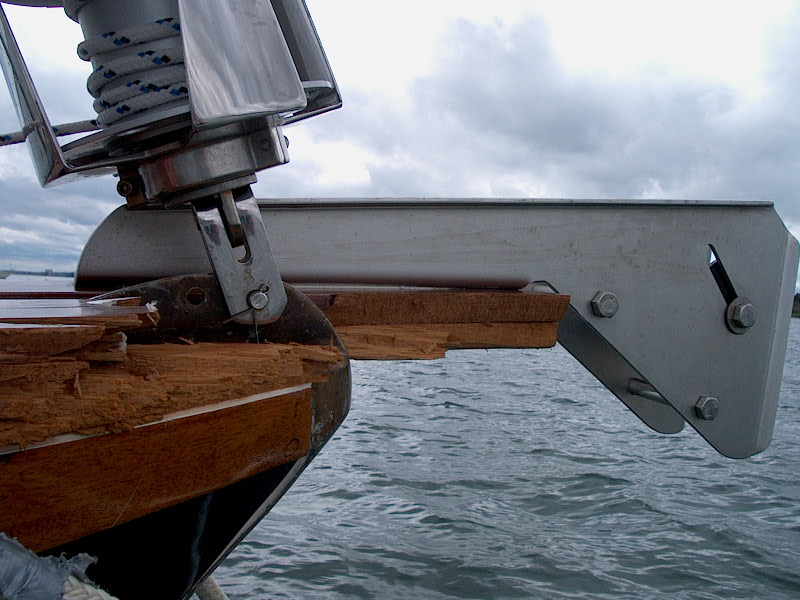
Also, I now could see that half
of the projecting part of the wooden anchor platform was missing
completely. The launch let me off on the boat, and I went forward to
inspect the thing further. The CQR was hanging by its end shackle on the
point of the bow chock, surprisingly securely--it took a bit of fussing to
remove it. I suppose I might have liked it better if the whole anchor had
gone overboard instead of catching--this probably would have made a mess of the
mooring lines and such (tangles), but might have prevented damage to the
hull. Well, in any case, that didn't happen, and I now have an ugly mark
on the hull. There's a slight scratch on the port side in a similar
position, but it is much more minor.
|
|
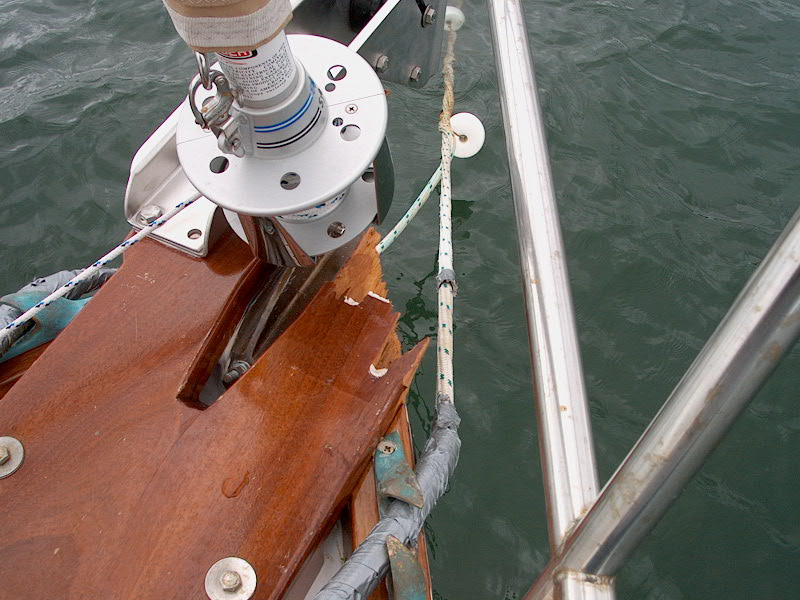 With
the swinging anchor now out of the way, I turned my attention once more to the
splintered platform. What I deduced had happened was that during the
height of the storm, when there must have been pretty good-sized waves in the
anchorage, the plunging bow, momentarily slacking the mooring lines, must have
allowed the mooring line to catch on the protruding tip of the anchor.
Probably immediately--at the next moment when the bow rose up on another
wave--the mooring line must have become instantly taut, thereby snapping the
platform as it pulled sharply down. The break is fairly clean and follows
the contour of the toerail, supporting this theory. I don't think the line
remained hung up on the anchor for more than a brief instant, since there were
no signs of any chafe on the pennant in that area. With
the swinging anchor now out of the way, I turned my attention once more to the
splintered platform. What I deduced had happened was that during the
height of the storm, when there must have been pretty good-sized waves in the
anchorage, the plunging bow, momentarily slacking the mooring lines, must have
allowed the mooring line to catch on the protruding tip of the anchor.
Probably immediately--at the next moment when the bow rose up on another
wave--the mooring line must have become instantly taut, thereby snapping the
platform as it pulled sharply down. The break is fairly clean and follows
the contour of the toerail, supporting this theory. I don't think the line
remained hung up on the anchor for more than a brief instant, since there were
no signs of any chafe on the pennant in that area.
The platform broke cleanly in a
longitudinal manner following the general line of the port side of the stem
casting cutout. This left the Bruce anchor and its roller intact and
unharmed. But the CQR roller was missing, completely gone without a trace.
|
 I unshackled the CQR from its chain and stowed
the anchor in the starboard cockpit locker for now. Then, I removed the
Bruce anchor as well to prevent any chance of losing it, and stored it
temporarily in the cabin. I was unhappy about the damage, of course, but
felt surprisingly copasetic about it--after all, considering some of the
horrible things I thought of during the night while listening to the wind, the
damage that occurred was fairly slight, and hardly the end of the world.
Obviously I was disappointed in the failure of my platform, the loss of an
expensive anchor roller, and the ugly paint damage. All of these things
can be fixed, and will be. I suppose I would rather have had a failure in
the platform now, under these circumstances, than later on when out cruising
somewhere lying to the anchor. I'll never know if the platform broke
because of an inherent weakness and/or design fault (which could have meant that
under normal use it might have broken, which would have been a real pain), or if
it was just an unfortunate incident that occurred under abnormal
circumstances. In any case, I will take this experience to heart and
account for its repeat possibility when designing and building a new
platform. For now, I had done all I could, so I left the boat. I unshackled the CQR from its chain and stowed
the anchor in the starboard cockpit locker for now. Then, I removed the
Bruce anchor as well to prevent any chance of losing it, and stored it
temporarily in the cabin. I was unhappy about the damage, of course, but
felt surprisingly copasetic about it--after all, considering some of the
horrible things I thought of during the night while listening to the wind, the
damage that occurred was fairly slight, and hardly the end of the world.
Obviously I was disappointed in the failure of my platform, the loss of an
expensive anchor roller, and the ugly paint damage. All of these things
can be fixed, and will be. I suppose I would rather have had a failure in
the platform now, under these circumstances, than later on when out cruising
somewhere lying to the anchor. I'll never know if the platform broke
because of an inherent weakness and/or design fault (which could have meant that
under normal use it might have broken, which would have been a real pain), or if
it was just an unfortunate incident that occurred under abnormal
circumstances. In any case, I will take this experience to heart and
account for its repeat possibility when designing and building a new
platform. For now, I had done all I could, so I left the boat. |
|
Repairs
and Rebuilding Later in the day, despite trying to talk myself
out of going, I decided to return to the boat to start removing the broken
anchor platform. I can't stand unresolved issues or projects, and knew I
would feel better if I could get the darn thing off the bow and start working on
a replacement.
The first thing to do was remove the nuts and
washers from beneath the platform--located in the chain locker. I removed
all the books and the bookshelf from in front of the access door, and crawled in
as much as possible to access the nuts. I had visions of being stuck
there, halfway in the silly door, so I took my cell phone with me! (Just
in case...) The nuts came off easily, thanks to the 20 gallons of 5200
that were holding the bolts in place. I will certainly live to regret
choosing 5200 for my sealant/adhesive on the anchor platform, though. (I used it
because I wanted the strength, and never foresaw having to take the platform
off...who knew!) When I had the nuts off, I banged the bolts up with a
hammer, then pried them up and out from above.
Next, I unbolted the Bruce roller, after tying a
line to it to prevent it from being lost in case I lost my grip. Now came
the fun part: releasing the 5200's tenacious bond with the deck, and the
flat part of the stem. With a few different putty knives, I began cutting
the bond beneath the wooden platform. The worst part is that there is no
real access on much of the length, because of the curvature of the bow.
This hampered my attempts to get the knives slid in everywhere. After an
hour or so, I called it quits for the day. I had made progress--the after
sections were free, but I couldn't get to the forward sections well enough yet.
The next day, I returned with
some new tools--a couple new, stiff putty knives--and a tiny container of
Antibond 2015--the magical stuff that's supposed to release the bond of
5200. Don't be fooled by the picture in the catalog, which makes it look
like you're getting a standard aerosol-sized can; no, the can isn't much
bigger than my thumb. Very small.
A very stiff northwest wind was blowing off the
shore, making work not particularly pleasant during the highest gusts. It
was cool and gray with sunny breaks. Where is summer, anyway? I
suppose that if I have to be ripping my boat to pieces it might as well be lousy
weather.
I slaved over the platform for an hour or more,
and the antibond did seem to work. I got the port side of the platform
free--well, the after portion at least. The part that is attached to the
stem on the flat area either side of the headstay is still glued. I'll
deal with that later; I don't care if I break the wood when I pry it up.
However, the starboard side was being stubborn. Part of my problem, I
discovered after a time, was that the upper deck skin was coming free along with
the platform. This highlighted another problem: a small portion of
the foredeck contained rotten core and delamination, evidently a problem I
missed before. (I didn't recore the foredeck on the starboard side because
it seemed OK. Obviously I missed this spot.) In any case, the
flexing of the upper laminate was working against me, and the 5200 remained
securely stuck to the fiberglass along the inner edge of the platform foot--the
spot that I can't get to. Upon seeing this, I stopped work to
regroup. I need to debonded that 5200 on the inside and remove the
platform without trashing the whole deck. Obviously, I'll have to do some
minor core work in this area--probably just drill some holes and inject
epoxy. It's a small area, and is confined to the nonskid area, so it'll be
easy to repair and repaint.
Next plan of attack: use a handsaw to cut
the platform down the middle, the long way. It's trash anyway, and I think
I need to get in there. Sigh.
|
|
 The
next day, I was back with renewed determination to finish the removal.
Enough, already! I brought a selection of hand saws and even a flat pry
bar, just in case. The
next day, I was back with renewed determination to finish the removal.
Enough, already! I brought a selection of hand saws and even a flat pry
bar, just in case.
Starting at the opening around
the stem chainplate. I used a small hand saw to cut the platform down the
middle. The upper surface of the platform is about 1-1/2" thick, and
is supported by two "feet" that are about the same thickness, so in
between the longitudinal "feet" is an open space. Cutting was
plenty of work through the mahogany and epoxy, with a dull saw, but after 10 or
15 minutes the cut was complete. I pried off the port side of the
platform, which I had already loosened in an earlier day, and therefore exposed
the very, very stuck inner side of the starboard "foot". The
5200 came easily off the Awlgripped stem area, alleviating a concern of mine.
|
|
 Next,
I sprayed more of the antibond stuff on the 5200 on the inside part of the
remaining platform. After waiting a few minutes, I started carefully
prying up the remains with a couple stiff putty knifes. The antibnd loosed
the 5200 enough to allow the putty knives to be hammered in between the deck and
the platform, but it was still a surprisingly hard task. Only the forward,
inner half of this "foot" was still stuck, but, boy oh boy, was it
ever stuck! It took a
few putty knives to finally get the bond separated, and, even so, part of the
deck, which I had damaged in earlier attempts, came with the piece. The
aftermath left a very ugly foredeck, with a substantial piece of the deck
damaged on the starboard side and a crack down the middle. Next,
I sprayed more of the antibond stuff on the 5200 on the inside part of the
remaining platform. After waiting a few minutes, I started carefully
prying up the remains with a couple stiff putty knifes. The antibnd loosed
the 5200 enough to allow the putty knives to be hammered in between the deck and
the platform, but it was still a surprisingly hard task. Only the forward,
inner half of this "foot" was still stuck, but, boy oh boy, was it
ever stuck! It took a
few putty knives to finally get the bond separated, and, even so, part of the
deck, which I had damaged in earlier attempts, came with the piece. The
aftermath left a very ugly foredeck, with a substantial piece of the deck
damaged on the starboard side and a crack down the middle.
|
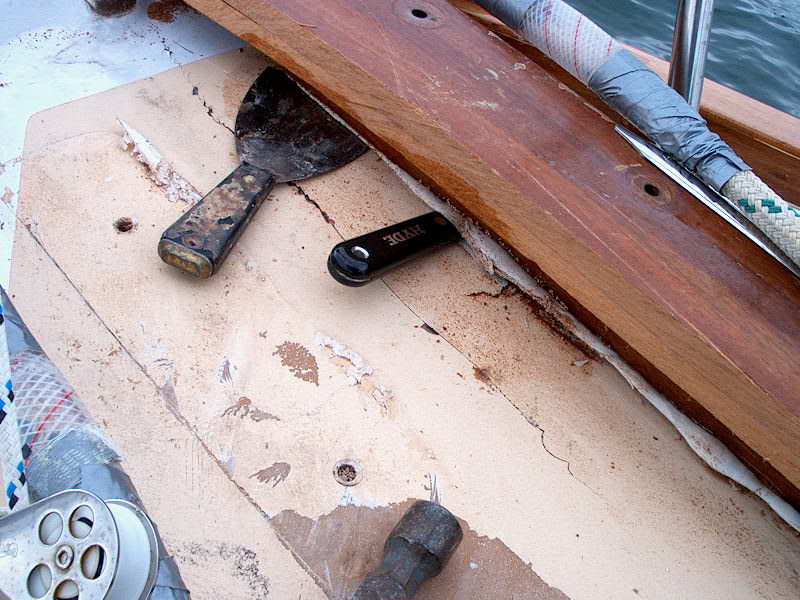
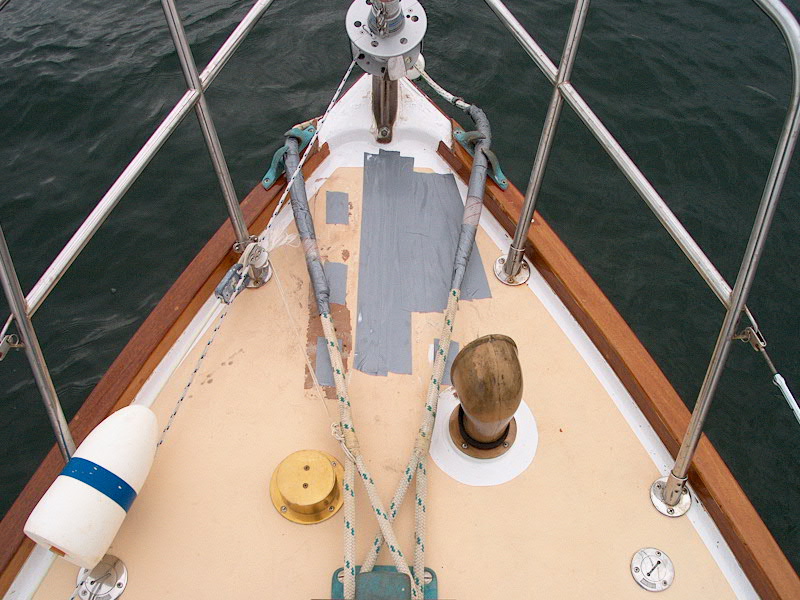
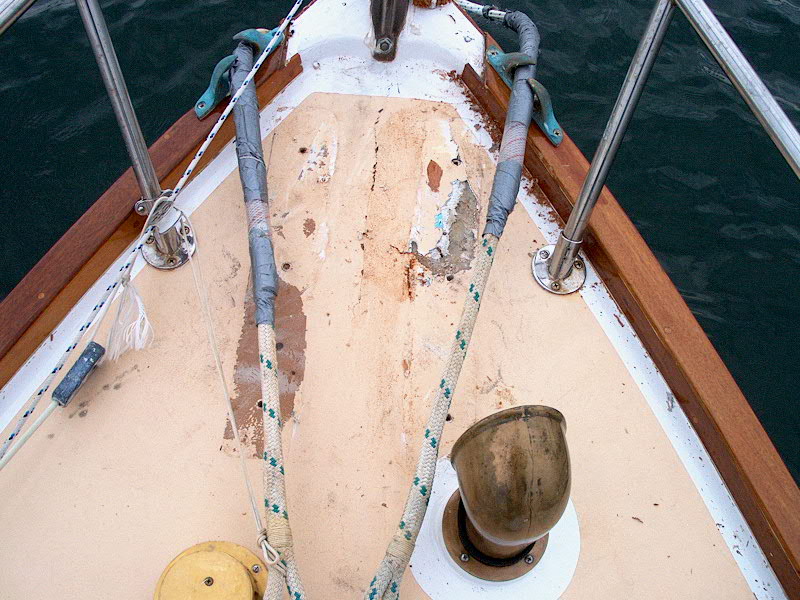 I spent some time cleaning up the
area, removing any remaining small bits of wood and 5200, and sweeping away
sawdust and the like. Then, as a temporary means to prevent any water from
entering the deck or interior, I filled the old boltholes and the cracks and
deck damage with some polysulfide caulk, and covered these areas with strips of
duct tape. Rest assured, this is a very short-term patch, and is ugly as
hell, but this, too, shall pass. I spent some time cleaning up the
area, removing any remaining small bits of wood and 5200, and sweeping away
sawdust and the like. Then, as a temporary means to prevent any water from
entering the deck or interior, I filled the old boltholes and the cracks and
deck damage with some polysulfide caulk, and covered these areas with strips of
duct tape. Rest assured, this is a very short-term patch, and is ugly as
hell, but this, too, shall pass. |
|
Next: the actual repairs to
the deck and platform begin. Click here to
continue.
|
|