|
Deck: Recore
(Page 2)
This page was last
updated on 29 January 2002
Tear Off | New
Core | Reinstalling
the Deck Panels | Fairing
| Ice Hatch | Deck
Recore Page 1
|
|
The port deck required several more layers of fiberglass at the forward end; the new core, installed by the previous owner, had been covered with only a thin layer of glass. I installed two more layers of mat/woven roving in epoxy resin over the port side of the foredeck and back to the chainplates; more will be required (probably one layer of mat/woven and one or two layers of standard fiberglass cloth) before this part of the deck is of the proper thickness, as compared to the intact starboard side, but too much heat would have built up in the laminate if I had layered any more glass in one application.
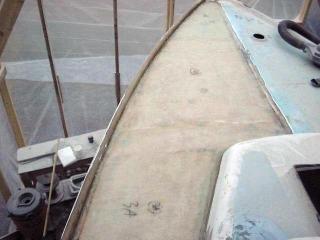 I first cut the fiberglass to the proper shape, using four pieces to span the distance involved. For the second layer, I offset the cloth by 8" or so, so the layers would overlap. Next, I wetted out the cloth, one section at a time, with epoxy, making sure the woven was well saturated before applying the mat over the top, then saturating the mat. I rolled out the laminate with plastic resin rollers to smooth it and remove any trapped air beneath. I then moved on to the next section, until I had completed the first layer. Then, going back
to the bow, I started the second, overlapping layer. It was a lot of work, and I worked quickly to prevent the new laminate from kicking before I had a chance to get the second layer on. Plus, I had to keep getting down from the staging to mix new batches of epoxy, as I didn't want to mix too much at once and risk having it go off in the pot. I first cut the fiberglass to the proper shape, using four pieces to span the distance involved. For the second layer, I offset the cloth by 8" or so, so the layers would overlap. Next, I wetted out the cloth, one section at a time, with epoxy, making sure the woven was well saturated before applying the mat over the top, then saturating the mat. I rolled out the laminate with plastic resin rollers to smooth it and remove any trapped air beneath. I then moved on to the next section, until I had completed the first layer. Then, going back
to the bow, I started the second, overlapping layer. It was a lot of work, and I worked quickly to prevent the new laminate from kicking before I had a chance to get the second layer on. Plus, I had to keep getting down from the staging to mix new batches of epoxy, as I didn't want to mix too much at once and risk having it go off in the pot.
|
|


|
|
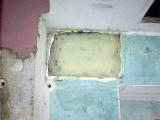
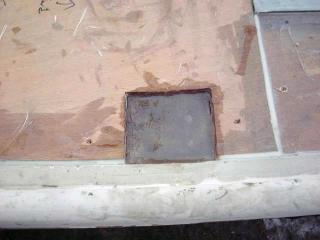 The openings in the core around the stanchion bases and the headsail tracks were filled with eight layers of fiberglass cloth, laminating four at a time to prevent excess, laminate-weakening heat buildup as the layers kicked. When the final layers cured, the remaining void was filled flush to the top of the new core with epoxy resin thickened with # 404 high density filler, as was used around the chainplates. The resulting plug of solid glass and epoxy should be extremely strong and will prevent any water from entering the core through the hardware boltholes. The openings in the core around the stanchion bases and the headsail tracks were filled with eight layers of fiberglass cloth, laminating four at a time to prevent excess, laminate-weakening heat buildup as the layers kicked. When the final layers cured, the remaining void was filled flush to the top of the new core with epoxy resin thickened with # 404 high density filler, as was used around the chainplates. The resulting plug of solid glass and epoxy should be extremely strong and will prevent any water from entering the core through the hardware boltholes.
As it turned out, I did not
install stanchions in the locations I had planned on. At the time that I
replaced the core, I thought I was reusing the existing stanchions, and that I
would simply add a third one somewhere aft of the two existing. Instead, I
decided to space my new stanchions evenly between the bow and stern pulpits, so
all my additional work in creating these solid fiberglass patches beneath the
proposed stanchion bases was for naught. Such are the vagaries of any
restoration project! Plans and intentions change.
|
|
Feathering
the Deck Seams
& Fairing the Deck
(Begin)
5-6-7-8-9 December 1999
Well, the weather won't let me quit! Another week of above-normal temperatures is forecast, with temperatures in the 50's. I had pretty much figured I was done with fiberglass work by shortly after Thanksgiving, when some cold are swept in.
 WRONG!
Taking advantage of the warm (relatively speaking, of course) weather, I spent a couple hours grinding and feathering the deck seams where the panels had been reinstalled. There was minor unevenness in a few areas, and lots of excess epoxy resin that had squeezed through. Plus, I wanted to create a slight depression over the seam so that the fiberglass tape required for strength and tie-in will end up reasonably flush. I also sanded the nonskid smooth in this
area in preparation for fairing and, eventually, painting. The job was fairly straightforward, but very nasty; it
created mountains of talc-consistency dust. The end result is a surface that is relatively smooth, other than finish sanding, and ready to accept fiberglass tape and epoxy filler over the seams. WRONG!
Taking advantage of the warm (relatively speaking, of course) weather, I spent a couple hours grinding and feathering the deck seams where the panels had been reinstalled. There was minor unevenness in a few areas, and lots of excess epoxy resin that had squeezed through. Plus, I wanted to create a slight depression over the seam so that the fiberglass tape required for strength and tie-in will end up reasonably flush. I also sanded the nonskid smooth in this
area in preparation for fairing and, eventually, painting. The job was fairly straightforward, but very nasty; it
created mountains of talc-consistency dust. The end result is a surface that is relatively smooth, other than finish sanding, and ready to accept fiberglass tape and epoxy filler over the seams.
I decided the chainplates should be removed; this should have been done a long time ago, but I didn't want to lose the holes, and I wanted solid material around them anyway. They came out without too much trouble, and it's good I did remove them, as they need replacing. There are signs of significant age damage to the bronze, so I'll add them to the list of items needing replacement. More $$$$$$$--it never ends!
|
 I ground the areas around where the chainplates had been, especially on the port side, where a heavy buildup of fiberglass had
occurred. Both sides are now smooth and level and ready to accept fairing compound.
Next, I cut narrow strips of fiberglass cloth, enough for two overlapping layers on the deck seams. This will provide the requisite strength and tie-in for the seams. These strips were then laminated over the seams with epoxy resin. When the resin cures, the seams will be ground smooth in preparation for epoxy fairing compound. I ground the areas around where the chainplates had been, especially on the port side, where a heavy buildup of fiberglass had
occurred. Both sides are now smooth and level and ready to accept fairing compound.
Next, I cut narrow strips of fiberglass cloth, enough for two overlapping layers on the deck seams. This will provide the requisite strength and tie-in for the seams. These strips were then laminated over the seams with epoxy resin. When the resin cures, the seams will be ground smooth in preparation for epoxy fairing compound.
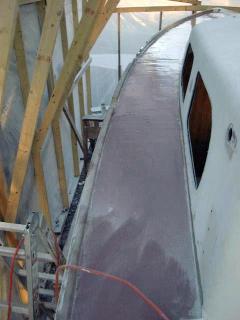
The photo to the right shows the deck after taping the seams. Next: grind the seams and fair with epoxy compound. |
|


|
|
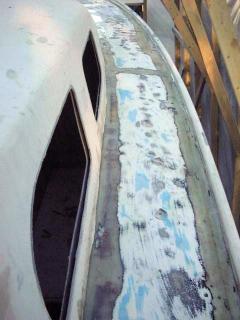
 Now begins the multi-step process of fairing the decks. The procedures will be slightly different on the port and starboard sides, as the deck was recored using different methods on each side. The port side was entirely relaminated with new fiberglass over the core, a job started by the previous owner and completed by me a couple weeks ago (described above). Therefore, the entire port deck requires significant fairing, to fill the weave of the fiberglass cloth, and to make up for any dins and depressions, and other unevenness, that there may be. Now begins the multi-step process of fairing the decks. The procedures will be slightly different on the port and starboard sides, as the deck was recored using different methods on each side. The port side was entirely relaminated with new fiberglass over the core, a job started by the previous owner and completed by me a couple weeks ago (described above). Therefore, the entire port deck requires significant fairing, to fill the weave of the fiberglass cloth, and to make up for any dins and depressions, and other unevenness, that there may be.
After grinding the entire deck surface relatively smooth, I mixed up a batch of epoxy fairing compound, using West epoxy and # 407 low-density filler. This filler is designed for use as a fairing compound, and is supposed to be easily sanded. We'll see about that! I would have preferred to use # 410 Microlight, but it is not recommended for use where high heat might be expected, and one could expect high temperatures on a boat deck. So, I used the #407, which is not quite as lightweight, but should be easily-enough sanded.
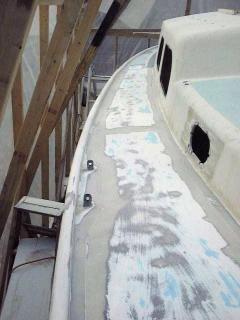
I mixed in enough filler to reach a peanut-butter consistency, and
troweled it on to the deck--it took several batches, as I did not mix large batches in the fear that it would kick too quickly in the pot. I don't want to waste this stuff at $80/gallon. The photo shows the deck after the first application. Next, I'll have to clean the blush from the surface, lightly sand and apply another layer.
|
|


|
|
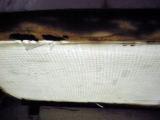
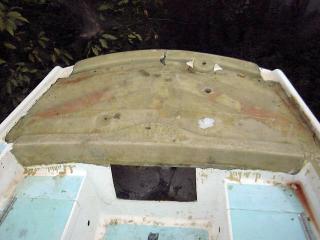 The poop deck was uncored and inadequately supported, and was very weak underfoot. Something had to be done to strengthen this area.
(Before photo, left, taken August 30,. 1999) The poop deck was uncored and inadequately supported, and was very weak underfoot. Something had to be done to strengthen this area.
(Before photo, left, taken August 30,. 1999)
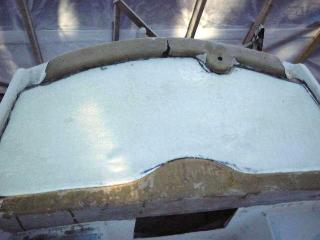
After discovering Coremat, I decided to laminate a layer on top of the poop deck. This should stiffen the laminate
significantly.
I prepped the surface by sanding and cleaning, then cut a piece of the 2mm Coremat to shape, as well as a layer of 6 oz. fiberglass cloth to cover it. Then, I wetted the surface with epoxy, applied the Coremat and fully saturated it. I then lay down the piece of cloth,
wetted it out and rolled the entire area. The Coremat was very difficult to wet out, and required a large amount of resin.
|
|
 This was the final project for
Wednesday, Dec. 8. Tomorrow I'll be able to clean and sand the epoxy filler, the fiberglass tape, and the poop deck, and get ready for a second application of fairing compound. It looks like I have two more days of "warm" weather (45-50), which will allow me to up to two more applications of fairing compound. This should pretty much take care of the fairing, although time will tell. This was the final project for
Wednesday, Dec. 8. Tomorrow I'll be able to clean and sand the epoxy filler, the fiberglass tape, and the poop deck, and get ready for a second application of fairing compound. It looks like I have two more days of "warm" weather (45-50), which will allow me to up to two more applications of fairing compound. This should pretty much take care of the fairing, although time will tell.
(After photo, left, taken
December 8, 1999)
Thursday, 9 December 1999
Last night got colder than expected--down to the 20's--which resulted in a fair amount of condensation on the inside roof of the boat shed. This condensation, possibly exacerbated by the exothermic epoxy reaction of the fairing compound and fiberglass done on Wednesday afternoon, of course froze during the night--the end result being that this morning, when the sun began hitting the shed, the ice melted and began dripping all over the boat, including on the partially
kicked resin. The resin took longer to kick than normal because of the cold. By the end of the day, it had kicked well, so I don't think there will be any problem. I think I'm done with resin work after today, though.
Once things had warmed up and melted, I went ahead and scrubbed the fairing compound on the port deck with water and a green Scotchbrite pad to remove blush. The resin was still in a green stage, so I was able to put on some new compound without sanding. I only had to fill in some low spots and add
additional filler in some of the deepest depressions, so this wasn't a big job. I'll thoroughly sand the entire area before doing any more fairing, so I can see where it needs to be done.
The fiberglass tape on the starboard side was also still green, so I left it alone--as it needs to be ground down before beginning to fair. By the late afternoon, this resin was kicked, but it was too late to do any additional work.
Filling
in the Ice Hatch
The time had come to do something about the opening in the cockpit for the old stupid icebox. One of the first jobs I did on the boat was to
remove the lower part of the unit and its cabinetry, leaving only the deck loading hatch. I knew I wouldn't be reusing the hatch. I didn't take any photos of the hatch before I removed it, but if you have a Triton you know what it looks like (East Coasters, anyway!)
Using a Sawz-all, I began cutting the thick, raised flange around the hatch. That baby is solid fiberglass, and cutting it was slow and difficult. Access for the saw at the end closest to the cabin trunk was difficult, so I just ground that section flush. Talk about dust! I think that hatch was the strongest part of the cockpit.
|
|
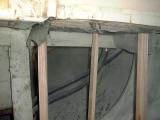 Once the flange was removed, I ground a slight bevel around the edges of the opening, to allow for overlapping of fiberglass layers. Then, I created a crude "mold" for the laminating by covering a piece of plywood with wax paper and wedging it in place beneath the hatch opening. The underside doesn't have to be pretty--it will never be seen. The wax paper should allow me to remove the wood without too much trouble, in theory at least. Once the flange was removed, I ground a slight bevel around the edges of the opening, to allow for overlapping of fiberglass layers. Then, I created a crude "mold" for the laminating by covering a piece of plywood with wax paper and wedging it in place beneath the hatch opening. The underside doesn't have to be pretty--it will never be seen. The wax paper should allow me to remove the wood without too much trouble, in theory at least.
|
|
 I then cut two sets of mat and woven roving to size and laminated them on top of the "mold",
overlapping the layers slightly. Because the cockpit is not cored, this comes close to being the right
thickness. I'll probably add a little more later, once I grind the current layers and see how much room is left to make the area flush. The photo above shows the hatch after lamination. I then cut two sets of mat and woven roving to size and laminated them on top of the "mold",
overlapping the layers slightly. Because the cockpit is not cored, this comes close to being the right
thickness. I'll probably add a little more later, once I grind the current layers and see how much room is left to make the area flush. The photo above shows the hatch after lamination.
When the resin is kicked, I'll grind the edges down and add more glass as necessary. I'll probably go underneath, fill the voids around the edges with thickened epoxy, and put a couple layers of glass there, too.
|
|
 The next day, the mold released perfectly from the repair, even leaving a fairly smooth surface. A bit more glass, a little fairing, and the old icebox hole will be good as new, and probably stronger than the rest of the cockpit. The next day, the mold released perfectly from the repair, even leaving a fairly smooth surface. A bit more glass, a little fairing, and the old icebox hole will be good as new, and probably stronger than the rest of the cockpit.
|
|
