|
Deck: Recore
This
page was last updated on 2 April 2008
Tear Off
| New
Core | Reinstalling
the Deck Panels | Fairing
| Deck Recore Page 2 |
2008 Update
Over the years, I've frequently been asked about the plywood deck core,
and whether I'd recommend it. I thought it would be good if I
addressed the issue here and explain the hows and whys of the choice,
and what I'd do now. There are a number of things I'd change in
terms of how I went about this rebuild project, and while few are major,
it's still important to try and explain that by no means was every
aspect of the project done perfectly, however well it all functions even
now.I used marine plywood to
recore the starboard side of the deck because enough of it to do the job
came with the boat, and because the port side had been already recored
using this product (though the new top skin was incomplete when we
bought the boat). When I embarked on the recore portion of this
project--which, after demolition, was the first job to be attacked--I
didn't yet know how far I was going to take the project, and was still
operating under the delusion that we'd have the boat back and sailing
for a $10,000 investment in repairs and related upgrades. (ha)
Ergo, I elected to use the no-cost supply of decent core material
that came with the boat.
Plywood core is OK. It's heavier
than most other commonly-used materials, and its overall properties as a
core material are not as good as balsa, foam, or extruded plastic
honeycomb products like Nida-Core. As a result, I'd not recommend
plywood as a core material; certainly it's not a material I'd make a
conscious decision to use, other than in a few select applications that
aren't likely to arise during a typical sailboat recore.
I have no problems with the core that I
installed, so I don't intend to malign plywood as a core material based
on a bad experience; just the opposite. I think the plywood recore
was, and continues to be, a success.
I happen to be a proponent of balsa
core, and frequently find myself defending its excellent properties in
the face of all the failed balsa cores that exist in typical production
boats. But the reasons why these cores fail, whether through
moisture intrusion or debonding (that is, failure of the adhesive used
to secure the core to either skin), have little to do with the product
itself and everything to do with the installation practices, both of the
core material during construction (or reconstruction) and of subsequent
hardware installations that penetrate the deck. Any of these
conditions are further exacerbated by a lack of regular maintenance seen
on so many boats of all ages.
People tout foam or plastic cores as
the latest and greatest, and there are many good choices out there, any
of which might be the right choice in a given situation. But I
wouldn't suggest immediately discounting balsa just because of a past
failure. I feel that any properly-constructed and maintained cored
structure has an indefinite lifespan, though, as long as it's properly
maintained and as long as water is kept out. This includes balsa:
balsa is no more inherently subject to failure than any of the others,
as long as the installation is sound. Perhaps balsa will
deteriorate more quickly under adverse conditions, which is one of the
reasons people often choose foams, saying the foam will resist water
better. To a point, I agree; but close up any material, however,
seemingly ideal, in a stagnant, moisture-ridden, and neglected
environment for long enough, and the material is likely to suffer some
sort of failure. So in 10 or 30 years, we might see similar core
failures in foam or plastic-cored boats if the boats are incorrectly
constructed or poorly maintained.
The point is that proper construction
and maintenance--especially in terms of proper installation of
penetrating hardware--is the key to the longevity of any kind of deck
structure. Don't blame the material; blame the neglect or poor
construction practice.
Another change of heart I've had since
this job relates to the re-use of the top skins. While this is
still a decent practice that may, depending on circumstances, be the
right choice, my own preference now would be to relaminate over the new
core with new material, rather than reusing the skins. I just feel
that reusing the skins takes at least as much time (if not more) as
installing new glass, and that the quality of a new fiberglass and epoxy
laminate is worth the effort.
Also, although I didn't have this
problem myself, it can often be challenging to install the core and old
skins so that they remain properly flush with the surrounding areas.
Given this concern, along with the other work required for preparing and
installing the skins, I believe that new fiberglass is a superior
method. Cost-wise, it probably costs more to install new glass,
but only if one doesn't account for their time, in my opinion.
Now, on to the original posting from
1999. |
When we bought the boat, we knew that the decks were in poor condition
structurally. The entire port side had been recored by the
previous owner, although not completely finished. He had removed
the top layers of glass and the core, and replaced all the core along
the entire sidedeck and port side of the foredeck. He then
laminated new fiberglass cloth, mat and woven roving over the core.
What has been completed is a fairly good job, and we see no reason to
change or redo it. The forward portion of the port deck requires
from one to three or four more layers of cloth, a project that is on the
to-do list this month. Then it will be a matter of fairing the
entire deck prior to repainting.
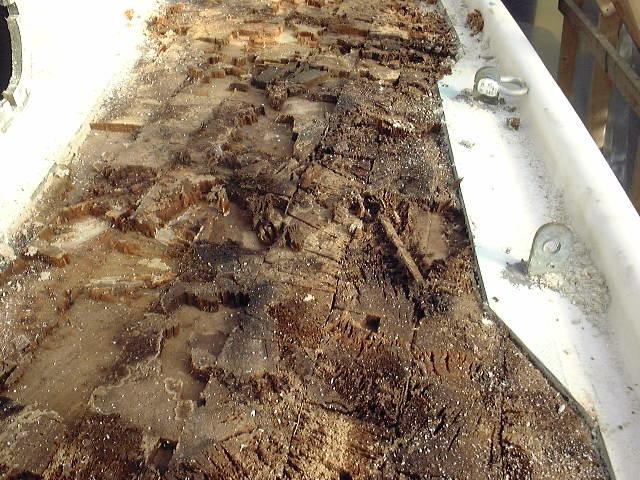
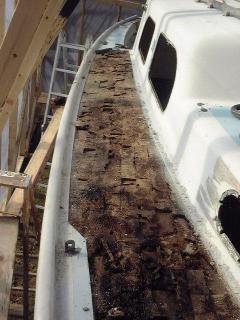
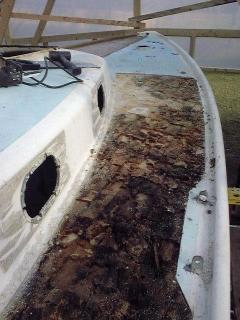
The starboard side had not been
touched, and it was very soft underfoot along most of its length.
This is of course an indication of saturated and rotting core.
However, the softness and delamination seemed to stop at about the
forward end of the cabin trunk, so we hoped the foredeck on the
starboard side would not need to be repaired.
Deck
Tear Off
(Starboard Side)
9 November 1999
Starting a recore project is an easy thing to put off! I really
didn't want to start until I had the shed
built around the boat, a task I only recently completed. Having
the semipermanent structure for protection would eliminate any anxiety
about the weather forecast, and would help keep the decks dry while the
recore project is underway.
I finally made the decision to get
started one day in the first week of November. I set up staging
next to the boat to allow me to stand comfortably next to the deck while
working. I then sounded the entire starboard deck to get a
good idea as to the extent of the core damage, to avoid cutting any more
than necessary. As originally expected, the damage extended from
the forward end of the cockpit to the end of the cabin trunk forward,
and a small amount into the foredeck. The starboard foredeck is
amazingly solid, despite holes drilled for anchor chocks and the bow
pulpit. |
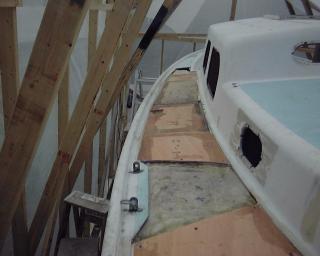
 Having determined my approximate cut lines, I set the circular saw--a Porter Cable 6" Saw Boss (great tool!) to a depth approximating the presumed thickness of the top fiberglass skin over the core (about 1/4"-5/16") and plunged it through the fiberglass, with the narrow side of the saw table riding against the gunwale on the outboard cut and the cabin trunk on the inboard cut. This leaves about 2" of deck for retabbing later. Cutting was easy, although I had to make some angled cuts to clear the chainplates, leaving extra material there. Having determined my approximate cut lines, I set the circular saw--a Porter Cable 6" Saw Boss (great tool!) to a depth approximating the presumed thickness of the top fiberglass skin over the core (about 1/4"-5/16") and plunged it through the fiberglass, with the narrow side of the saw table riding against the gunwale on the outboard cut and the cabin trunk on the inboard cut. This leaves about 2" of deck for retabbing later. Cutting was easy, although I had to make some angled cuts to clear the chainplates, leaving extra material there.
 Once all the cutting was completed, I had to finish cutting the corners by hand to free them--one of the limitations of circular saws. At this point it became obvious how poor the structure was--virtually the entire deck panel I had just cut was completely loose from the underlying core, with the exception of a small area at the forward end where the
core was still in good condition and well secured to the top skin. A little prying with a crowbar and flat bar and this area gave way, allowing me to remove the entire deck panel and place it below on the ground. Once all the cutting was completed, I had to finish cutting the corners by hand to free them--one of the limitations of circular saws. At this point it became obvious how poor the structure was--virtually the entire deck panel I had just cut was completely loose from the underlying core, with the exception of a small area at the forward end where the
core was still in good condition and well secured to the top skin. A little prying with a crowbar and flat bar and this area gave way, allowing me to remove the entire deck panel and place it below on the ground.
|
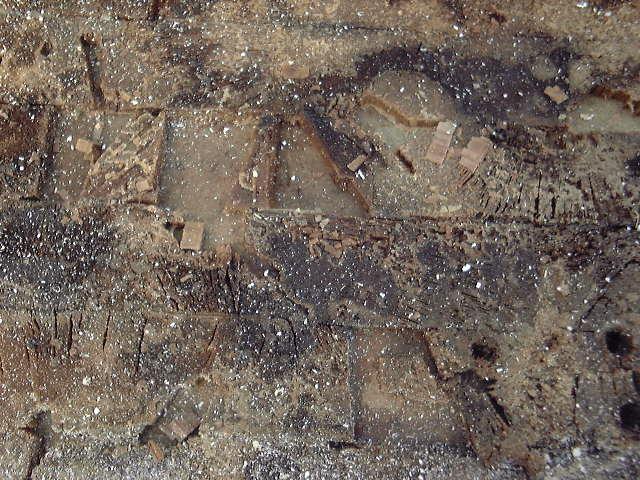
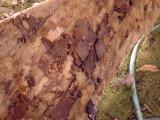
 The core beneath was totally soaked--I could wring it out like a sponge--and barely attached to the top skins. It was bonded more securely to the bottom skin I spent a fair amount of time with a stiff putty knife scraping the
remaining core off the lower deck skin and from underneath the deck flanges, as much as possible. There was some core next to the cabin trunk at the forward end that was in good condition and well bonded to the lower skin--this took substantial persuasion to remove, a minor testament to the effectiveness of this
construction when properly built. I found I had to extend my cut on the foredeck
in a small area near the gunwale, where the core was still wet. About a 6" square extra was cut out in the same manner as above, revealing, finally, solid, dry core all around. The core beneath was totally soaked--I could wring it out like a sponge--and barely attached to the top skins. It was bonded more securely to the bottom skin I spent a fair amount of time with a stiff putty knife scraping the
remaining core off the lower deck skin and from underneath the deck flanges, as much as possible. There was some core next to the cabin trunk at the forward end that was in good condition and well bonded to the lower skin--this took substantial persuasion to remove, a minor testament to the effectiveness of this
construction when properly built. I found I had to extend my cut on the foredeck
in a small area near the gunwale, where the core was still wet. About a 6" square extra was cut out in the same manner as above, revealing, finally, solid, dry core all around.
|
|


|
Installing
New Deck
Core
22 November 1999
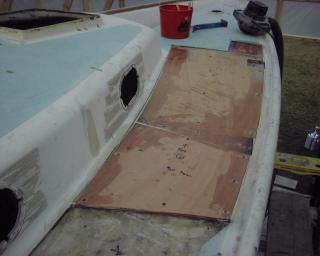
The port side had been recored with marine plywood, and a substantial amount of this material was left over and came with the boat when we bought her. Therefore, as a cost-saving measure, I decided to use the plywood to recore the starboard deck. My first choice would have been end-grain balsa, the standard in the industry, but I could see no reason to spend the extra money when I had enough core material already on hand. Besides, this will keep the deck homogeneous, and the plywood will work well as a core as long as it stays dry--which it will, given the steps I am taking to properly reinstall the hardware. I don't plan to ever go through another deck recore project again (at least with this boat!)
A forecast for several days of unseasonably warm weather (50's and 60's) allowed me to get started on the recore project after a couple week hiatus. With several more warm days forecast, I hope to get the bulk of work completed before Thanksgiving.
The first step before recoring was to take my electric grinder and thoroughly sand the inner deck skin and the inside of the deck panels, taking care to grind off all remnants of the old balsa
and the resin that had squeezed between the balsa blocks. This was a dirty, nasty job, but took less than thirty minutes total. I then blew off all the dust with my blower and, while waiting for the dust in the shed to settle, spent some time cutting the plywood core to size.
Using the deck panels as templates, I cut the pieces of core to shape, making them just slightly undersized so that they would not interfere with the cut edges of the deck flange and cause an installation problem. The plywood is 3/16" thick, so two layers are needed to replace the original 3/8" balsa. Once the pieces were cut, I cut out some areas where hardware will be installed later, namely the lifeline stanchions and genoa/jib tracks. The openings in the new core will allow me to install solid fiberglass in these areas, for strength, resistance to compression, and leak resistance. |
 With the core pieces cut, I spent some time on deck digging and brushing out any loose, old core from beneath the deck flanges. This done, I cleaned the entire area with acetone and then brushed and rolled a coat of unthickened epoxy resin over the inner deck skin and beneath the flanges, coating all areas. With the core pieces cut, I spent some time on deck digging and brushing out any loose, old core from beneath the deck flanges. This done, I cleaned the entire area with acetone and then brushed and rolled a coat of unthickened epoxy resin over the inner deck skin and beneath the flanges, coating all areas.
|
 Once the first 3/16" layer of core was laid in place over the notched epoxy, I covered the top with more thickened epoxy--again using the notched trowel--and laid on the second layer, a piece identical to the first. To hold it in place and ensure that not only would the core not move as the epoxy set, but also that the deck would not be deformed, I drove some temporary drywall screws through both pieces of core and into the fiberglass beneath. These screws will be removed once the epoxy sets, in a day or so. Because the interior is unfinished, and all surfaces there will eventually be refinished and recovered, the holes from the screws will not be a problem. This method seemed to work well, drawing the core down onto the bed of epoxy with just enough force to hold it in place without causing the deck to deflect or deform. This saved me the hassle of erecting supports and frames beneath to hold the deck shape. Once the first 3/16" layer of core was laid in place over the notched epoxy, I covered the top with more thickened epoxy--again using the notched trowel--and laid on the second layer, a piece identical to the first. To hold it in place and ensure that not only would the core not move as the epoxy set, but also that the deck would not be deformed, I drove some temporary drywall screws through both pieces of core and into the fiberglass beneath. These screws will be removed once the epoxy sets, in a day or so. Because the interior is unfinished, and all surfaces there will eventually be refinished and recovered, the holes from the screws will not be a problem. This method seemed to work well, drawing the core down onto the bed of epoxy with just enough force to hold it in place without causing the deck to deflect or deform. This saved me the hassle of erecting supports and frames beneath to hold the deck shape.
|
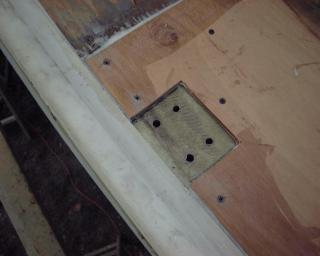
 The photos above and to the left show a gap in the core around the chainplates.
Later, I filled in this area with core, but after I didsome more work on the chainplates, filling the gap beneath the deck flange with solid thickened structural epoxy. The photos above and to the left show a gap in the core around the chainplates.
Later, I filled in this area with core, but after I didsome more work on the chainplates, filling the gap beneath the deck flange with solid thickened structural epoxy.
|
|
 Starting at the bow, I worked my way aft, piecing in the core as described above, securing it with temporary screws, and filling the small gaps between the core pieces and the deck flange with more of the thickened epoxy. It took me around 3 1/2 hours to apply the core and epoxy to the area involved, working alone. Having someone else available to mix the epoxy would have been helpful, but I was alone this day. I'll leave the screws in until the epoxy sets, removing them at that time--probably after 24 hours or so, maybe longer as the weather, while unseasonably warm for Maine in November (around 55-60), is still somewhat cool for epoxy. Starting at the bow, I worked my way aft, piecing in the core as described above, securing it with temporary screws, and filling the small gaps between the core pieces and the deck flange with more of the thickened epoxy. It took me around 3 1/2 hours to apply the core and epoxy to the area involved, working alone. Having someone else available to mix the epoxy would have been helpful, but I was alone this day. I'll leave the screws in until the epoxy sets, removing them at that time--probably after 24 hours or so, maybe longer as the weather, while unseasonably warm for Maine in November (around 55-60), is still somewhat cool for epoxy.
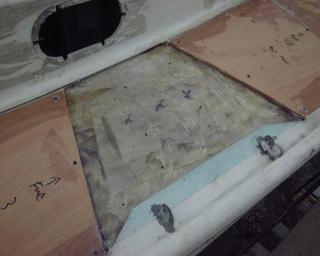
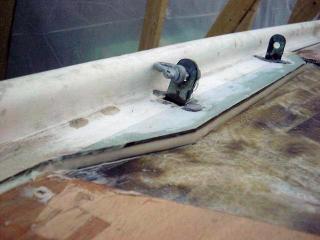
The photo to the right shows how I left gaps in the core around the stanchion base locations; I'll fill these areas with solid fiberglass and epoxy. I left similar openings in way of the genoa track and the working jib track. Solid glass in these areas will not only be stronger, but will essentially eliminate the potential for future water damage to the core.
|
|
Reinstalling
the Deck Panels
24/26 November 1999
 Prior to installing core adjacent to the chainplates, I filled the void between the deck skins with epoxy thickened with # 404 High Density Filler, a structural and non-compressive product. I packed the material tightly into the space, ensuring that all voids were filled. When this kicked, it formed a solid block of very strong epoxy around the chainplates, effectively sealing this area off from the remainder of the deck core. There should be no more leakage problems here that might lead to the type of
core damage that I found when I removed the deck. Once this area had kicked, I
installed core in the open area using the same techniques described above. Prior to installing core adjacent to the chainplates, I filled the void between the deck skins with epoxy thickened with # 404 High Density Filler, a structural and non-compressive product. I packed the material tightly into the space, ensuring that all voids were filled. When this kicked, it formed a solid block of very strong epoxy around the chainplates, effectively sealing this area off from the remainder of the deck core. There should be no more leakage problems here that might lead to the type of
core damage that I found when I removed the deck. Once this area had kicked, I
installed core in the open area using the same techniques described above.
Next, it was time to reinstall
the deck panels and button the deck up again. Before beginning, however, I
had a few loose ends to attend to.
First,
I ground all the dead core and resin off the undersides of the panels, then drilled a series of relief holes throughout the panel, on a 6-8" grid. These holes will allow excess resin and air to be released when the panel is installed. There are two pieces of deck panel to install, each about half the length of the sidedeck from the cockpit to the forward edge of the cabin trunk. Using smaller pieces would make installation easier, but I didn't want too many seams to repair, and I thought the larger pieces would make for an ultimately stronger
structrure.
|
|
 I mixed up a big batch of thickened epoxy, using # 406 filler to achieve a loose
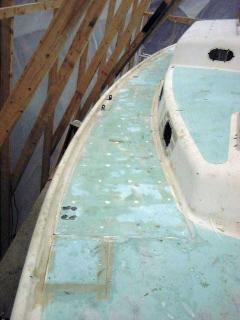
mayonnaise-like consistency. I spread this mixture thickly over the area to be covered with the panel--thinner near the edges, very heavy in the middle, where the deck camber is greatest. The goal was to have solid epoxy filling all the airspace and voids beneath the panel without having to distort the panel with excess weight. Once the mixture was spread, I laid the panel in place, noting with satisfaction the epoxy welling through the release holes. To pull the panel down the proper amount and to hold it in place temporarily, I drove drywall screws as necessary; they'll be removed once the resin cures. I picked up the excess resin as it oozed from the holes and around the edges. The photo shows the starboard deck after both panels were epoxied in place; the round whitish circles in the deck are where epoxy bled through the air holes during installation. I mixed up a big batch of thickened epoxy, using # 406 filler to achieve a loose
mayonnaise-like consistency. I spread this mixture thickly over the area to be covered with the panel--thinner near the edges, very heavy in the middle, where the deck camber is greatest. The goal was to have solid epoxy filling all the airspace and voids beneath the panel without having to distort the panel with excess weight. Once the mixture was spread, I laid the panel in place, noting with satisfaction the epoxy welling through the release holes. To pull the panel down the proper amount and to hold it in place temporarily, I drove drywall screws as necessary; they'll be removed once the resin cures. I picked up the excess resin as it oozed from the holes and around the edges. The photo shows the starboard deck after both panels were epoxied in place; the round whitish circles in the deck are where epoxy bled through the air holes during installation.
|
|


|
|
After allowing the epoxy time to cure, I
removed the drywall screws holding the panels in place. While I was
waiting over the course of a few days, I continued the deck project by working
on the port side.
To continue the recore
and deck project, please click here.
|
|