|
Retractable Lazy Jacks
This page was last updated
17 February 2008. |
I finally gave in to the lazy jack craze. However, there was no way
I was willing to install permanent lazy jacks, with their annoyances and
sailcover modifications and so forth. For a couple years, I sort
of considered some retractable lazy jacks, but just never got around to
it; there were always other priorities, and, after all, I was used to
sailing without the lazy jacks. |
However, this year I upgraded to a Strong
mainsail track system, and decided that with the new low-friction
capability of that system, lazy jacks sure would be nice.
Therefore,
I decided to actually plunge ahead with the installation.
Retractable capability was an absolute requirement. |
Interestingly, I ended up finding the right retractable design through
the former owner of my Allied Seabreeze project boat, who had designed
up a retractable system for that boat. With some minor
modifications and some changes that would suit me personally, I came up
with a general plan. After several weeks of sort of looking at the
plan and listing some hardware needed, I ordered the pieces required for
the job--two small blocks, one small swivel block, some 1/4" line, and
assorted hardware. |
 I
began with two pieces that I already had in stock, left over from
something or another: two small Harken cheek blocks. I
mounted these on the mast, just above the spreaders. I chose the
location after mocking up the potential line lead with the mast on the
ground, and made sure that the line would pass through both sides of the
block without running into any problems with the spreaders, jumper strut
wires, or any other obstructions. I
began with two pieces that I already had in stock, left over from
something or another: two small Harken cheek blocks. I
mounted these on the mast, just above the spreaders. I chose the
location after mocking up the potential line lead with the mast on the
ground, and made sure that the line would pass through both sides of the
block without running into any problems with the spreaders, jumper strut
wires, or any other obstructions. |
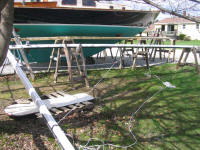
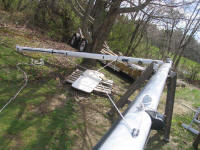 Later,
before the mast was put onboard the boat prior to launch, I continued
with some of the early preparatory work. To make life easier, I
temporarily attached the boom to the gooseneck with both pieces on the
ground (on horses); since I had removed the gooseneck toggle for safe
keeping, the boom ended up sideways in order to allow my temporary bolt
to secure it in place, but that was OK for this mockup purpose. Later,
before the mast was put onboard the boat prior to launch, I continued
with some of the early preparatory work. To make life easier, I
temporarily attached the boom to the gooseneck with both pieces on the
ground (on horses); since I had removed the gooseneck toggle for safe
keeping, the boom ended up sideways in order to allow my temporary bolt
to secure it in place, but that was OK for this mockup purpose. |
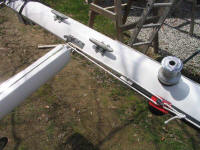
 Running
the 1/4" line through one of the cheek blocks, and securing one of the
new blocks to the bottom end, I took the other end of the long line (I
had ordered something along the lines of 130' total for the job) and
rove it through the bottom block, creating two legs that would attach to
the boom. I temporarily secured one end to the boom with tape in
approximately the right location (about 10' aft of the gooseneck), and
then played with the second connection point till things looked right,
and temporarily secured that in place as well. Running
the 1/4" line through one of the cheek blocks, and securing one of the
new blocks to the bottom end, I took the other end of the long line (I
had ordered something along the lines of 130' total for the job) and
rove it through the bottom block, creating two legs that would attach to
the boom. I temporarily secured one end to the boom with tape in
approximately the right location (about 10' aft of the gooseneck), and
then played with the second connection point till things looked right,
and temporarily secured that in place as well. |
 The
whole idea of these lazy jacks was to be easily retractable and easily
deployed, so that they would only be in place when required (when
lowering the sail). I wanted to be able to loosen the control line
(more on that later) to the point that I could easily hook the parts
under the reefing hooks at the gooseneck, without having to remove the
jacks from the boom. Therefore, I adjusted the locations and the
length of the lower line (a single line run through the turning block
and connected in two places ion the boom, forming two "legs") so that I
could easily pull the legs forward without disconnecting the lines from
the boom. The
whole idea of these lazy jacks was to be easily retractable and easily
deployed, so that they would only be in place when required (when
lowering the sail). I wanted to be able to loosen the control line
(more on that later) to the point that I could easily hook the parts
under the reefing hooks at the gooseneck, without having to remove the
jacks from the boom. Therefore, I adjusted the locations and the
length of the lower line (a single line run through the turning block
and connected in two places ion the boom, forming two "legs") so that I
could easily pull the legs forward without disconnecting the lines from
the boom. |
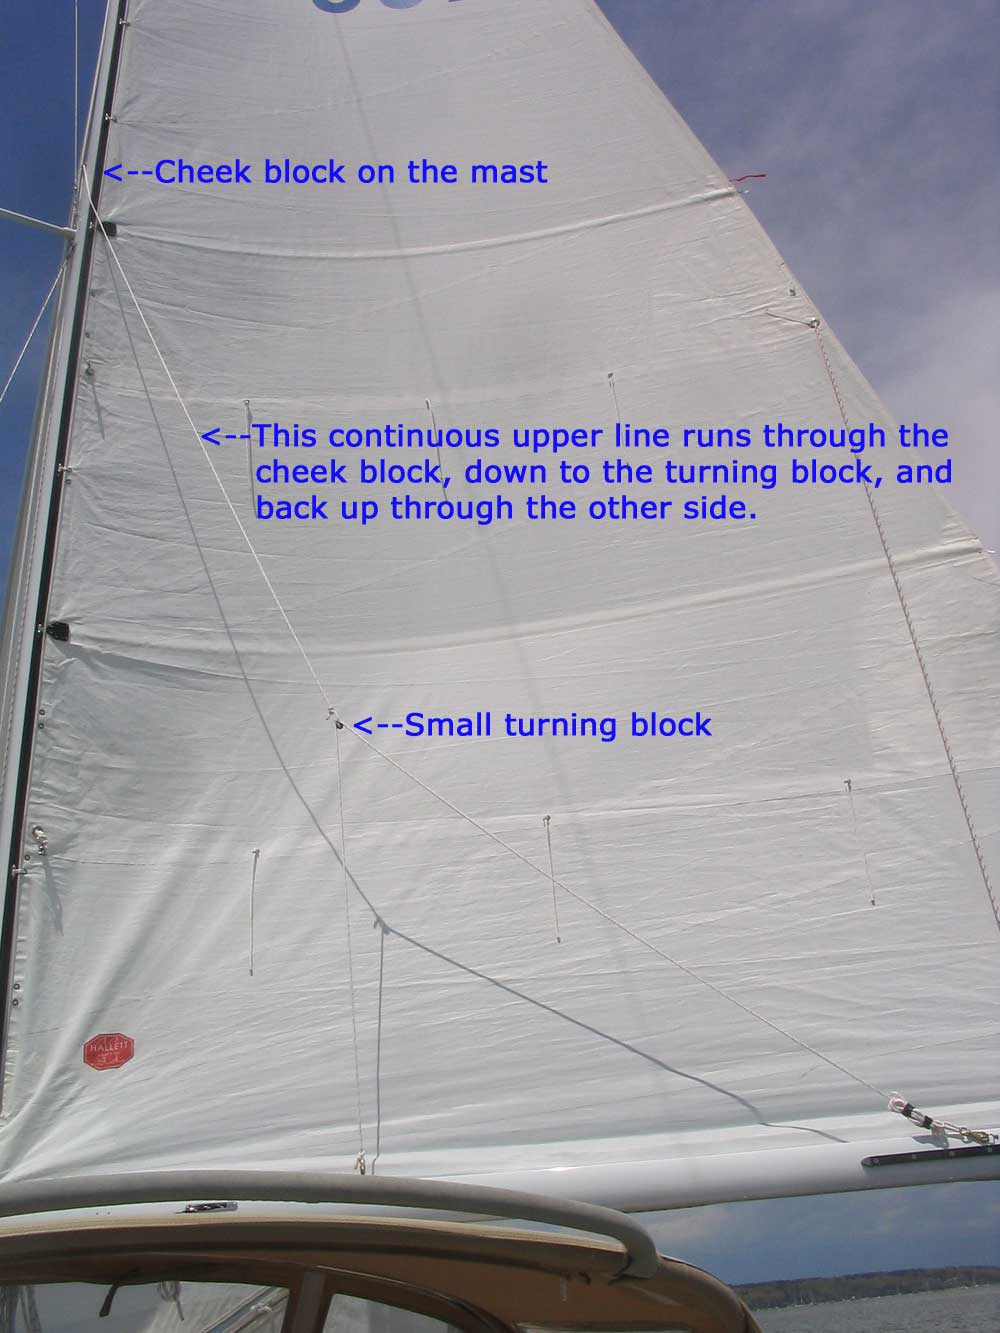
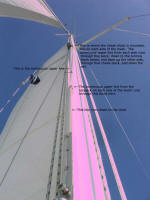
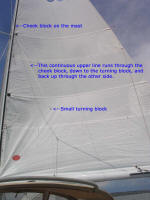
The upper line, running from the turning block at the tops of the legs
to the cheek block on the mast (and then downward) was a continuous
length, running from one side, through the cheek block, down to a swivel
turning block (to be held in place with a separate control line) and
finally up to the cheek block on the opposite site and down to the other
set of legs. Confused? Me too, but it's clear when seen in
person. The idea behind the system is that with a single
continuous line, the tension on both sides of the lazy jacks can be held
constant, keeping them equalized. |
Assisting in this is the lower control line, which runs between the
lower swivel block, at the so-called "center" of the two sides, and a
new cleat I installed on the mast. This single control line would
allow both sides of the lazy jacks to be easily tensioned or loosened as
required, all from the comfort of the mast base. Since the lazy
jacks are truly needed only when lowering the sail (and possibly
reefing), it would be an easy process to unhook the retracted lazy jacks
from their storage position hooked beneath the reefing hooks at the
gooseneck and then tension them with the control line, all before
lowering the sail. |
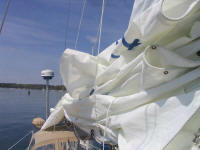
Alternatively, the lazy jack legs could be unhooked entirely from the
boom and brought outboard to hook on the lifelines or elsewhere, if they
wanted to be right out of the way. To make this an easy process, I
secured small snap hooks to the bottom ends of the lower legs at all
four mounting locations. The system is inherently much more simple
than it would seem by this description. I can't draw, so I won't
try to create a diagram. |
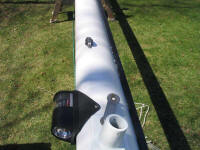
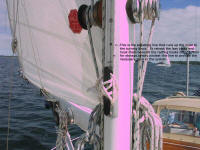
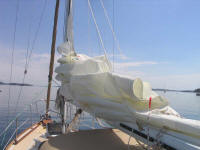
Update
Once the boat was in the water and the mast stepped, I had an
opportunity to finalize the installation. After confirming the
locations I'd chosen during the initial mockup, I began by installing
four eye straps, one at each location on the boom; I secured these with
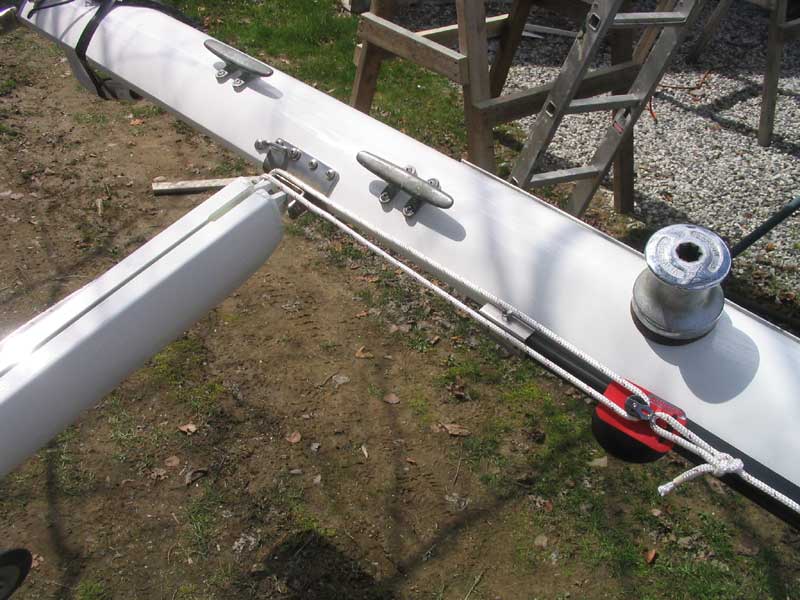
stainless steel machine screws in tapped holes. Then, I installed
a cleat on the forward side of the mast for the control line, just below
an existing track on the forward side of the mast.
The photos I have of the adjusting
arrangement on the forward side of the mast are atrocious, but here they
are in an attempt to illustrate how the simple adjusting mechanism is
set up. |
|
 |
Initially, I temporarily tied off the two legs on each side as I played
around with the proper lengths and adjustments. In most of these
photos, you'll see excess line either draped around or bundled up near
each hook. I sailed in this manner for a bit of time to ensure
that I had the adjustments right; once I was satisfied with the lengths
of the various parts of the system, I cut off the excess and properly
made up the ends. |
|
|
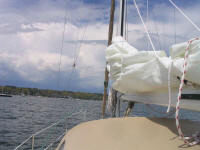
Because of potential interference with the existing reefing setup that I
had, I chose to mount my aftermost leg rather further forward than I
might have otherwise. From a practical standpoint, this meant that
the after fold or two of the sail, when dropped, tended to spill over
the boom more than I would have liked. Splitting the after leg
into two parts (thereby creating three legs), with the aftermost part
running about one foot aft of the existing location, would have cured
this, but I feared it might interfere with the reefing setup.
After several seasons, I've come to terms with this minor inconvenience,
but may still revisit a slight modification in the future. |
|


|
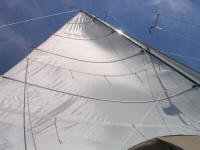
This minor inconvenience aside, the simple two-leg system works well to
catch the sail when dropped. It's more than sufficient to hold the
sail without any further need to secure it, which works well for mooring
under sail or other times where dropping the sail quickly is important.
For a long time, I was a staunch naysayer of lazy jacks; I sure am
glad I overcame my illogical dislike of them and installed this system,
since it's made dropping the sail a much easier proposition. And I
really like the ability to retract the lazy jacks when not in use; I
still don't like having them hanging all over, so being able to pull
them forward for storage is important to me.
All you need for a system similar to this
is a pair of small cheek blocks, three small turning blocks, a cleat,
snap hooks, and a quantity of small line. |
|
|
|