|
Constructing a New Galley:
Page 2
This page was last updated on 30
January 2002
Return
to Constructing a New Galley, Page 1
|
|
Constructing
a New Icebox
One of the many faults of the original
galley--at least as far as our plans for the boat were concerned-- was its
poorly insulated icebox. IN addition, I didn't like the silly design with
the side-opening door and cockpit-mounted ice hatch. So, in the early
stages of the project, I removed the old icebox
and filled in the cockpit ice
hatch with fiberglass. Many months later, I moved forward with
building the new icebox.
 Like
the old, the new icebox will be mounted to port of the companionway, occupying
more or less the same footprint as the old. Since I had shortened the
starboard settee to make way for a real stove, I wanted to keep the port settee
long enough to be used as a berth. So, measuring six feet from the forward
bulkhead, I placed a line on the settee to show the forwardmost extent of the
new icebox. Like
the old, the new icebox will be mounted to port of the companionway, occupying
more or less the same footprint as the old. Since I had shortened the
starboard settee to make way for a real stove, I wanted to keep the port settee
long enough to be used as a berth. So, measuring six feet from the forward
bulkhead, I placed a line on the settee to show the forwardmost extent of the
new icebox.
Heavy, effective insulation
was key to the success and planning of the new icebox, and I factored in a
minimum of 4" all the way around. To better accommodate the
insulation at the bottom side of the icebox, and to make more room, I first cut
out a portion of the settee. This would allow the insulation to sit
directly against the hull and create the deepest icebox possible. While
there are upper limits for size on any icebox for efficiency, I still wanted as
large a box as possible so that I could fit plenty of ice and still leave room
for food and drink. To allow for the thickness of the insulation, I left a
4" border around the edges of the cutout for the insulation to sit on.
|
|
 Using
the line on the settee and the existing engine box as a guide, I measured for
a new bulkhead. In preparation for securing
the new bulkhead, I attached some wooden cleats to the settee and engine box
in the proper position with stainless steel screws. Using
the line on the settee and the existing engine box as a guide, I measured for
a new bulkhead. In preparation for securing
the new bulkhead, I attached some wooden cleats to the settee and engine box
in the proper position with stainless steel screws.
Next, I made a
pattern of the hull side using a tick strip,
marking the measurements on a scrap of plywood that I attached to the
cleats. Back in the shop, I transferred the marks to a sheet of
1/2" cherry plywood, and cut the piece out. I brought it to the
boat, and installed it against the cleats, although I had to make a few
modifications to my cut to get it to fit. Once I was satisfied with the
position, I tabbed the bulkhead to the hull with several layers of glass and
epoxy, after grinding the paint off the inside of the hull.
|
|
 With
this done, I screwed some cleats to the inside of the bulkhead and the
sort-of-bulkhead at the rear of the compartment as needed to support the future
countertop. Then, I began cutting my chosen insulation to fit
inside. With
this done, I screwed some cleats to the inside of the bulkhead and the
sort-of-bulkhead at the rear of the compartment as needed to support the future
countertop. Then, I began cutting my chosen insulation to fit
inside.
I used two
thicknesses of 2" Homosote, or polyisocyanurate, for a total of 4"
all around, which has a total R value of 28.8 (7.2 per inch). The foam
has a foil backing on each side. This should provide very good
insulating qualities. To install the foam, I simply measured and cut as
necessary, using a regular handsaw and utility knife. The pieces feature
staggered joints at the corners, to help seal the gaps, and are installed with
only a friction fit. I installed 4" in the bottom of the cutout in
the settee, and stuffed the remainder of the edges of this space with additional
insulation. On the hull side of the icebox, I was able to bend the sheets
of insulation to match the curvature of the hull. I figured this would give me the maximum amount of room in the
icebox, as opposed to a stepped portion against the hull. The foam bent
easily into shape, and stayed in place with no problem.
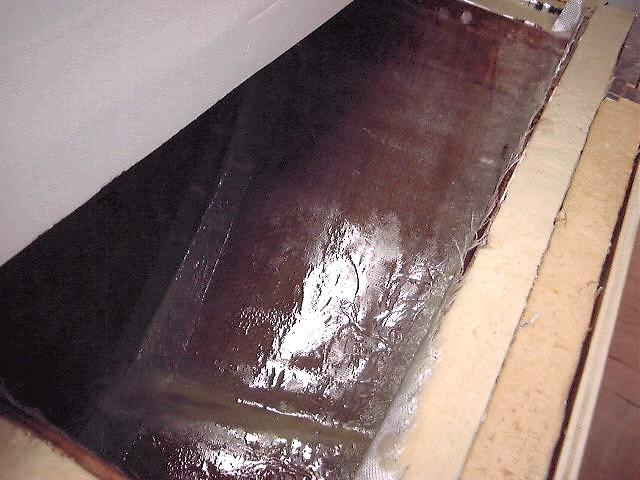
To line the icebox and
protect the insulation, I cut pieces of 1/4" plywood to the proper size
and shape, covering each interior surface--sides and bottom. This was a
real pain and took a fair bit of time, and was not in the least bit
satisfying. However, it had to be done. I didn't take any pictures
of this process because I hated it so. The reason it was such a pain was
that none of the surfaces of the icebox were really square to each other.
This is because the lousy little bulkhead beneath the cockpit was so skewed out
of whack and completely un-square to the centerline of the hull.
(Installed that way from the factory). This meant that I had to deal with oblique
angles and other difficulties when covering the inside of the
box. Not fun.
I also found it was difficult to bend the plywood into shape to cover the insulation; the
curve is too tight. To allow the plywood to curve properly, I cut a
series of saw kerfs in the bottom surface on my table saw, keeping the blade
so that it cut about halfway through the material. I cut these kerfs
every 1/2" or so along the back. With these cut, the piece bent
beautifully into place--it's kind of like a tambour door on a roll top desk.
Once all the pieces were
cut to fit properly--it took a bit of trial and error--and dry fit, I
installed them permanently with 3M 101 (polysulfide), sticking them to the
insulation. With any leftover caulking, I filled some of the seams
between the panels. I used friction fit sticks to hold the pieces in
position as necessary, although the fit was generally tight enough that little
of this was needed.
The next day, I was able
to remove the sticks holding things temporarily in place. The next step
was to mix up a batch of epoxy thickened with cabosil to a thick, putty-like
consistency. With my finger, I pressed this mixture into all the seams
in the icebox, filling any voids and creating a small fillet. Not only
does this step help create a water-and vapor-tight box, it also will make
laying fiberglass cloth into the corners easier.
|
|
 Next,
I wet out two layers of fiberglass cloth strips with unthickened epoxy and
laid them into each corner of the box, pressing the cloth into the corners as
tightly as possible with a plastic resin roller and a paintbrush. When
this was complete, I installed precut layers of fiberglass cloth on all
surfaces--two layers for the three vertical surfaces, and two layers plus one
layer of 24 oz. roving on the bottom and curved (outboard) side. This
was fun (not!), reaching deep into the box to wet out and smooth the
material. I was glad when the job was over. The entire job,
including creating the fillets and laminating the sides, took about two to
three hours. The point of all this work is to not only seal the box
against moisture leakage--in or out--and to make it vapor tight, but also to
make it strong enough inside to resist the impact if I should ever drop a
block of ice onto the bottom or something; that's why I added the heavy roving
to the bottom, the surface most likely to receive the most abuse. Next,
I wet out two layers of fiberglass cloth strips with unthickened epoxy and
laid them into each corner of the box, pressing the cloth into the corners as
tightly as possible with a plastic resin roller and a paintbrush. When
this was complete, I installed precut layers of fiberglass cloth on all
surfaces--two layers for the three vertical surfaces, and two layers plus one
layer of 24 oz. roving on the bottom and curved (outboard) side. This
was fun (not!), reaching deep into the box to wet out and smooth the
material. I was glad when the job was over. The entire job,
including creating the fillets and laminating the sides, took about two to
three hours. The point of all this work is to not only seal the box
against moisture leakage--in or out--and to make it vapor tight, but also to
make it strong enough inside to resist the impact if I should ever drop a
block of ice onto the bottom or something; that's why I added the heavy roving
to the bottom, the surface most likely to receive the most abuse.
|
|
 After
the resin had a chance to cure for a day or so, I sanded it with 80 grit paper
to smooth any rough edges and provide a little tooth for the paint. It's
always fun to sand in a deep, constricted space like this. After
the resin had a chance to cure for a day or so, I sanded it with 80 grit paper
to smooth any rough edges and provide a little tooth for the paint. It's
always fun to sand in a deep, constricted space like this.
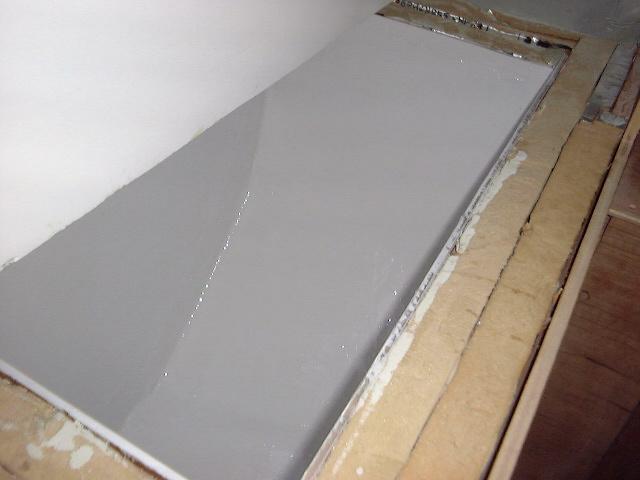
Next, after cleaning the sanding dust
with a vacuum and acetone, I applied a coat of Brightside primer. When
the primer dried, I applied three coats of Brightside white to all icebox
surfaces.
|
|
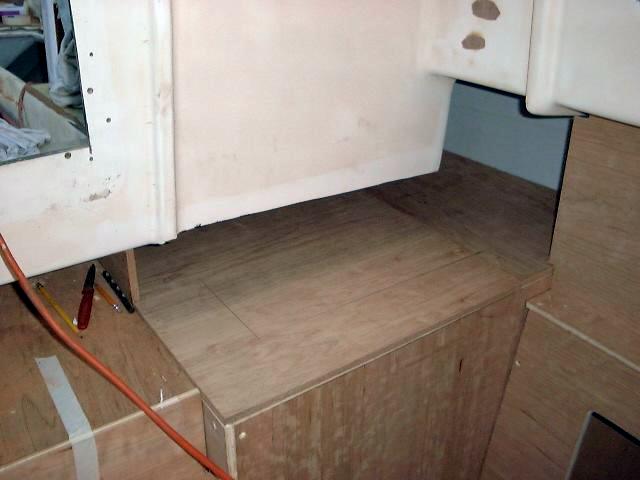 For
the countertop, I cut two pieces of merranti plywood to size. I had to
use two pieces because of the constricted space around the icebox--there was not
room to maneuver a larger piece into place. For
the countertop, I cut two pieces of merranti plywood to size. I had to
use two pieces because of the constricted space around the icebox--there was not
room to maneuver a larger piece into place.
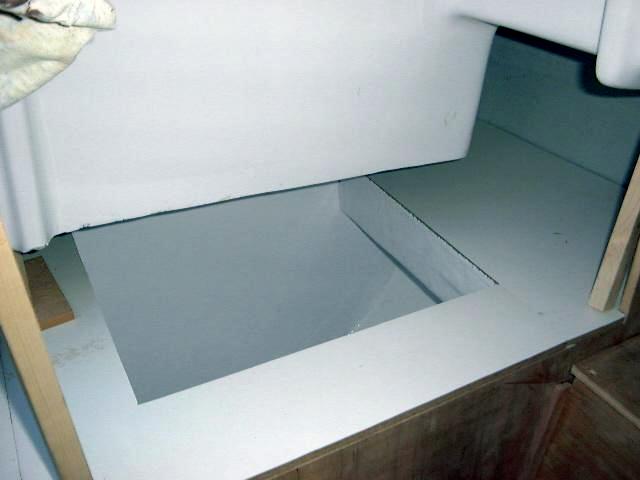
With the insulation and liners
installed, I could now determine the size of the icebox hatch. I tried to
make the lid as large as possible to give me the best access to the icebox when
complete. After double checking my measurements, I cut the opening with my
saw.
I first cut as large a hole as possible out of
the inboard section of the two-piece plywood top--one side of the seam is
forming the edge of the hatch--since getting ice into the
icebox will be a tight squeeze because of the position and height of the
cabinetry. With this done, I trimmed the resulting rectangular hatch
slightly to allow for 1/4" solid cherry moldings on all sides, which I
will install a little later on to trim out the hatch. I cut two layers
of the same 2" foam insulation I used in the icebox and glued them to the
hatch and the other top piece (which will be stationary). After letting
the glue kick, I shaped the edges and corners of the foam a little to round
them over; this will allow the fiberglass that will be installed to lay more
easily over the foam.
After searching through my fiberglass
supply, I found a couple pieces of roving and mat that I thought I could use
to cover the foam on the hatch and stationary portion of the top. I did
not have any of the lightweight cloth that I used on the chest itself, and,
since I was anxious to get this part of the project completed, I decided to
use materials on hand. I cut a layer of roving and a layer of mat to fit
each piece, and began the wetting out process with epoxy resin. Big
mistake.
I soon discovered that the roving was way
too heavy to lay down over the corners of the foam, and after valiantly trying
for several minutes to get it to work, I realized it was a lost cause and
discarded the sloppy, now resin-soaked material. Bummer. I made
plans to go get some more lightweight cloth the next day.
Armed with the proper material, the
laminating went quickly and smoothly. I laminated two layers of the 6
oz. cloth over the foam on both pieces, and set them aside to kick. When
the resin cured, I sanded the rough areas to prepare the pieces for painting
with more of the white Brightside that I used in the icebox.
|
|
 When
the paint was dry, I applied more white Formica to the hatch and two pieces of
the countertop. Because of the tight clearance above the counter in the
boat, I had decided not to try to secure the top with screws; rather, I used
5200, laying down heavy beads of it on the bearing surfaces. I wedged
the top in place at strategic locations from above to hold it until the 5200
cured. When
the paint was dry, I applied more white Formica to the hatch and two pieces of
the countertop. Because of the tight clearance above the counter in the
boat, I had decided not to try to secure the top with screws; rather, I used
5200, laying down heavy beads of it on the bearing surfaces. I wedged
the top in place at strategic locations from above to hold it until the 5200
cured.
With the countertop installed, I moved on to
installing trim around the icebox and countertop. I left the portion next
to the hull open for the time being, because it will become an important route
for wiring (which was not installed at the time of icebox construction).
Installed a fiddle along the forward side of the countertop to hide the plywood
edge and allow small items to be stored on the countertop when underway.
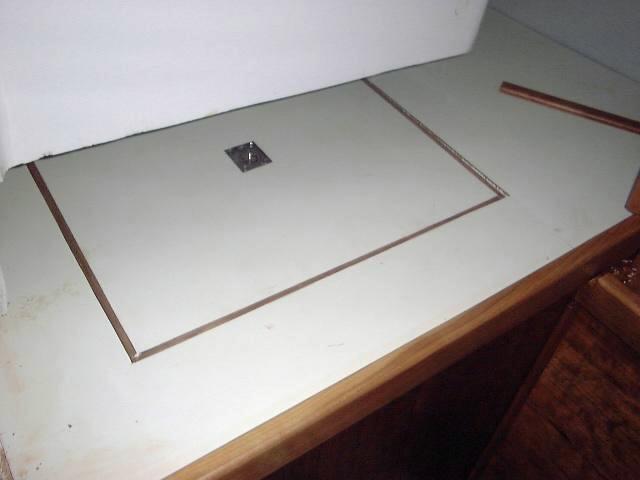
To
install the icebox lid, I installed some hardwood cleats along the
sides of the opening to support the top. I left some clearance for some
gasket material that will be installed later. With a little fine tuning
on the size of the hatch, it fit tightly into the opening. In the center
of the lid, I routed a space for a small flush pull ring, one that I had on
hand. (I can already tell it's too small, so I expect that I'll be
replacing it sooner than later. For now, at least, it lets me open the
lid...)
|
|
|
|
 Just before launching the boat, after wiring had been
installed, I finally built some trim
pieces and surrounds to hide the inside of the hull and the aft bulkhead
behind the icebox. I made these removable for access to the wiring runs
behind. Just before launching the boat, after wiring had been
installed, I finally built some trim
pieces and surrounds to hide the inside of the hull and the aft bulkhead
behind the icebox. I made these removable for access to the wiring runs
behind.
|
|