|
Anchoring Setup and Ground Tackle (Page 3)
This page was last updated on May 2, 2002
35#
CQR 33# Bruce/Claw
20# Danforth 13#
Danforth
Marking
the Anchor Rodes Anchor Rode
Storage/Chain Pipes
Anchor
Platform
|
|
 20 Lb.
Danforth Setup (Spare) 20 Lb.
Danforth Setup (Spare)
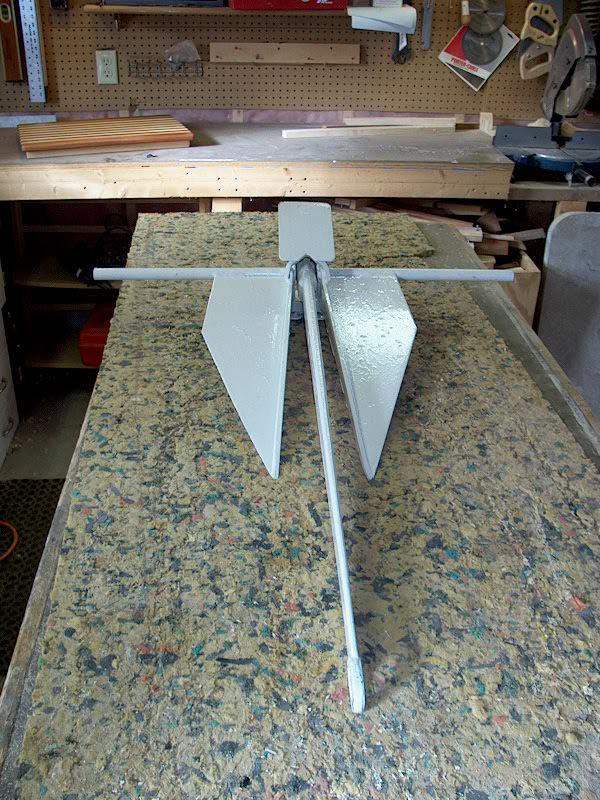
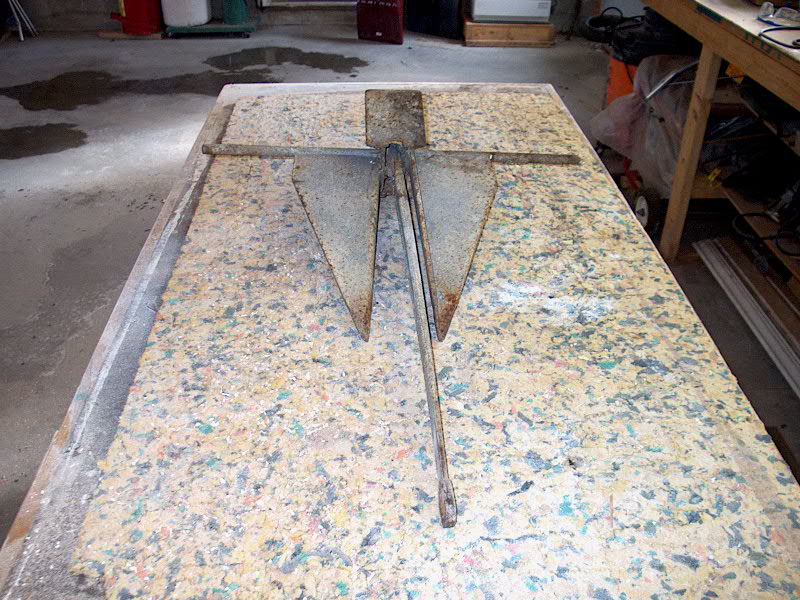
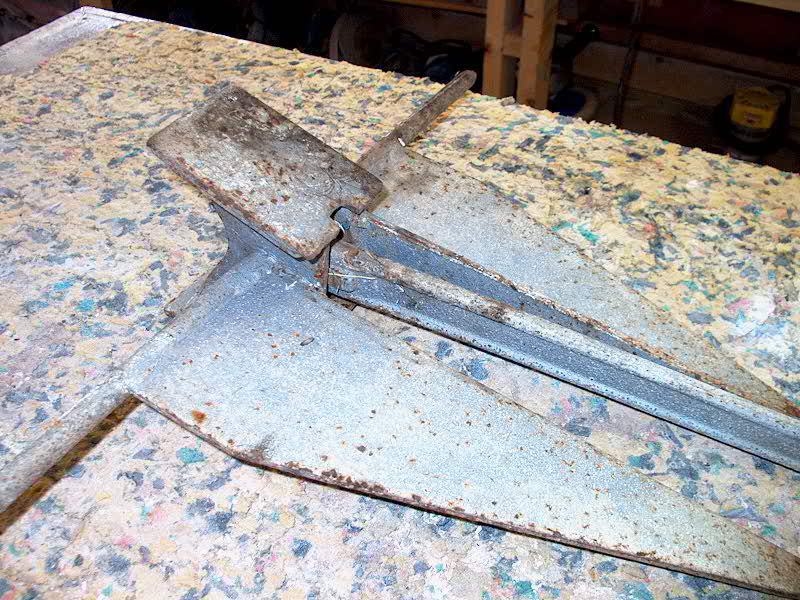
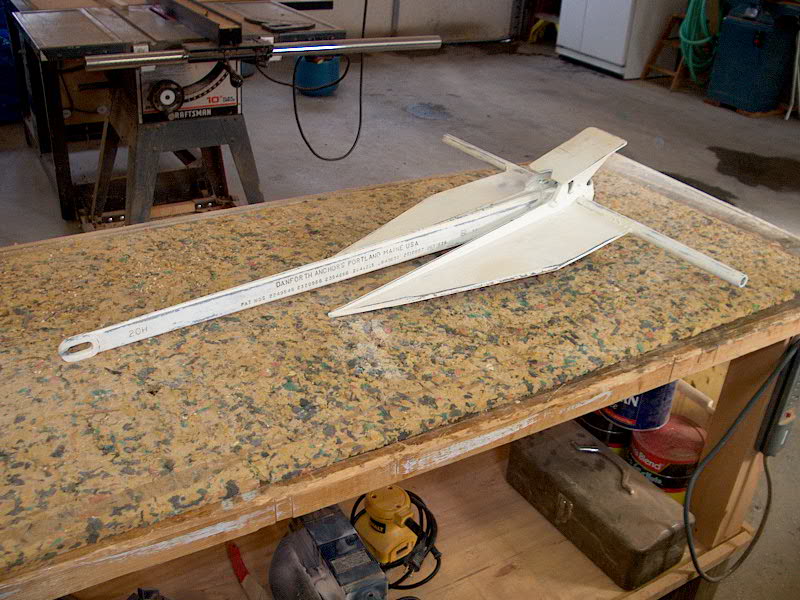 I bought this anchor used
from Ebay. It came painted white, and whoever painted it must have
missed class the day they taught about gravity. There were thick,
heavy drips and runs on the flukes, shank and stock, and it just didn't look
good that way. I'm not a huge fan of painted anchors, but since it was
already painted, I decided to clean it up and repaint. This anchor
will be stored on deck as a spare anyway, and will probably rarely be
used. I wanted a good-sized Danforth because there are times when this
type of anchor really holds better than the others, and I want to be
prepared for every situation that might be encountered. To go along
with the Danforth, I have 300' of 1/2" nylon spliced directly to 10
feet of 1/4" chain.
I'll store this somewhere convenient--not quite sure how to deal I bought this anchor used
from Ebay. It came painted white, and whoever painted it must have
missed class the day they taught about gravity. There were thick,
heavy drips and runs on the flukes, shank and stock, and it just didn't look
good that way. I'm not a huge fan of painted anchors, but since it was
already painted, I decided to clean it up and repaint. This anchor
will be stored on deck as a spare anyway, and will probably rarely be
used. I wanted a good-sized Danforth because there are times when this
type of anchor really holds better than the others, and I want to be
prepared for every situation that might be encountered. To go along
with the Danforth, I have 300' of 1/2" nylon spliced directly to 10
feet of 1/4" chain.
I'll store this somewhere convenient--not quite sure how to deal  with this
much rode in a convenient way. I want it to be accessible and easy to use
when necessary, but must be stored out of the way in between. This is
really a spare anchor, or one intended for use only when both of the main
anchors don't hold for some reason. Who knows--it may never get
used. But I believe in preparation. with this
much rode in a convenient way. I want it to be accessible and easy to use
when necessary, but must be stored out of the way in between. This is
really a spare anchor, or one intended for use only when both of the main
anchors don't hold for some reason. Who knows--it may never get
used. But I believe in preparation.
|
|
To restore the anchor, the
first thing to do was to sand down the lumps and drips on the anchor.
I used my trusty Porter Cable and some 80-grit discs for this, which easily
took care of the mess. I sanded the entire anchor to prepare it for
further coats of paint.
 To
continue, I applied a coat of Interlux Brightside white primer to the anchor,
concentrating on the areas where it had been sanded to bare metal. The
existing paint was generally in good condition and well adhered, although
I coated it all with a thin coat of the primer. To finish the job, I
applied two coats of Brightside white. The finished product doesn't look
as good as I has really hoped--there are still lumps left over from the previous
sloppy paint job--but it's much better, and hey--it's an anchor. To
continue, I applied a coat of Interlux Brightside white primer to the anchor,
concentrating on the areas where it had been sanded to bare metal. The
existing paint was generally in good condition and well adhered, although
I coated it all with a thin coat of the primer. To finish the job, I
applied two coats of Brightside white. The finished product doesn't look
as good as I has really hoped--there are still lumps left over from the previous
sloppy paint job--but it's much better, and hey--it's an anchor.
|
|
Here's
a little exercise to keep you sharp. Look at the photo below and try to
figure out what all those pieces are for. To find out, click on the photo
and you'll see!
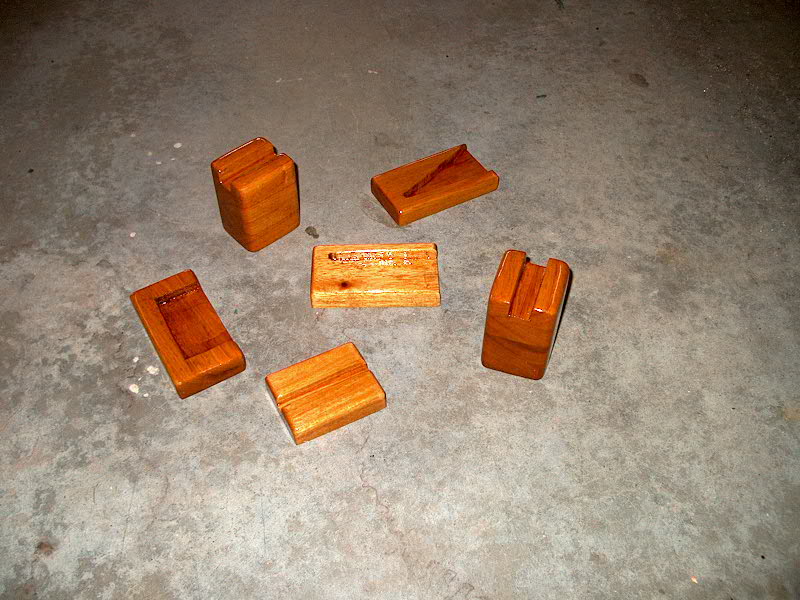
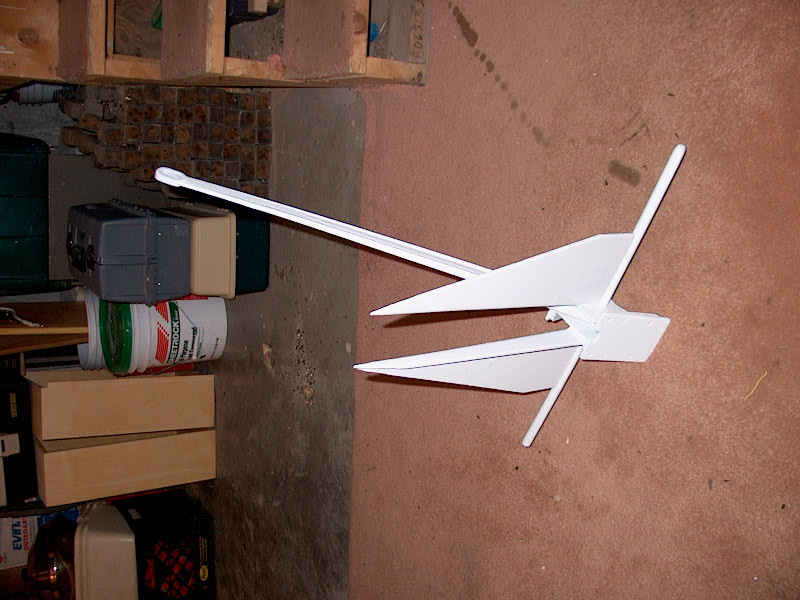
Storage of a large spare anchor
is always a challenge, even more so on the storage-starved Triton. I
decided that the best thing to do was store the Danforth flat on deck.
There's room on the coachroof aft of the mast for an anchor stored in
chocks. Now, store-bought chocks are always disappointing, so I decided to
make my own. Using scrap mahogany, I fabricated the pieces you see
above. To begin, I laid the anchor on my bench and slipped some scraps
under the fluke tips and crown, then marked the outlines. Using a router,
and then a chisel, I cleaned out the area inside the lines to allow the anchor
to fit inside. Then I measured the height of the stock and epoxied up two
blocks so that they'd be high enough to support each end--this will further
secure the anchor and, more importantly, will prevent stubbed toes or stabbed
shins from these protruding cylindrical annoyances. When the glue was set,
I cut the blocks to the proper size and routed out the grooves in the top.
Finally, I made the small piece to fit under the shank. After sanding the
pieces smooth, I applied 10 coats of varnish to match the exterior trim.
To install the chocks, I first
searched for the best place. I chose the coachroof on the port side, just
forward of the doghouse bump-up. Because of the crown of the deck, I found
that the center piece under the anchor crown didn't work--it needs to be
taller. For now, I dispensed with it, as it really is unnecessary.
Later, I'll probably modify this piece and install it as needed.
|
|
With the chocks in the proper
location, I drew pencil lines around their outlines, then applied masking tape
to the deck outside of the lines. I also taped off the sides of each chock
piece. The tape is to protect the deck and the varnish from the adhesive,
and to make cleanup easier. With this done, I applied heavy amounts of
fast-cure 5200 (cures in 24 hours) and pressed the pieces into place, taking 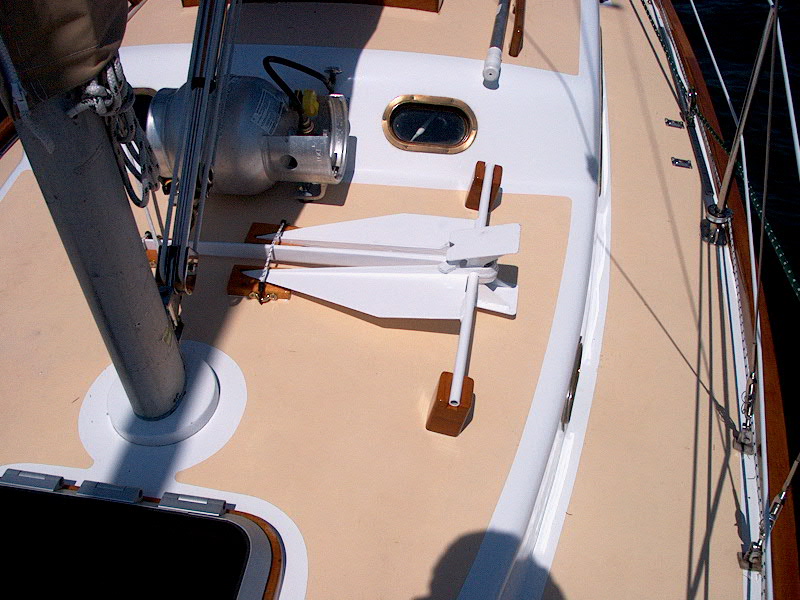 care
to align them properly. I set the anchor in place briefly to check that
all pieces were in the right place, but removed it while the adhesive set
because I was worried the chocks might slide around under the weight. I
left the adhesive squeezeout for cleanup after it cured. care
to align them properly. I set the anchor in place briefly to check that
all pieces were in the right place, but removed it while the adhesive set
because I was worried the chocks might slide around under the weight. I
left the adhesive squeezeout for cleanup after it cured.
The next day, I removed the
excess adhesive--a relatively simple chore involving cutting the stuff free and
peeling it (along with the masking tape) away. To secure the anchor in
place in the chocks, I attached two pair of brass strap eyes--one pair to the
fluke chocks, one pair to the shank chock--and attached short lengths of
1/4" bungee cord that I made up with plastic clips on the end. These
seem to hold the anchor securely. You can just catch a glimpse of the
bungees in the photo above. Time will tell if I need any restraint on the
stock.
|
|
 13 Lb.
Danforth Setup (Stern Anchor) 13 Lb.
Danforth Setup (Stern Anchor)
 This
13#
Danforth came with the boat--one of the few usable items. It was in
decent structural condition, but had some rust and generally looked
bad. A length of ancient vinyl-coated chain came attached to it;
getting the chain off was a chore in and of itself. (I had to cut the
shackle.) This
13#
Danforth came with the boat--one of the few usable items. It was in
decent structural condition, but had some rust and generally looked
bad. A length of ancient vinyl-coated chain came attached to it;
getting the chain off was a chore in and of itself. (I had to cut the
shackle.)
I decided to
paint this anchor to match the larger Danforth--that will look better than
if I left it alone the way it was. To begin, I sanded the entire
anchor with 80-grit paper to remove some of the rust and crud and prepare
the surface for paint.
After cleaning
the surface with solvent, I applied an even coat of Interlux Brightside primer
(white), making sure to get paint into all the small pockmarks  and
unevenness and such on the surface of the anchor. (The metal is hardly
smooth after sanding--there will always be a texture to the surface.) I
just used a foam brush to apply the primer, not being fussy but looking for a
smooth, even, complete coat on all surfaces an in all dimples. I stood the
anchor on end to that I could do both sides at once. and
unevenness and such on the surface of the anchor. (The metal is hardly
smooth after sanding--there will always be a texture to the surface.) I
just used a foam brush to apply the primer, not being fussy but looking for a
smooth, even, complete coat on all surfaces an in all dimples. I stood the
anchor on end to that I could do both sides at once.
|
|
 When the primer dried, I applied
two coats of Interlux Brightside white. This greatly improved the
appearance of the anchor, although it's still pretty ugly. I purchased a
pair of those hangers that attach to a pulpit, and intend to install this anchor
right on the stern pulpit, ready to go. This is all conjecture at this
point--I may find that there's a different, or better, solution for
storage. I won't really know till later. When the primer dried, I applied
two coats of Interlux Brightside white. This greatly improved the
appearance of the anchor, although it's still pretty ugly. I purchased a
pair of those hangers that attach to a pulpit, and intend to install this anchor
right on the stern pulpit, ready to go. This is all conjecture at this
point--I may find that there's a different, or better, solution for
storage. I won't really know till later.
To go along with this anchor, I
have 400' of 1/2" nylon rode and 6' of 1/4" anchor chain. I
installed a bronze chain pipe on the port poop deck, and stored the line in the
locker beneath--outboard of the exhaust hose. It was a tight fit with all
that line. Later, I expect to come up with a divider for inside the
locker, but for now the lifejackets stowed in the other portion of the locker
will ensure that the rode remains restrained in the proper place.
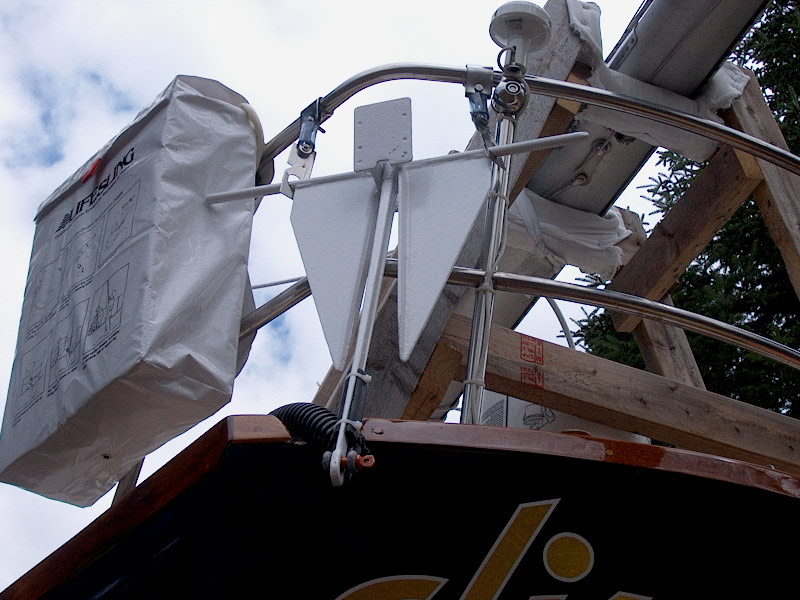
 I
installed hanging brackets on the stern pulpit and hung the anchor from
them. To protect the wood trim work and the deck from damage from the
metal anchor shank and anchor chain, I installed rubber chafing gear over the
offending portion of the anchor, and slipped a length of hose over the anchor
chain. I held things in place against rattling with some 1/4"shock
cord equipped with little hooks. I
installed hanging brackets on the stern pulpit and hung the anchor from
them. To protect the wood trim work and the deck from damage from the
metal anchor shank and anchor chain, I installed rubber chafing gear over the
offending portion of the anchor, and slipped a length of hose over the anchor
chain. I held things in place against rattling with some 1/4"shock
cord equipped with little hooks.
|
|
|
Click
here to continue. |
|