|
Finish Trim: Woodwork and
Interior Details
This page was last updated on 4 March 2002
Main Salon
Forward Cabin
Head Cushions
Cabin Sole
Storage Drawers
Cabinet Doors and Caning
Trimwork in Galley
Bookshelves
Completed
Interior
Finishing
off the Chain Locker Small
Projects and Finishing Touches
|
|
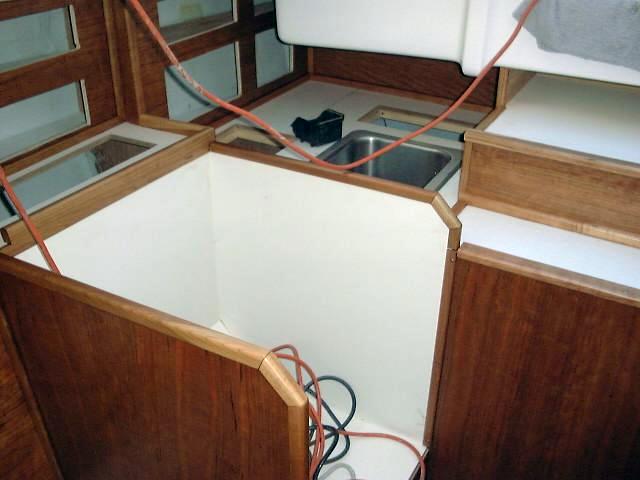
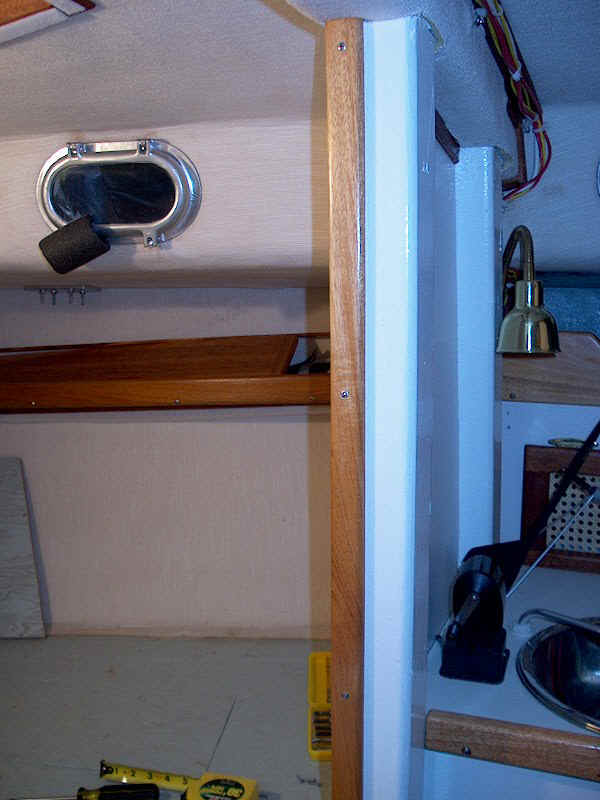
SALON
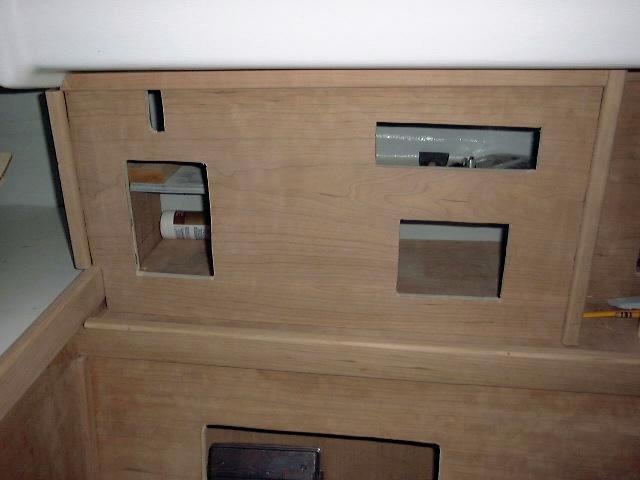
With the rough cabinetry complete in the main
salon, I turned my attention to the myriad trim pieces required to cover raw
plywood edges, seams and corners. I will mill the various pieces needed
out of solid cherry stock.
I started by milling some fiddles for the
shelves on the backrests port and starboard, as well as cushion-retaining
fiddles for the settees. These four pieces are identical and consist o a
3/4" thick piece of cherry stock with a wide dado in the back to provide an
overlap. I rounded the top corners to provide pleasing appearance and
smooth feel. To prevent the berth fiddles from cutting into legs when
sitting, I made them so they project only 1" above the plywood surface of
the berth. With 4" cushions, cutting off the circulation to our feet
shouldn't be an issue. I cut them to the proper length and finished them
with four coats of varnish (2 gloss base coats followed by 2 final coats of
rubbed effect satin) and set them aside; I won't install the fiddles on the
berths for a little while, since they would be susceptible to damage during the
rest of construction, but the shelf fiddles were installed with glue.
I milled a variety of other pieces to cover
the corners and seams as necessary; I milled all pieces with a table saw, router
and hand tools as needed. To date, I have spent a lot of time just milling
and sanding these pieces, and I still have much more to do. This is a time
consuming part of the project, but one that doesn't show any immediate
results.
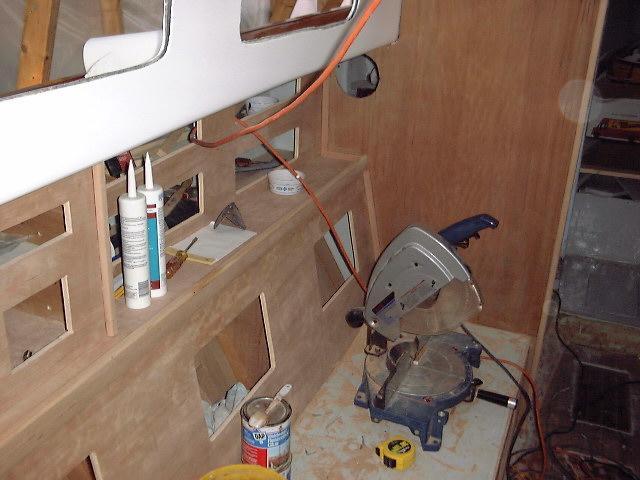
After a couple long days in the shop, I had a
wide variety of trim pieces milled, some with grooves, some with rabbets, and
all of them with rounded edges for smooth looks and safety. I had fiddles
for the countertops and shelves, backstops for some of the engine box, and thin,
1/4" x 3/4" pieces that I planned to use to trim around the perimeters
of the plywood interior joinery.
I spent time over a week or so installing the
various bits of trim in the salon. This is a time-consuming process, but
one that really brings things together in the cabin. I wanted to avoid
visible screws wherever possible, but the problem was that most of the trim was
too thin to allow for countersunk and plugged screws. Plus, that is a lot
of effort that I hoped to avoid. To that end, I installed most of the trim
with resorcinol glue, and "clamped" it in place while the glue dried
with a hot melt glue gun. This seemed to work pretty well, although on
trim pieces that I knew would receive a lot of abuse I did use oval head screws
to secure those pieces in place.
|
|


|
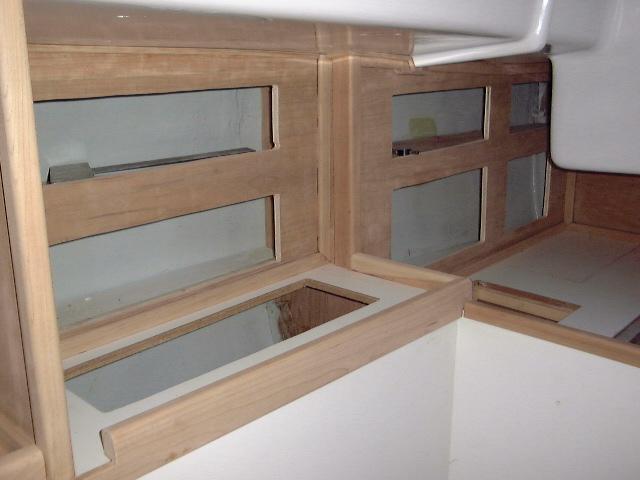
| After finally finishing the last few pieces of
trim (with the exception of the area above the icebox--more to come on this
later), I sanded everything again with 220 grit, vacuumed everything off,
cleaned with solvent and tacked. I then, over the course of two
warm-enough late November days, applied two coats of Epifanes gloss
varnish. The first coat was thinned 50%, the second about 25%; I lightly
sanded between coats, although it was hardly necessary because the first coat
soaks so much into the wood.. These
form the base for the final two coats of Epifanes rubbed effect satin varnish
that I will apply as soon as the weather allows. The varnish transformed
the cherry cabinets, changing them from attractive but dry-looking light wood to
richly grained, darker, more intense looking joinery. The effect is
beautiful. |
After getting the fixed ports in place a day
after the second coat of varnish, I set up my electric ceramic disc furnace (Polonis)
in the salon to help heat things up and cure the varnish, which was taking its
sweet time because of the temperature. I hung a blanket in the passageway
to the head, and draped a heavy comforter
(an old one) over the companionway
opening, since I haven't yet installed the new companionway trim. The
heater made things warm enough that I was able to apply a coat of the final,
rubbed effect satin varnish despite cold temperatures outside. Fortunately, this coat came out very nicely, and I think it is good enough that
I don't have to do a fourth coat.
(Photos taken 12/4/00)
|
|


 |
|
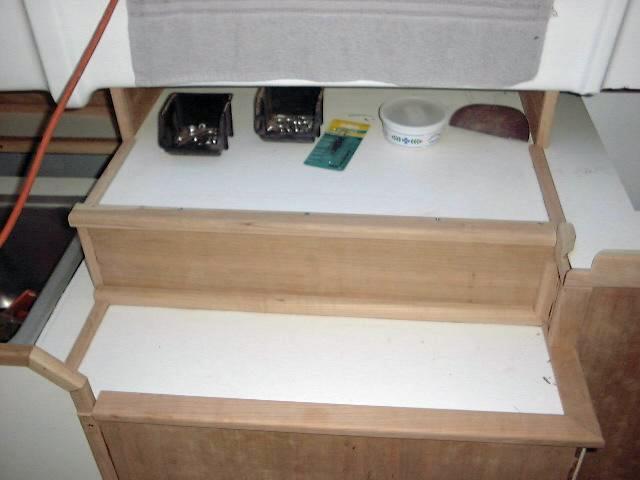
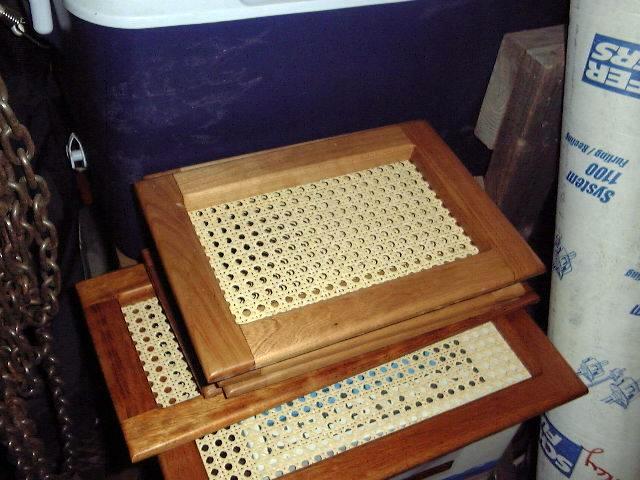
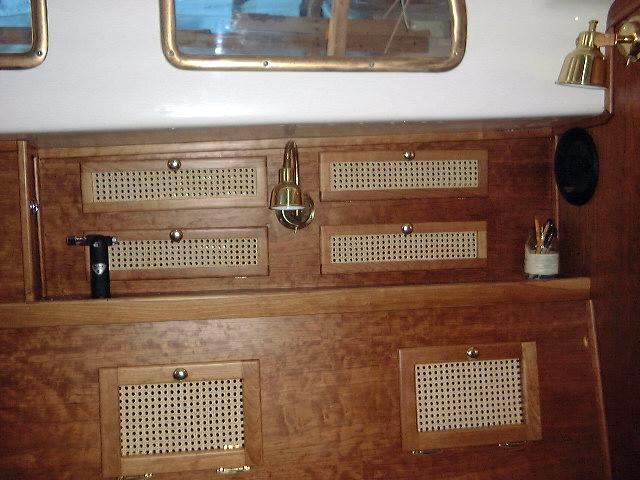
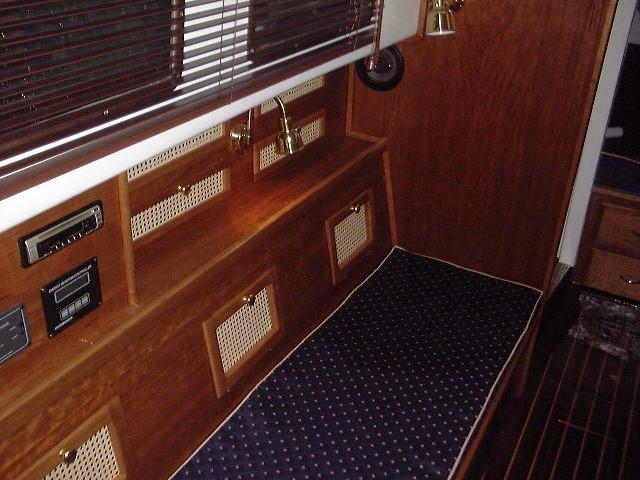
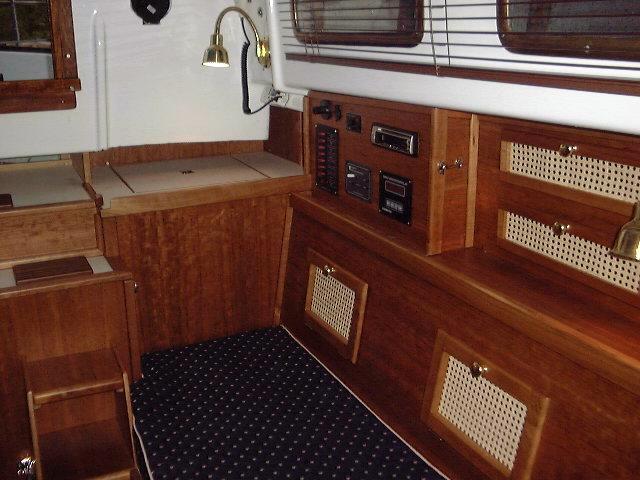
Cabinet
Doors and Caning
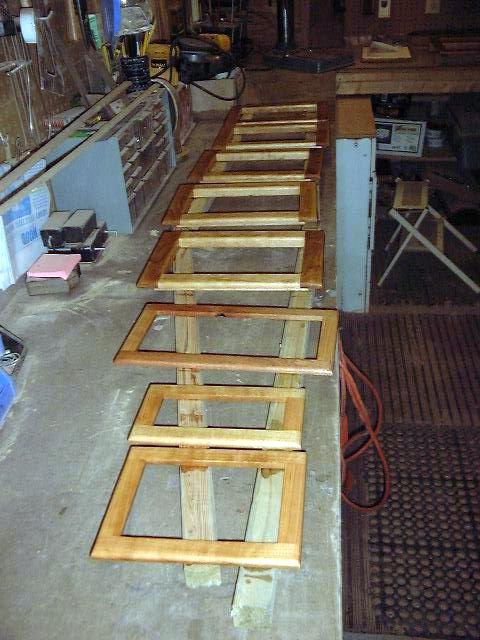
 Cabinet doors:
I made about a million doors, more or less, to cover all the cubbies in the
cabin that I thought were such a good idea when I cut them out. Ha!
There's five doors for the settee backs, eight little doors for the cubbies above
the settees, six more in the galley, and three larger doors in the head.
That's 88 pieces of wood needed! I spent most of two full working
days cutting rails and stiles, gluing up the pieces, milling the roundovers and
rabbets, and sanding everything to 220 grit. The larger doors are made
from 3/4" stock, joined at the corners with half lap joints. I milled
a 3/8" square rabbet around the edges, so they sit partially inset.
The doors Cabinet doors:
I made about a million doors, more or less, to cover all the cubbies in the
cabin that I thought were such a good idea when I cut them out. Ha!
There's five doors for the settee backs, eight little doors for the cubbies above
the settees, six more in the galley, and three larger doors in the head.
That's 88 pieces of wood needed! I spent most of two full working
days cutting rails and stiles, gluing up the pieces, milling the roundovers and
rabbets, and sanding everything to 220 grit. The larger doors are made
from 3/4" stock, joined at the corners with half lap joints. I milled
a 3/8" square rabbet around the edges, so they sit partially inset.
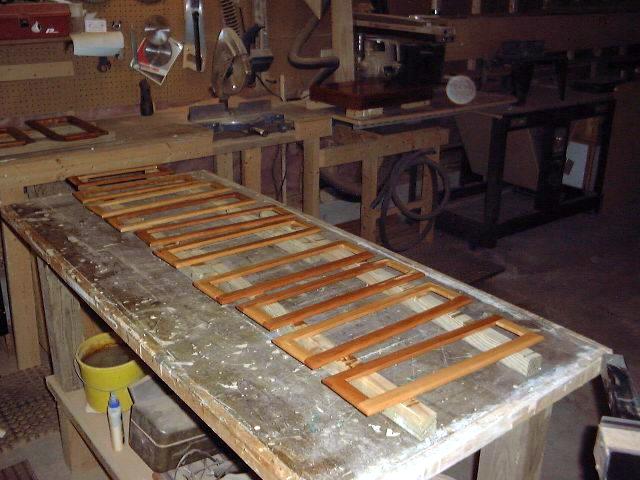
The doors  for
the upper settee cubbies and galley compartments would be too awkward and heavy
if built from 3/4" stock, so I cut some 1/4" thicknesses (by 1"
wide) and built the doors from that material. I plan to install
pre-manufactured caning in the openings, which will provide ventilation for the
contents of the lockers. We've dubbed the doors "Singapore
Doors". (Because of all the caning...) for
the upper settee cubbies and galley compartments would be too awkward and heavy
if built from 3/4" stock, so I cut some 1/4" thicknesses (by 1"
wide) and built the doors from that material. I plan to install
pre-manufactured caning in the openings, which will provide ventilation for the
contents of the lockers. We've dubbed the doors "Singapore
Doors". (Because of all the caning...)
After 30 or 40 years of sanding, I varnished
the doors, using three coats: 2 coats of Epifanes gloss for a durable base
and quicker build-up, and a final coat of Epifanes rubbed effect to match the
rest of the woodwork in the cabin.
|
|
I ordered prewoven
traditional caning
and reed splines, and prepared the doors for the caning installation.
On the larger, thicker doors, I milled an 11/64" wide groove for the spline
on all four edges, with two passes through the table saw blade, moving the fence
slightly for the second pass. The smaller, thinner doors (for the
cubbyholes above the settees and galleys) don't contain enough wood to
accommodate the spline, so I cut caning to size and simply glued it to the
backs, using masking tape to clamp it in position. The openings on these
doors are small enough that stretching the caning is not a real problem.
This is an admittedly imperfect setup, but time will tell how these doors hold
up. Under the circumstances, it seemed the best option for the time being. |
|
 I
installed the caning in the larger doors by first cutting the caning slightly
oversize, then wetting it by briefly immersing it in water. The
installation involved pressing the cane into the spline grooves with a wedge (I
made the mistake of not ordering dedicated caning wedges for this, so I
improvised with several tools on hand--the most effective was a school-type
protractor). Once the caning was pressed into the groove, I applied a bead
of glue and then hammered the spline into place with a rubber mallet. I
left the excess caning and spline overhanging until the glue dried, when I
trimmed it off with a utility knife and wood chisel. As the wet caning
dried, it shrank somewhat, leaving a drum-tight surface. The process went
fast once I had figured out a few tricks to make it easier for me. I
installed the caning in the larger doors by first cutting the caning slightly
oversize, then wetting it by briefly immersing it in water. The
installation involved pressing the cane into the spline grooves with a wedge (I
made the mistake of not ordering dedicated caning wedges for this, so I
improvised with several tools on hand--the most effective was a school-type
protractor). Once the caning was pressed into the groove, I applied a bead
of glue and then hammered the spline into place with a rubber mallet. I
left the excess caning and spline overhanging until the glue dried, when I
trimmed it off with a utility knife and wood chisel. As the wet caning
dried, it shrank somewhat, leaving a drum-tight surface. The process went
fast once I had figured out a few tricks to make it easier for me.
|
|
 The
larger doors--the ones in the settee backs and the head--are hung on
3/8" offset partially hidden hinges--standard kitchen-type brass
ones. I use a self-centering drill bit to drill pilot holes, and then
attach the hinges to the door and the cabinet with brass screws. I
installed brass cabinet catches on the insides of the cabinets and doors to hold
the door closed; these are screwed in place. Solid brass knobs are secured
with stainless screws. The
larger doors--the ones in the settee backs and the head--are hung on
3/8" offset partially hidden hinges--standard kitchen-type brass
ones. I use a self-centering drill bit to drill pilot holes, and then
attach the hinges to the door and the cabinet with brass screws. I
installed brass cabinet catches on the insides of the cabinets and doors to hold
the door closed; these are screwed in place. Solid brass knobs are secured
with stainless screws.
The smaller doors were much more of a
pain. Because the wood frames are only 1/4" thick, with no rabbet, I
couldn't use most traditional cabinet hinges. I ended up with some
miniature brass hinges, which I secured with tiny brass screws--even these I had
to drive in at a small angle to make sure they wouldn't stick through the front
of the doors. Then, I screwed the other half of the hinge to the cabinets,
after aligning the doors as necessary. The door catches were another
challenge--again, screws would have been too long, and would have come through
the front of the door. Therefore, I had to glue the catch to the inside of
each door with epoxy, being careful to get the alignment just right with the
corresponding section on the openings in the cabinets, which are screwed in
place. Tedious stuff to be sure. Having all the doors installed
really makes a difference in the cabin, though--it finally looks finished.
Time will tell how the small doors and  hinges
hold up. When I brought the doors out to the boat for installation, the
caning on the small doors--which was not stretched as it was on the larger doors
(with the splines)--loosened a bit. It doesn't look terrible, but it is
not what I had hoped for. Maybe there will be some further work here after
this sailing season-something to do next winter. hinges
hold up. When I brought the doors out to the boat for installation, the
caning on the small doors--which was not stretched as it was on the larger doors
(with the splines)--loosened a bit. It doesn't look terrible, but it is
not what I had hoped for. Maybe there will be some further work here after
this sailing season-something to do next winter.
|
|
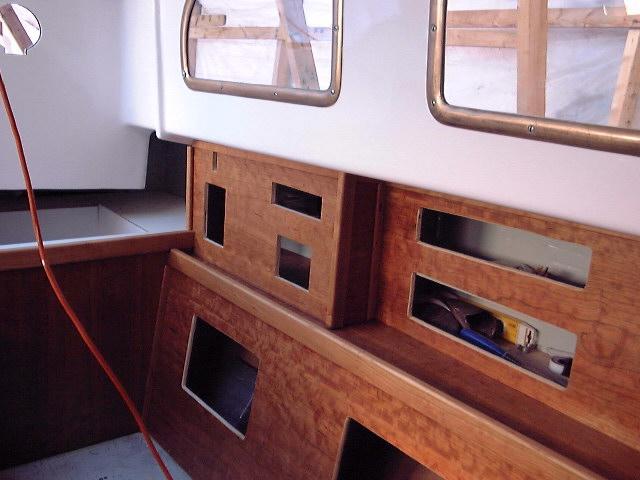
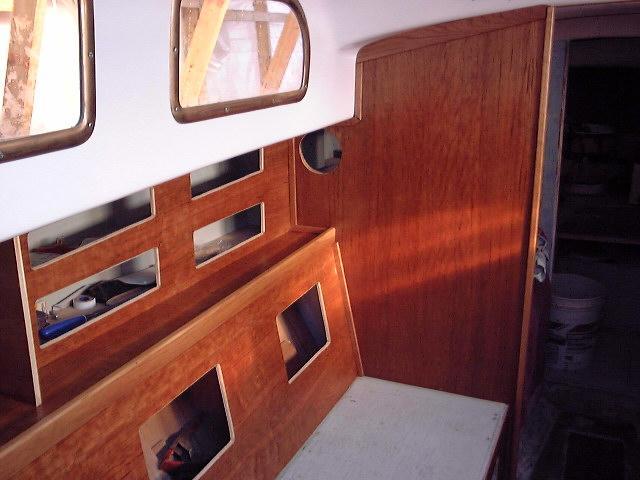
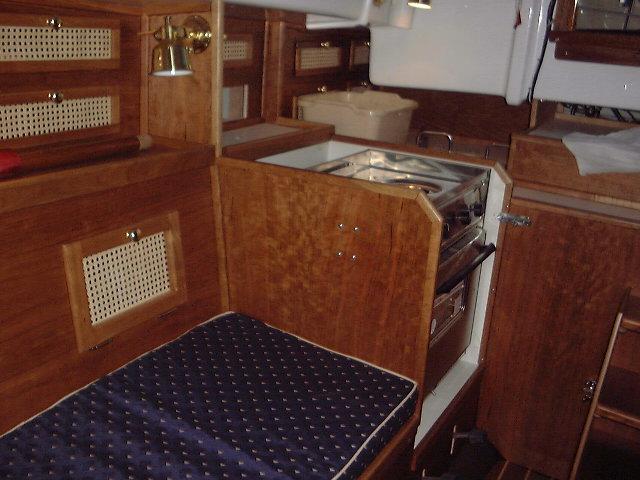
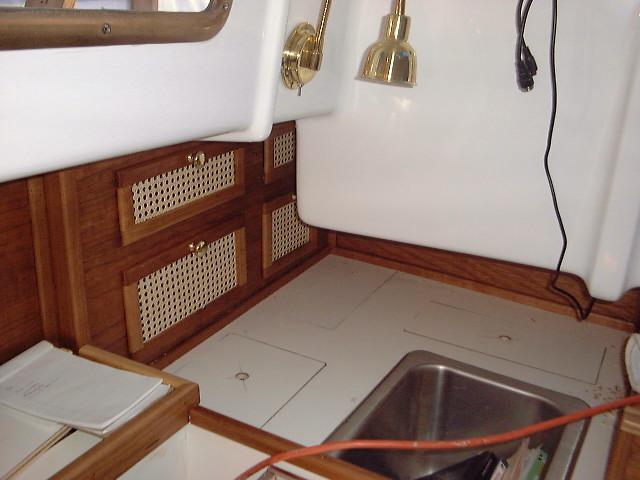 There
are more doors in the galley area, which are pretty much he same. However,
the after two doors over the counter are sort of buried in the narrow space between
the cabinets and the inside of the cockpit molding. Because of this,
traditional hinged doors would not work, so I installed little cleats on the
bottoms of these two doors to hold the bottom in place, and the tops are held
with the same cabinet catches as the rest of the doors. The ugly wires
hanging there in the photo are to the new knotmeter/depthsounder, and will be
properly hidden once I run the transducer cables. I hate visible wires! There
are more doors in the galley area, which are pretty much he same. However,
the after two doors over the counter are sort of buried in the narrow space between
the cabinets and the inside of the cockpit molding. Because of this,
traditional hinged doors would not work, so I installed little cleats on the
bottoms of these two doors to hold the bottom in place, and the tops are held
with the same cabinet catches as the rest of the doors. The ugly wires
hanging there in the photo are to the new knotmeter/depthsounder, and will be
properly hidden once I run the transducer cables. I hate visible wires!
|
|
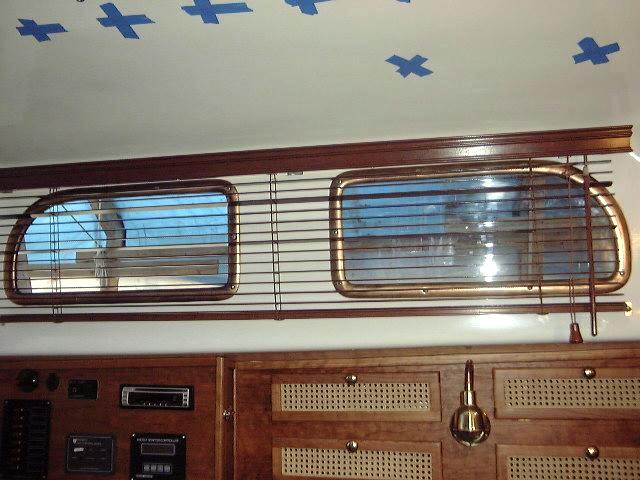 We
decided to cover the large ports with some cherry finish wood blinds.
Curtains never seem to work well, and the ports beg to be covered. We
ordered the custom blinds--54" long by 13" high. They feature
1" wood slats. I installed the blinds with some short screws into the
liner, and modified the valance slightly by moving the attaching clips lower on
the back so that the valance would sit up a little higher than normal, which
suits this installation better. To keep the blinds from swinging, I
installed hold-down clamps at the bottom edge. The blue crosses in the
photo are tape over some epoxy-filled holes in the overhead for the sea hood
installation. Obviously, the tape will be removed later. We
decided to cover the large ports with some cherry finish wood blinds.
Curtains never seem to work well, and the ports beg to be covered. We
ordered the custom blinds--54" long by 13" high. They feature
1" wood slats. I installed the blinds with some short screws into the
liner, and modified the valance slightly by moving the attaching clips lower on
the back so that the valance would sit up a little higher than normal, which
suits this installation better. To keep the blinds from swinging, I
installed hold-down clamps at the bottom edge. The blue crosses in the
photo are tape over some epoxy-filled holes in the overhead for the sea hood
installation. Obviously, the tape will be removed later.
|
|
After nearly a year of construction since the
initial application, the paint on the settees was pretty beat up, stained and
scarred. I applied one final coat of Bilgekote--which is what I originally
used--to freshen it up.
Check out the new cabin sole here.
|
|
FORWARD
CABIN
 I
covered
the bulkhead at the aft end of the vee berth with satin white Formica (see head
page for details on the process). This will eliminate maintenance in
the form of painting, and looks clean and fresh. Some trim pieces are required to cover the gaps along the edges, which
were applied after the fabric headliner is installed. I
covered
the bulkhead at the aft end of the vee berth with satin white Formica (see head
page for details on the process). This will eliminate maintenance in
the form of painting, and looks clean and fresh. Some trim pieces are required to cover the gaps along the edges, which
were applied after the fabric headliner is installed.
Follow this
link to see the trim details on the inside of the forward hatch.
|
|
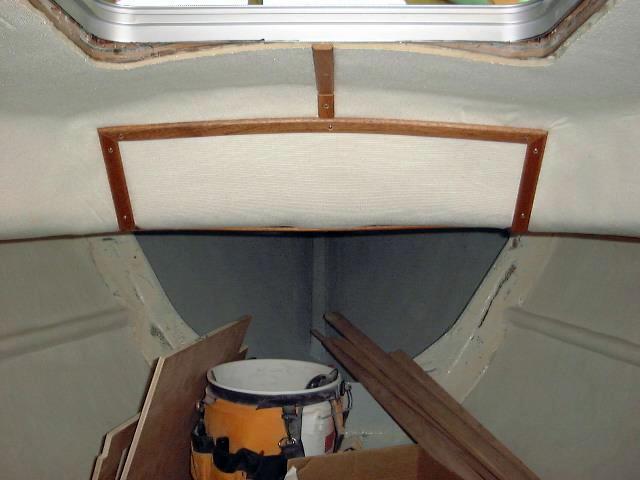
 I
milled a number of 1/4" x 3/4" mahogany trim pieces, with one edge
rounded over with a 1/4" bit, and prefinished them with three coats of tung
oil. I used these pieces to cover all the rough edges and seams
between the Formica-clad bulkhead and fabric liner in the vee berth. I
installed the trim with a combination of hot melt glue and #4 x 1/2"
stainless screws, cutting the pieces to fit around the corners as I went.
It was easy to dab more tung oil on any cut ends or seams where the finish had
been removed. There is a teak fiddle (original) that will be installed
over the raw plywood edge of the shelf in the photo, but it had not yet been
installed when the photo was taken. I
milled a number of 1/4" x 3/4" mahogany trim pieces, with one edge
rounded over with a 1/4" bit, and prefinished them with three coats of tung
oil. I used these pieces to cover all the rough edges and seams
between the Formica-clad bulkhead and fabric liner in the vee berth. I
installed the trim with a combination of hot melt glue and #4 x 1/2"
stainless screws, cutting the pieces to fit around the corners as I went.
It was easy to dab more tung oil on any cut ends or seams where the finish had
been removed. There is a teak fiddle (original) that will be installed
over the raw plywood edge of the shelf in the photo, but it had not yet been
installed when the photo was taken.
|
|
 I
also trimmed out some seams on the cabin trunk and overhead where I had been
unable to avoid them during the installation of the fabric. While a
seamless appearance would have been nice, the finished mahogany looks good in
place over the seams. I
also trimmed out some seams on the cabin trunk and overhead where I had been
unable to avoid them during the installation of the fabric. While a
seamless appearance would have been nice, the finished mahogany looks good in
place over the seams.
We
are modifying the vee berth to make it a more comfortable and useful berth for
the coastal cruising we plan. The modifications include filling in the Vee
and creating a couple storage drawers in the space created.
|
|
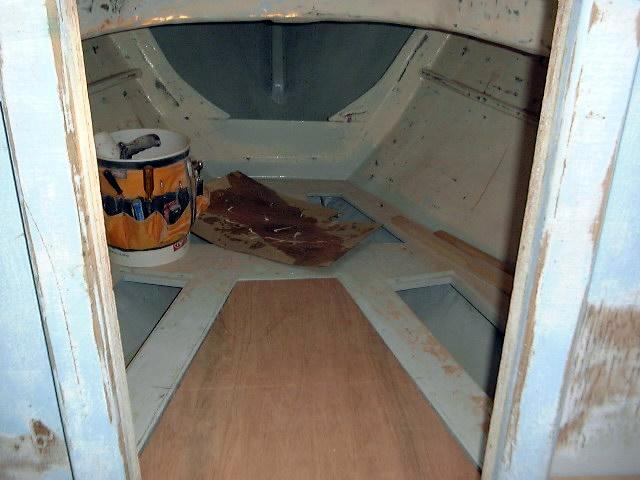 Filling in the
vee was a simple matter of installing hardwood cleats on the old vee berth
plywood and cutting a couple pieces of 1/2" plywood to fit the gap. I
cut this in two pieces, which will allow the aftermost piece to be permanently
installed over the new drawers, while the forward piece, located immediately
over the old seat, will be easily removable for access to the water tank beneath
the seat. As of this writing, the plywood is loosely installed as I
continue work on the drawer concept. To make the new filler pieces easily
removable for access to the water tank, some valuable storage spaces, and the
drawer frames, I will install some simple latches to hold them in place. Filling in the
vee was a simple matter of installing hardwood cleats on the old vee berth
plywood and cutting a couple pieces of 1/2" plywood to fit the gap. I
cut this in two pieces, which will allow the aftermost piece to be permanently
installed over the new drawers, while the forward piece, located immediately
over the old seat, will be easily removable for access to the water tank beneath
the seat. As of this writing, the plywood is loosely installed as I
continue work on the drawer concept. To make the new filler pieces easily
removable for access to the water tank, some valuable storage spaces, and the
drawer frames, I will install some simple latches to hold them in place.
|
|
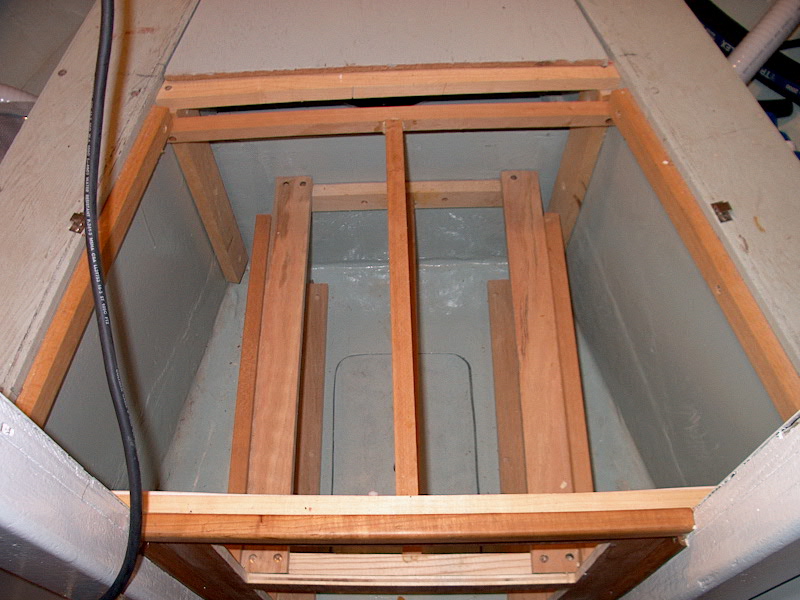
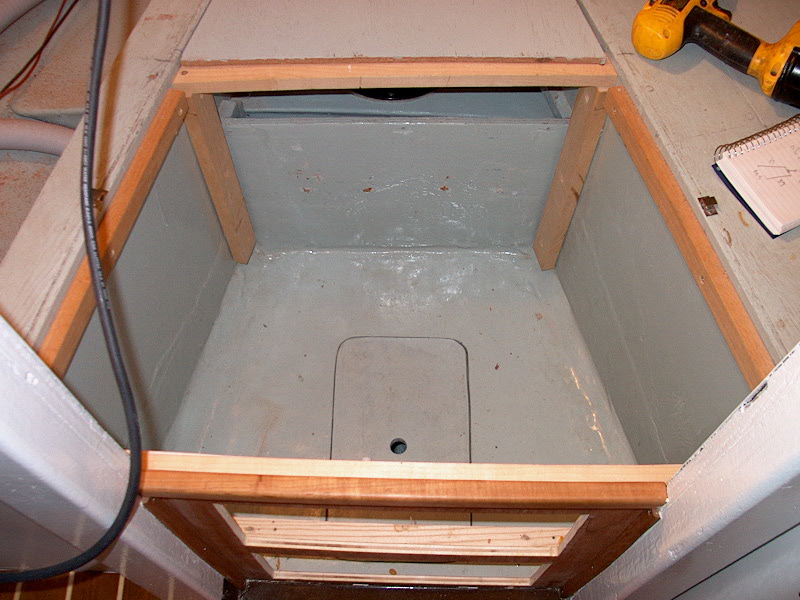
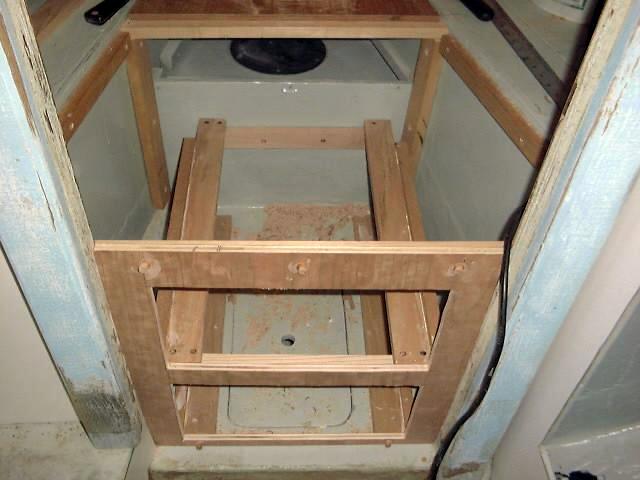 To
begin the drawer frame
construction, I installed a piece of cherry plywood, pre-cut with two openings, vertically at
the end of the vee berth nearest the head. I screwed some hardwood cleats
to the surrounding cabinetry as necessary, and screwed the plywood to the
cleats. Then, I cut some oak strips to length and installed two sets of
drawer runners--upper and lower. There is another piece of oak along each
outside edge of the runners to help contain the drawer, and a final piece above
each drawer opening to keep the drawer from tipping when it is pulled out.
All these various pieces were screwed in place with stainless screws. Note
that the framework still allows access to the bilge hatch beneath, either
through the lower drawer opening or by removing both drawers and the plywood v
berth filler piece. To
begin the drawer frame
construction, I installed a piece of cherry plywood, pre-cut with two openings, vertically at
the end of the vee berth nearest the head. I screwed some hardwood cleats
to the surrounding cabinetry as necessary, and screwed the plywood to the
cleats. Then, I cut some oak strips to length and installed two sets of
drawer runners--upper and lower. There is another piece of oak along each
outside edge of the runners to help contain the drawer, and a final piece above
each drawer opening to keep the drawer from tipping when it is pulled out.
All these various pieces were screwed in place with stainless screws. Note
that the framework still allows access to the bilge hatch beneath, either
through the lower drawer opening or by removing both drawers and the plywood v
berth filler piece.
The size and
construction of the drawer frames allows some small, trapezoidal storage areas
on either side, outboard of the drawer units. To access these, I will
install the plywood top with latches of some sort.
|
|
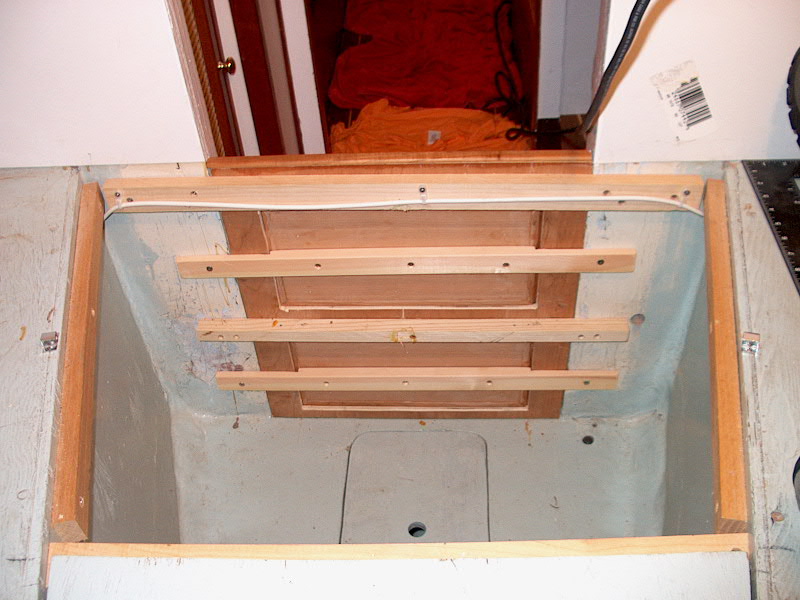
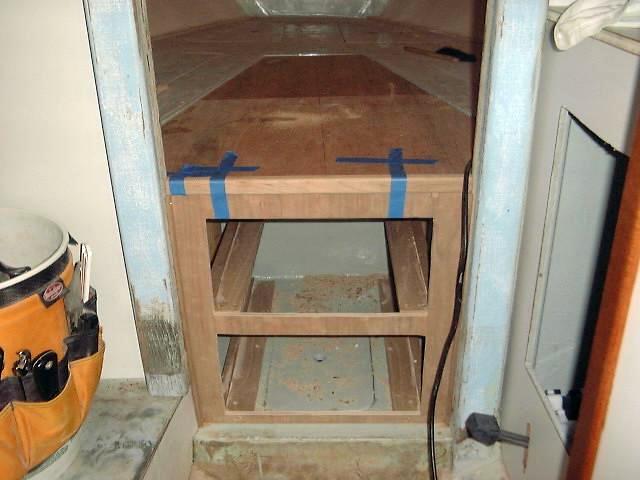 I
installed trim pieces to cover the edges where the plywood front met the
bulkhead, and a third piece at the top to cover the plywood end grain, and
plugged any screwholes with bungs. The blue tape in the photo is clamping
the top trim piece on while the glue dries. Note that the awful light blue
paint on the oak deck beam supports will soon be gone, covered with fresh
white. I
installed trim pieces to cover the edges where the plywood front met the
bulkhead, and a third piece at the top to cover the plywood end grain, and
plugged any screwholes with bungs. The blue tape in the photo is clamping
the top trim piece on while the glue dries. Note that the awful light blue
paint on the oak deck beam supports will soon be gone, covered with fresh
white.
|
|
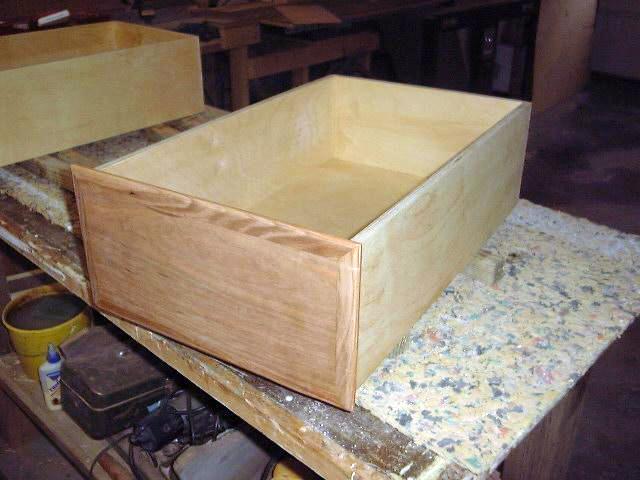 I
built two drawers of 12mm Baltic birch plywood, a multi-layer, void-free
cabinet grade material. I connected the four sides with simple rabbet
joints, and installed the bottom in a dado cut near the bottom of each side and
end piece. I glued the assemblies together with waterproof glue. I
built two drawers of 12mm Baltic birch plywood, a multi-layer, void-free
cabinet grade material. I connected the four sides with simple rabbet
joints, and installed the bottom in a dado cut near the bottom of each side and
end piece. I glued the assemblies together with waterproof glue.
When the basic
boxes were made, I made two cherry drawer fronts, which I screwed to the boxes
from inside. After varnishing to match the other interior trim, I
installed some brass handles.
Then, I finished
up the varnish on the face frame of the cabinet, and installed the drawers in
place. The photo below shows the finished product.
|
|
 The
drawers were very handy for clothes storage, and swallowed quite a bit of
material. However, it looks like we're going to be removing the drawers to
make way for a decent holding tank. It will be easier to find storage room
for clothes than for the stuff that goes into a holding tank. I think that
I can keep the look the same from the outside--I'll just remove the cherry
drawer fronts from the boxes and install them in place on the face frame with
some cleats screwed from the inside. Or, if space and time allow, maybe
I'll be able to build some little storage areas there or something. See below
for what I did. The
drawers were very handy for clothes storage, and swallowed quite a bit of
material. However, it looks like we're going to be removing the drawers to
make way for a decent holding tank. It will be easier to find storage room
for clothes than for the stuff that goes into a holding tank. I think that
I can keep the look the same from the outside--I'll just remove the cherry
drawer fronts from the boxes and install them in place on the face frame with
some cleats screwed from the inside. Or, if space and time allow, maybe
I'll be able to build some little storage areas there or something. See below
for what I did.
|
|
  To
begin, I removed the drawers and unscrewed the solid cherry drawer fronts--six
screws in each. I put these aside for later use and removed the drawer
boxes to my shop where they'll find eventual use. Next, I started
unscrewing the various pieces of the drawer frame and slides. These are
mostly just secured with stainless steel screws, but a few of the pieces were
glued together--nothing that my deadblow mallet couldn't handle. I
removed all the pieces--I had to drill two bungs out of the plywood face frame to
remove the bottom two drawer runners, which I had screwed into. I'll
rebung these holes later. To
begin, I removed the drawers and unscrewed the solid cherry drawer fronts--six
screws in each. I put these aside for later use and removed the drawer
boxes to my shop where they'll find eventual use. Next, I started
unscrewing the various pieces of the drawer frame and slides. These are
mostly just secured with stainless steel screws, but a few of the pieces were
glued together--nothing that my deadblow mallet couldn't handle. I
removed all the pieces--I had to drill two bungs out of the plywood face frame to
remove the bottom two drawer runners, which I had screwed into. I'll
rebung these holes later.
|
|
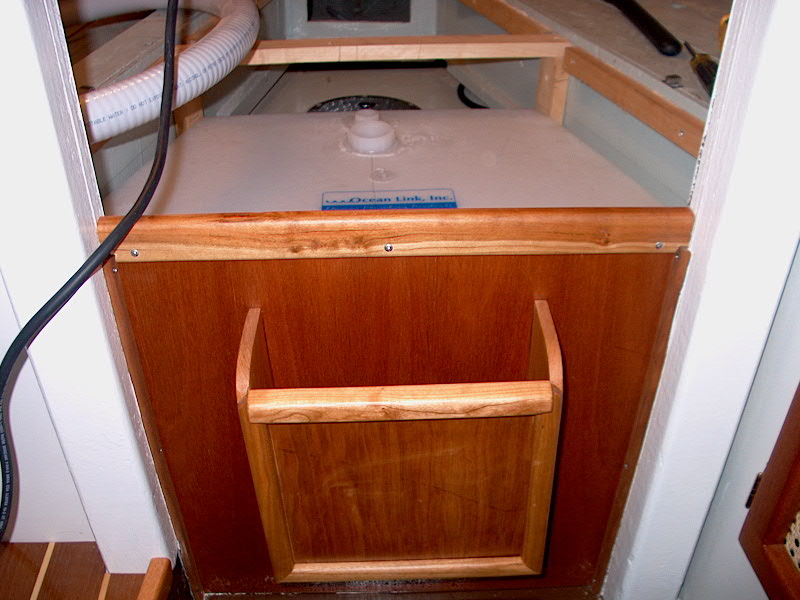
 Removal of all this
paraphernalia left the
space, once again, wide open and ready to accept the holding
tank. First, though, I milled a couple cleats out of some scrap
lumber to secure the drawer fronts back in place. For now, this is the
easiest way to make it look like we never touched the area, and the false drawer
fronts will still look good. Future plans may include replacing the drawer
fronts with a magazine rack--but that will come later. Removal of all this
paraphernalia left the
space, once again, wide open and ready to accept the holding
tank. First, though, I milled a couple cleats out of some scrap
lumber to secure the drawer fronts back in place. For now, this is the
easiest way to make it look like we never touched the area, and the false drawer
fronts will still look good. Future plans may include replacing the drawer
fronts with a magazine rack--but that will come later.
I screwed through the cleat into the backs of
the drawer fronts and into the bulkhead/compression posts on either side.
To make the braces fit tightly against the drawer and outer framing, I had to
notch the ends of each piece, taking out about 1/4" of the thickness of the
cleat. With that, the drawer fronts were once again secured in place, and
the openings are nicely finished off. Conversion complete! Or so it
seemed...
|
|
UPDATE!
3/4/02 Well, I decided to build a magazine rack for the area where
the false drawer fronts are. Of course, this meant that I had to replace
the plywood panel, so I removed the old one--I had to drill out the bungs and
unscrew the panel from the front, plus I had to remove the cleats behind that
were holding the false drawer fronts in place. When all the screws were
out, the panel came out easily. I gave the panel, drawers, cleats, and
drawer fronts to a friend for use in his Triton.
 Next,
I cut a new plywood panel to fit the opening, and finished it to match the rest
of the interior woodwork. Once the varnish was dry, I installed the
panel by screwing into it from behind--thus keeping any screw holes off the
front, finished surface. Don't ask me why I didn't install the original
panel this way. Who knows. Next,
I cut a new plywood panel to fit the opening, and finished it to match the rest
of the interior woodwork. Once the varnish was dry, I installed the
panel by screwing into it from behind--thus keeping any screw holes off the
front, finished surface. Don't ask me why I didn't install the original
panel this way. Who knows.
Please click here
to see the magazine rack.
Finally, I installed a
piece of solid cherry trim at the top of the new panel to cover the plywood edge
grain. It was a piece I had left over from the main reconstruction
project; it only required finishing, which I did in the shop
beforehand. I cut it to fit and notched the ends slightly to
accommodate the vertical panel trim beneath, and installed it with three small
screws.

|
|
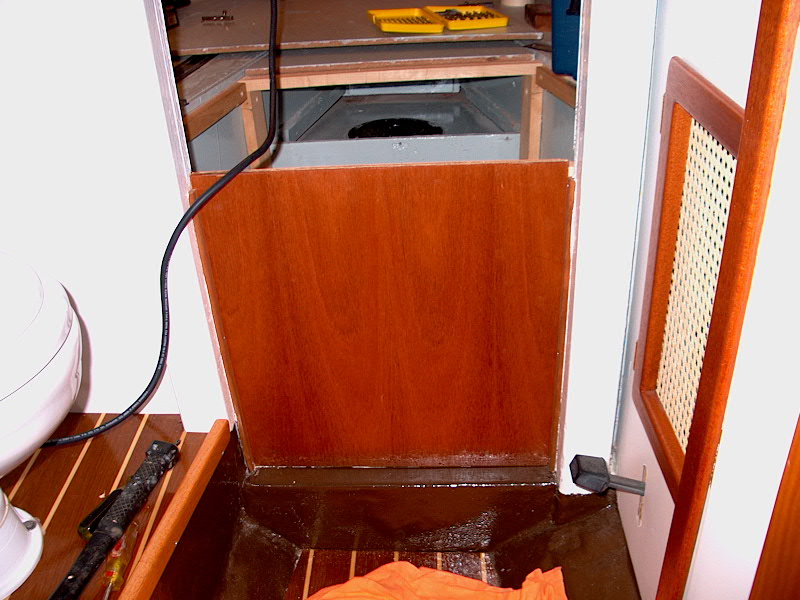
  Because
I removed the old door trim from the V-berth passageway at the beginning of
the p roject, there was some exposed plywood end grain visible even during our
first season--I just never got around to installing any trim. I wanted
some trim that would cover the 3/4" thickness of the plywood, as well as
wrap around the corner to cover the Formica edge and help hold that in
place. It also needed to be of minimal imposition to the doorway, since
the old trim was thick and substantially restricted movement in and out.
We got used to having no trim, and didn't want to really lose any space.
So, I needed some thin trim. I milled the necessary pieces out of
mahogany, and cut a deep dado that left about 1/4" of material remaining to
cover the inside of the door opening. I finished it with several coats of
tung oil to match the other mahogany trim on board, and installed the two pieces
with screws. Because
I removed the old door trim from the V-berth passageway at the beginning of
the p roject, there was some exposed plywood end grain visible even during our
first season--I just never got around to installing any trim. I wanted
some trim that would cover the 3/4" thickness of the plywood, as well as
wrap around the corner to cover the Formica edge and help hold that in
place. It also needed to be of minimal imposition to the doorway, since
the old trim was thick and substantially restricted movement in and out.
We got used to having no trim, and didn't want to really lose any space.
So, I needed some thin trim. I milled the necessary pieces out of
mahogany, and cut a deep dado that left about 1/4" of material remaining to
cover the inside of the door opening. I finished it with several coats of
tung oil to match the other mahogany trim on board, and installed the two pieces
with screws.
|
|
CUSHIONS
My wife, Heidi, did a great job
building four cushions for the interior. We chose a rich blue fabric from
a local shop, and purchased 4" foam for the settee cushions and huge
6" foam for the vee berth. I made patterns of the areas, which she
then translated into beautiful cushions. They look great, and really
complement the interior woodwork (if I do say so myself).
Sorry--no detailed descriptions
of the cushion-building process!
Here are some pictures of the
finished interior...
|
|
Salon Port
|
|
Salon Starboard (looking aft)
|
|
Salon port (looking aft)
|
|
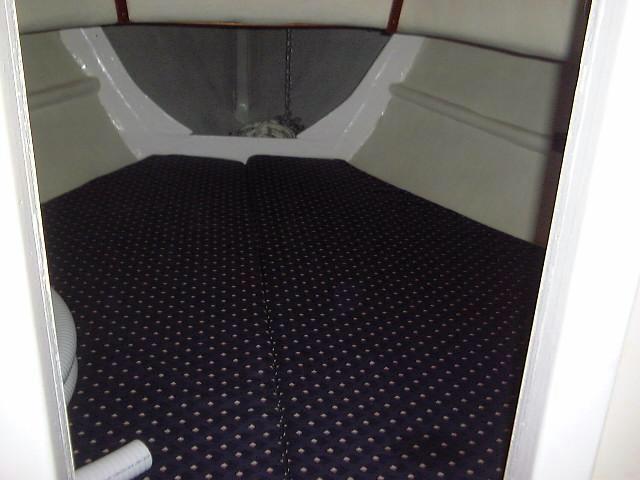
Vee berth
Please click here
to see the work related to finishing off that forward bulkhead, which I did in
the spring of 2002 after living with it as is for one season.
|
|
Check out the
completed interior for more photos. |
|