|
Ah yes, batteries! So
seeming magical in their performance until the day you are unknowingly stranded
with a dead battery bank. What went wrong? How do you avoid
it? How large should your batteries be? And how should you set up
the system for more efficiency, proper charging, and satisfactory capacity?
Well, I'm not going to answer all
these questions in the specific sense--check out the resources
on the battery charging page for more information on the specifics--they'll
explain it better than I could. What I will do, however, is pass along
details of my own installation and the thought process behind it. Later,
once Glissando is in the water and being used, I'll report on the
operation and success of the installed system.
First, I laid out what electrical
equipment I planned to have on board, and totaled up the expected daily usage of
the gear. This is a worst-case scenario, and certain usages cancel out
others for practical purposes. For example, if the running lights are on,
it is unlikely that the cabin lights are needed, and the GPS and instrument
usage may be higher or lower depending on whether day trips or overnight trips
are being made. However, for the purposes of estimation, the totals are
calculated without factoring this in. There may be other usages, such as
the bilge pump, AC usage through an inverter, etc., but these are either not
estimated or are so insignificant that they were not factored in to the expected
totals. The additional capacity of the batteries is more than
sufficient to take care of these small additional needs.
| Device |
Power Usage (Amps) |
Hours Use per Day |
Total Draw |
| Cabin Lights (Halogen) |
.4 |
3 |
8 lights @ 3hrs=9.6 amps |
| Running Lights |
3 |
8 |
24 amps |
| Masthead/Anchor Light |
1 |
8 |
8 amps |
| Steaming Light |
1 |
8 |
8 amps |
| Stereo |
1 |
3 |
3 amps |
| Engine Starter |
150 |
.02 |
3 amps |
| GPS/Instruments |
.75 |
5 |
3.75 amps |
The total usage from the above chart is 59.35
amps per day. Because the general rule is to provide a battery capacity at least double that
of your expected usage, we needed at least a 120 amp-hour battery bank.
Plus, you want additional capacity since you shouldn't dray deep cycles batteries
down lower than about 50% of full charge. Of course, we wanted additional
capacity to handle the inevitable additions that will occur over the years, plus
the ability to go more than a day between engine charges. In
practice, I expect the actual usage will be even less than the above, especially
since we don't plan on many overnight trips. This means that the running
light and steaming light usage can be effectively zeroed out.
After much thought, research,
pricing, etc., I decided to try a single house battery bank made up of two
Trojan T-105 golf cart batteries. These are 6-volt batteries, so two are
wired in series for 12 volts. The batteries have a rating of 220
amp-hours, which is excellent and comparable to an 8D 12-volt battery. With 220
amp-hours available we should be able to do at least between 2 and 3 days between
charges, using the available capacity between 50% and 90%. With the added
convenience of the installed energy monitor, we will always know exactly when
charging is necessary. It will be nice to be at anchor and not have to
worry about charging the batteries every day. The
benefits to the golf cart batteries are many:
-
Initial cost is substantially
lower (about $65/battery = $130, vs. over $400 for the 8D)
-
The divided weight of the two
separate batteries is manageable; an 8D is virtually impossible to move once
it's in place.
-
Even if the 6 volt batteries
have fewer discharge cycles available than a gel or AGM battery,
replacement is inexpensive enough that they still provide a better value for
the power supplied.
-
It will be easy and
inexpensive to double the battery capacity by purchasing two more T-105s, if
such capacity is needed.
In addition to the house bank, I
will also install a single engine starting battery, probably a traditional Group
24 automotive type. Because of the regulation and monitoring system I have
installed, the starting battery will automatically be isolated at all times,
except when the engine is running. This will prevent any possibility of
the starting battery being inadvertently drawn down by house power during the
night, and it will always be ready to start the engine. This system
eliminates the traditional useless 1-2-all switch seen so frequently and
replaces it with an emergency parallel on-off switch to tap the house bank for
the engine starting if necessary for whatever reason.
I plan to install the two Trojans
in the starboard cockpit locker, just aft of the galley bulkhead. I'll
locate the starting battery opposite to port. Hopefully, this weight
distribution will balance out the icebox (on the port side) when it's full of
ice., to the extent necessary. The batteries will be installed in custom
boxes that are yet to be built, and connected into the electrical system as
necessary. I purchased the two T-105s and a midrange Trojan group 24
starting battery at Ed's Batteries in Westbrook, Maine.
To make
installation easier, and to comply with all the various requirements for
battery restraint and safety, I hoped to use one of the nice Blue Seas battery
boxes. I ordered one to fit two golf cart batteries. However,
without access from directly above (which would entail another large hatch in
the cockpit seat, which I wish I had thought of adding when I had the chance) I
just could not get the box to fit in the space available. The curvature of
the hull is too extreme in the cockpit lockers. The batteries are not
particularly large in and of themselves, but the box, with its molded channels
and feet, was somewhat more cumbersome. Try as I might, I could not get it
to work. Oh well.
|
|
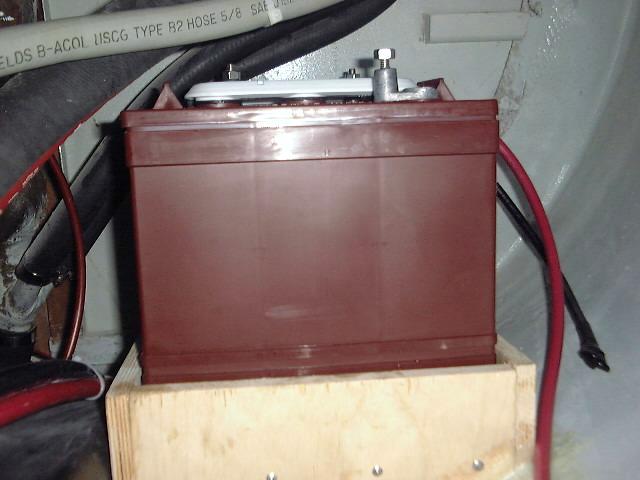 I ended up constructing a pretty
simple platform out of plywood. I built one for each side--the starting
battery, while residing in a standard Attwood battery box, still needed a level
platform on which to sit. The platform for the house batteries consists of
a piece of plywood cut to fit the two batteries side by side, with a 3"
high edge banding of plywood all around. The forward end of the platform
rests on a cleat that is screwed to the aft galley bulkhead (or the forward
locker bulkhead), and the after end features a plywood gusset that I shaped to
fit the curvature of the hull. Both ends are set in epoxy and bonded into
place. Later, I'll paint everything out with Bilgekote, but there's no
time now. It required some gymnastics to be able to reach the forward
bulkhead to attach the cleats--it's just too far to quite reach without hanging
upside down and half in the locker. To make the job easier, I predrilled
for screws every couple inches--to make sure there would always be a screw hole
where I wanted it--and applied double-stick tape to the back before reaching up
through my cockpit sole access hatch to press it into place (I found the access
was easier for this step through the hatch, rather than through the top of the
locker. I tried it both ways...). Then, I drilled a pilothole
through the pre-drilled holes into the plywood of the bulkhead, and, taping a
screw to the end of my drill driver, I installed screws. A simple job made
difficult by poor access...isn't that what boats are all about? I ended up constructing a pretty
simple platform out of plywood. I built one for each side--the starting
battery, while residing in a standard Attwood battery box, still needed a level
platform on which to sit. The platform for the house batteries consists of
a piece of plywood cut to fit the two batteries side by side, with a 3"
high edge banding of plywood all around. The forward end of the platform
rests on a cleat that is screwed to the aft galley bulkhead (or the forward
locker bulkhead), and the after end features a plywood gusset that I shaped to
fit the curvature of the hull. Both ends are set in epoxy and bonded into
place. Later, I'll paint everything out with Bilgekote, but there's no
time now. It required some gymnastics to be able to reach the forward
bulkhead to attach the cleats--it's just too far to quite reach without hanging
upside down and half in the locker. To make the job easier, I predrilled
for screws every couple inches--to make sure there would always be a screw hole
where I wanted it--and applied double-stick tape to the back before reaching up
through my cockpit sole access hatch to press it into place (I found the access
was easier for this step through the hatch, rather than through the top of the
locker. I tried it both ways...). Then, I drilled a pilothole
through the pre-drilled holes into the plywood of the bulkhead, and, taping a
screw to the end of my drill driver, I installed screws. A simple job made
difficult by poor access...isn't that what boats are all about?
|
|
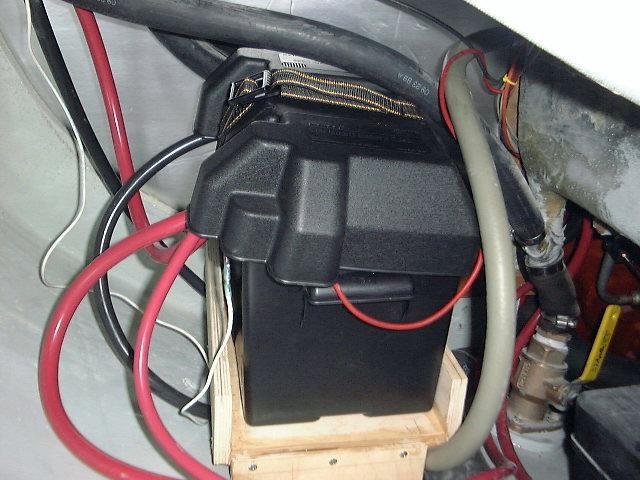 The starting battery platform is
similar, but only features the edge banding on two sides. I left the aft
end open to allow me to slide the box in and out, and the box is restrained by
its own strap anyway. Clearance is very tight beneath the cockpit seat and
sidedeck drain hoses on both sides. The starting battery platform is
similar, but only features the edge banding on two sides. I left the aft
end open to allow me to slide the box in and out, and the box is restrained by
its own strap anyway. Clearance is very tight beneath the cockpit seat and
sidedeck drain hoses on both sides.
I made up a pair of jumpers
between the two 6-volt T-105s. Of course, stupidly, I forgot that you only
need one jumper for batteries in series--the positive lead from the first
battery gets connected to the negative lead of the second, while the main ground
is attached to the negative of the first battery, and the main feed is attached
to the positive of the second battery. I hooked them up wrong at first,
and was sorely disappointed when there were no signs of life in my electrical
system. After some head scratching and a major "DUH!" heard
'round the land, I figured out my problem and quickly changes the cables around
as necessary. The system sprang into life, happily, and I continued
kicking myself in punishment for my dumb move. I held the batteries down
with some heavy-duty rubber bungees, and covered the positive terminals with
rubber boots for protection.
|
