|
Raw Water Cooling Pump
This page was last
updated on 21 March 2002.
Through a
brilliant feat of design and engineering, the fine folks at Yanmar decided that
it would be entirely inconvenient, difficult, and--basically--unsafe if they
cleverly installed the raw water pump on the engine so that the face place faces
backwards. My hat is off to them. At least the pump is located at
the front of the engine where it can be reached, but sheesh...why did they
decide to install it so that you can't service it without removing the whole
pump? May such marvels never cease.
Anyway, for this
reason (although I would have installed one anyway, regardless of the pump
orientation) I decided to install a Speed
Seal safety cover on the raw water pump. This is a truly clever
design, intended to allow rapid removal of the face plate on the pump for
inspection or emergency purposes. From all I have read, these are well
made and actually work as intended. They feature a custom cover plate,
fitted with an o-ring gasket, that is secured over the top of your existing pump
with knurled thumbscrews--making it easy to remove. Making it even easier
is the fact that only a couple of the screws need be completely removed--the
cover is slotted on one side, so that the opposite screws need only be loosened,
and the plate can slide right off. Ingenious.
I filled out the
order form and faxed it to England, where Speed Seal is located. Almost
immediately, I received a phone call from a very pleasant chap (Alex Parker) who
needed some more information about my particular water pump. Apparently,
the water pump design on the 2GM20F was recently changed, and he wanted to
confirm which pump I had. I didn't have the information he needed right at
hand, so I went out to the boat to remove the pump and check. I would have
had to remove the pump to install the new Speed Seal anyway, so no time like the
present.
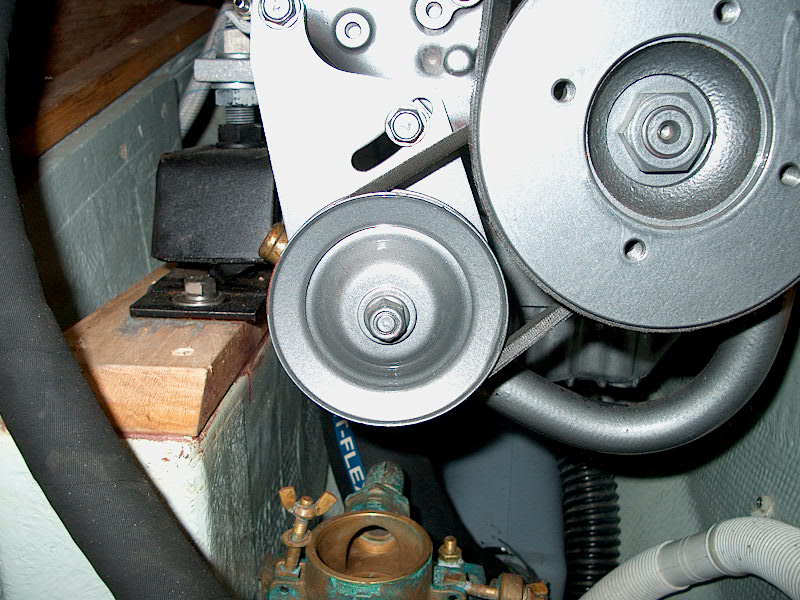 Removing
the pump (that's it behind the small pulley on the left in the photo) was easy,
although it still would be a better design if you didn't have to unbolt it to
check the impeller. There are two bolts that hold the pump in place, one
of which is installed through an adjustment bracket, used to tension the engine
belt that drives the pump. I removed the two bolts and pulled the pump
out. With the pump in hand, I was able to provide Alex with the pump model
number so he could confirm which Speed Seal was the right one. As it
turned out, I have the new style pump (Johnson F4B-903 10 24509-01), which
features its own O-ring on the inside instead of the standard paper
gasket. My service manual, purchased with the engine, does not show
this, so it was an eye opener for me. Apparently, Yanmar didn't see a need
to Removing
the pump (that's it behind the small pulley on the left in the photo) was easy,
although it still would be a better design if you didn't have to unbolt it to
check the impeller. There are two bolts that hold the pump in place, one
of which is installed through an adjustment bracket, used to tension the engine
belt that drives the pump. I removed the two bolts and pulled the pump
out. With the pump in hand, I was able to provide Alex with the pump model
number so he could confirm which Speed Seal was the right one. As it
turned out, I have the new style pump (Johnson F4B-903 10 24509-01), which
features its own O-ring on the inside instead of the standard paper
gasket. My service manual, purchased with the engine, does not show
this, so it was an eye opener for me. Apparently, Yanmar didn't see a need
to  ensure
that the service manual was updated to reflect important changes to the
engine. I wonder what else is wrong. Suffice it to say that I will
be carefully checking all spare parts that I purchase for this engine now,
actually confirming what the part currently on the engine is before ordering the
supposed replacement part. I imagine the standard impeller part number is
incorrect for my pump as well. That would have been a real bummer to find
out in an emergency. Anyway, my new Speed Seal is on its way from England
as we speak. Installation to follow. ensure
that the service manual was updated to reflect important changes to the
engine. I wonder what else is wrong. Suffice it to say that I will
be carefully checking all spare parts that I purchase for this engine now,
actually confirming what the part currently on the engine is before ordering the
supposed replacement part. I imagine the standard impeller part number is
incorrect for my pump as well. That would have been a real bummer to find
out in an emergency. Anyway, my new Speed Seal is on its way from England
as we speak. Installation to follow.
|
|
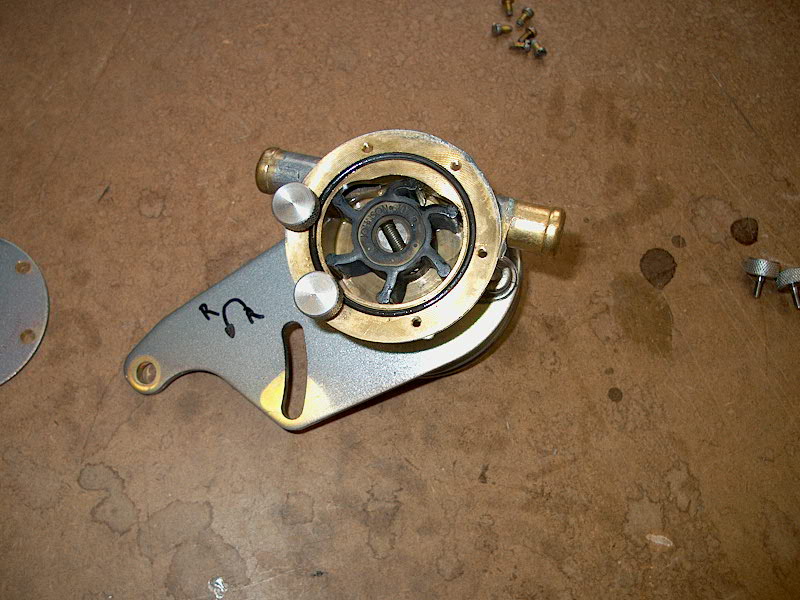
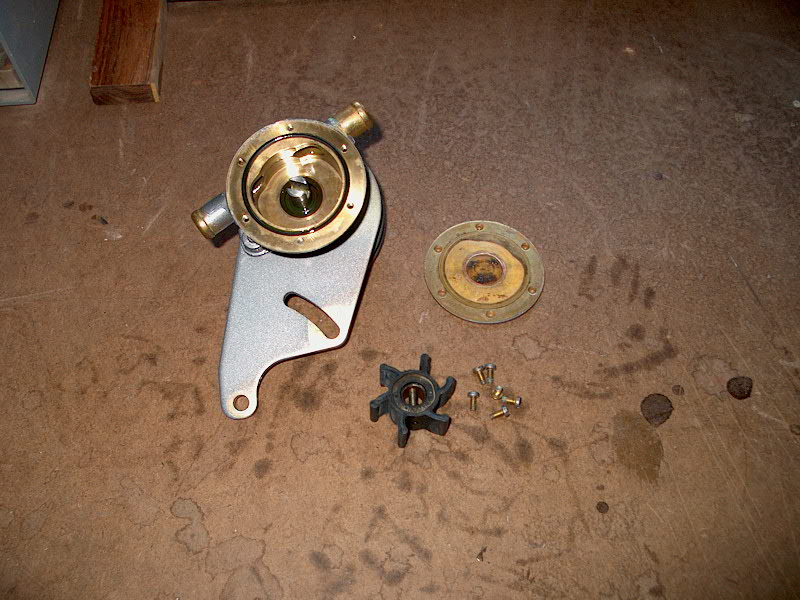 When
I removed the existing cover plate on the raw water pump for inspection (6 tiny
screws), I found that the impeller, which had been in place all winter, would
not spring back to shape when I removed it--the vanes that had been When
I removed the existing cover plate on the raw water pump for inspection (6 tiny
screws), I found that the impeller, which had been in place all winter, would
not spring back to shape when I removed it--the vanes that had been  compressed
at the top of the pump took a few days to regain their normal shape. The
practical problem behind this is that the pump would not likely have worked
properly if I had used it this way--the vanes would not have sprung back against
the bottom of the pump housing. The lesson here is that your impeller
should probably be removed for long-term storage to prevent this "vane memory".
While I have the pump off, I will be installing a brand new impeller (the
Johnson model number for my impeller is 810). The old one looked OK after
a few days, so I'll keep it as a last-ditch spare (I will also have brand-new
spares on board). compressed
at the top of the pump took a few days to regain their normal shape. The
practical problem behind this is that the pump would not likely have worked
properly if I had used it this way--the vanes would not have sprung back against
the bottom of the pump housing. The lesson here is that your impeller
should probably be removed for long-term storage to prevent this "vane memory".
While I have the pump off, I will be installing a brand new impeller (the
Johnson model number for my impeller is 810). The old one looked OK after
a few days, so I'll keep it as a last-ditch spare (I will also have brand-new
spares on board).
|
|
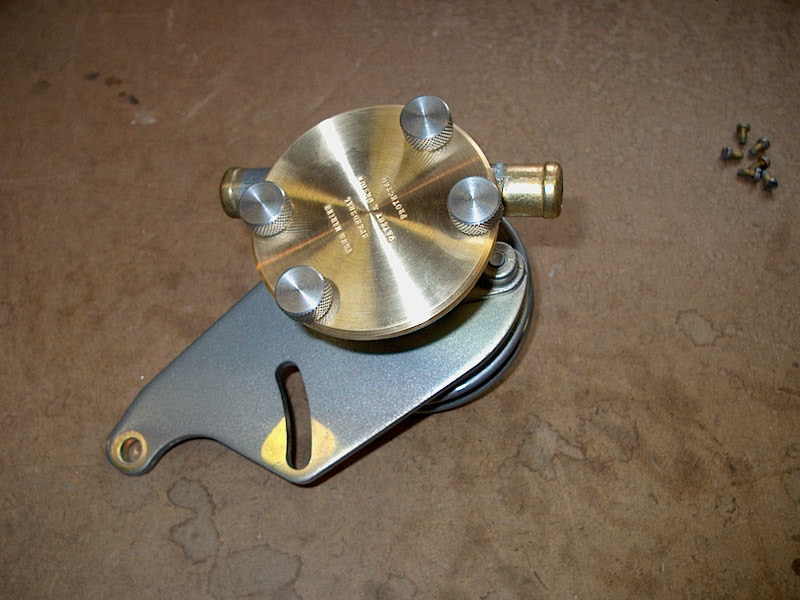
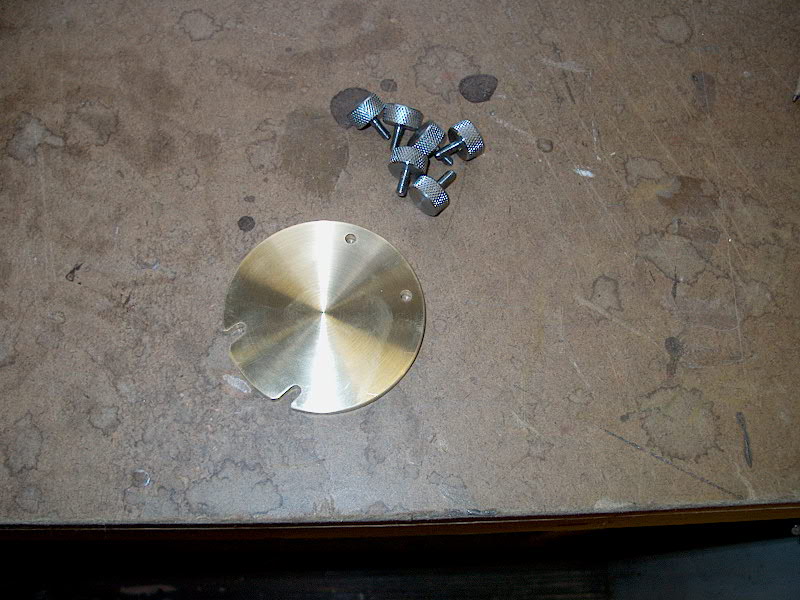 Exactly a week
after I placed my order, the Speedseal came in the mail. It's a nice
looking piece of gear--simple though it is. It's basically a machined
brass plate that is designed to reproduce exactly the original face plate from a
water pump, combined with knurled screws to fasten it. The picture shows
the inside of the Speedseal--the side that the impeller will bear
against. I ordered extra screws along with it--it only needs four, but I
figured it would be possible to lose one somewhere along the way, so it made
sense to order spares. Exactly a week
after I placed my order, the Speedseal came in the mail. It's a nice
looking piece of gear--simple though it is. It's basically a machined
brass plate that is designed to reproduce exactly the original face plate from a
water pump, combined with knurled screws to fasten it. The picture shows
the inside of the Speedseal--the side that the impeller will bear
against. I ordered extra screws along with it--it only needs four, but I
figured it would be possible to lose one somewhere along the way, so it made
sense to order spares.
Typically, the
Speedseal comes with its own O-ring gasket, which is an additional improvement
for most water pumps as it eliminates the need for an annoying paper
gasket. As mentioned above, however, my Johnson pump on the Yanmar already
had an O-ring gasket, so the Speedseal is just a basic smooth plate designed to
seal against the existing O-ring.
Final
installation calls for some waterproof grease on the threads and gasket.
For demonstration purposes, I reassembled the pump without the grease for the
moment. I'm awaiting a delivery of some new impellers--might as well
replace the one that's in there while the pump is apart (saving the
"old" one as a spare) and will complete assembly and replace the pump
on board once they arrive. I sprung the extra dollar each for the Globe
blue impellers that can run dry for 15 minutes without damage. More
details to follow at that point--along with a discussion on whether or not it
will be feasible now (because of the Speedseal) to change the impeller without
removing the pump from the engine.
|


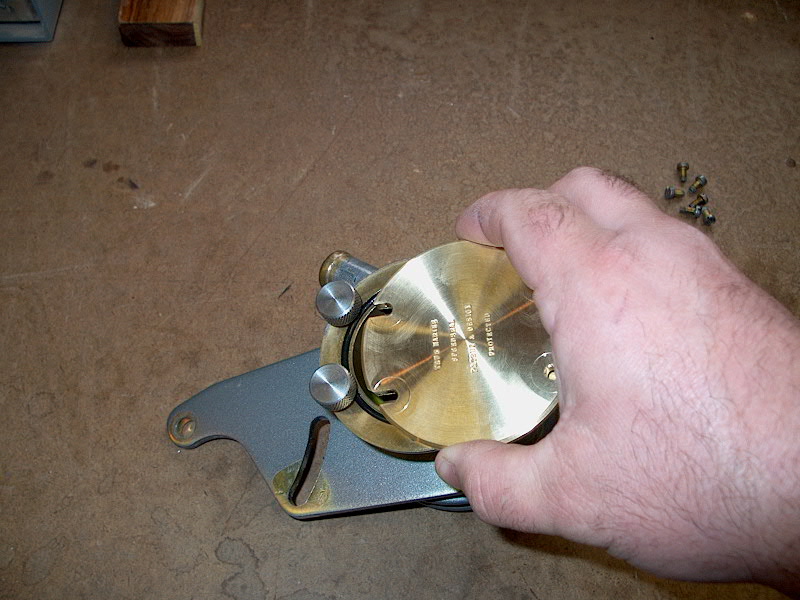
 I
have to say I'm impressed so far--amazing how such a simple thing can be so
precise. The new Speedseal fits the pump beautifully, and seems to seal
well. The four knurled screws are very easy to turn, and easy to tighten
properly--which had been a concern of mine. But the diameter of the knobs
is large enough to get a good grip on, and they crank right down. I'm sure
that the new cover plate will seal properly when water is introduced--something
just feels right about the way the screws thread down.
I
have to say I'm impressed so far--amazing how such a simple thing can be so
precise. The new Speedseal fits the pump beautifully, and seems to seal
well. The four knurled screws are very easy to turn, and easy to tighten
properly--which had been a concern of mine. But the diameter of the knobs
is large enough to get a good grip on, and they crank right down. I'm sure
that the new cover plate will seal properly when water is introduced--something
just feels right about the way the screws thread down.