|
Rubrail
This page was last updated
on 2 January 2004.
|
|
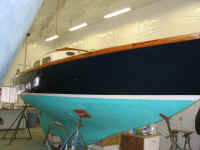
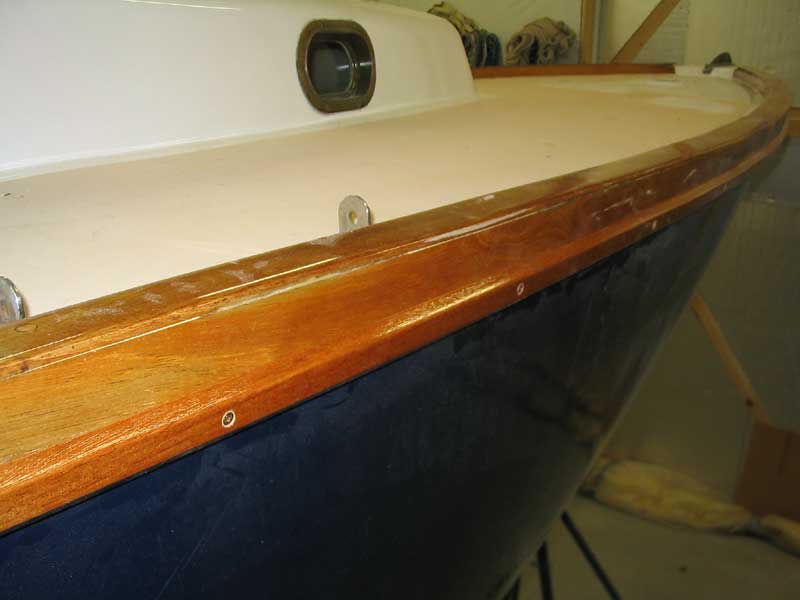
The mahogany toerail I added during the
original restoration made a vast aesthetic and functional improvement to
the boat, but from the onset I knew it wasn't finished. The outer
board, against the hull, looked decent, but it cried out for some trim
at the bottom edge. What it needed was an "official"
rubrail, which would not only trim off the edge and make the toerail
look finished, but would also help provide a modicum of protection
against piers or other boats.
After putting off the
project for some time, I procrastinated for another year or so before
finally, with the benefit of having the boat warmly ensconced in the
boat barn for the winter, attacking the visualization and construction
of a rubrail.
I envisioned a rail
capped with a bronze (or, as it turned out, brass) half oval strip, so
my first step was to determine which size half oval I wanted to
use. I consulted catalogs and eventually decided that 3/8"
half oval would be the correct size. With that important,
life-altering decision made, I moved on to conceive the ultimate rubrail
shape. Traditionally, these rubrails take on a trapezoidal shape,
and I saw no reason to stray from this attractive and functional
design. Getting the shape and size just right, however, took
several sketches and card board templates until I had the look I
wanted. With a successful cardboard template, I mocked up a short
length of the rail with a piece of scrap mahogany, making the necessary
cuts on my table saw. (More on this later.) I was pleased
with how the profile looked in the wooden mockup, so I went ahead and
milled the required pieces. |
|
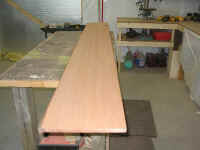
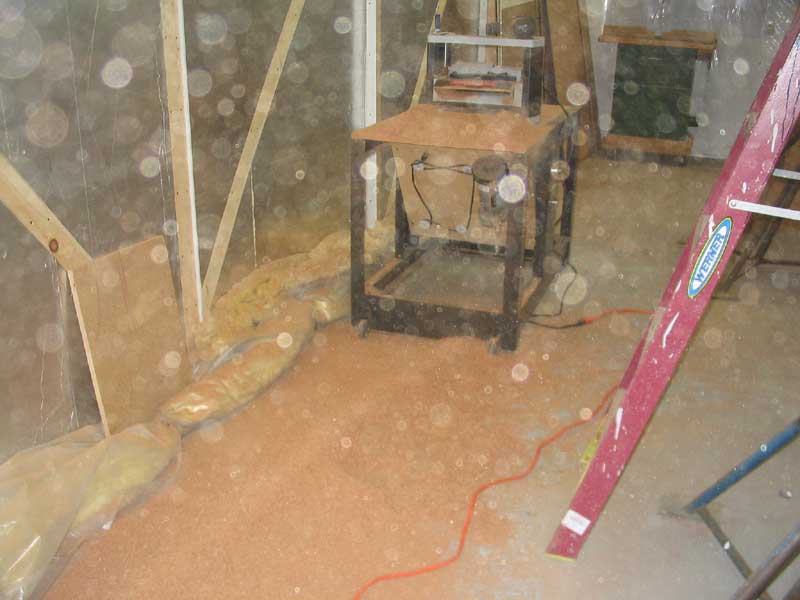
 Milling
was a several-step process, beginning with the thickness planer and a
rough mahogany board about 12" wide and 1" thick. I
planed the board smooth, and then removed material with the planer till
the board was 11/16" in thickness--the overall thickness of my
rubrail. This created huge piles of chips, of course. Milling
was a several-step process, beginning with the thickness planer and a
rough mahogany board about 12" wide and 1" thick. I
planed the board smooth, and then removed material with the planer till
the board was 11/16" in thickness--the overall thickness of my
rubrail. This created huge piles of chips, of course.
|
|
 Next,
I straightened one edge of the board using a long straightedge and
circular saw to cut it, and, with one smooth, straight edge, I moved to
the table saw to cut blanks 1-3/8" in width, exactly the overall
width I needed for the rubrail pieces. Then, I made two cuts that
had the effect of creating a rabbet on the back of the blanks. The
rabbet was designed to allow the rubrail to sit above and partially
cover the existing exterior toerail board, thereby finishing off that
lower edge nicely as well as keeping the rubrail up high enough so that
it didn't add significantly to the width of the varnished rail trim. Next,
I straightened one edge of the board using a long straightedge and
circular saw to cut it, and, with one smooth, straight edge, I moved to
the table saw to cut blanks 1-3/8" in width, exactly the overall
width I needed for the rubrail pieces. Then, I made two cuts that
had the effect of creating a rabbet on the back of the blanks. The
rabbet was designed to allow the rubrail to sit above and partially
cover the existing exterior toerail board, thereby finishing off that
lower edge nicely as well as keeping the rubrail up high enough so that
it didn't add significantly to the width of the varnished rail trim.
|
|
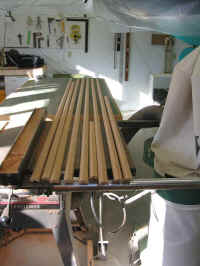 With
the rabbet cut, I completed the millwork by making two angled cuts,
which formed the top and bottom edges of the trapezoidal profile:
30 degrees at the top, and 45 degrees at the bottom. This left me
with a 5/8" wide flat section on the outer face, onto which my
3/8" brass half oval would eventually be secured. Using a
brand new thin kerf blade in my saw left very smooth cut lines, but I
sanded all the pieces lightly with 120 (by machine) and 220 (by hand) to
remove machine marks and to very slightly round the edges on the face of
the pieces. I ended up with 7 pieces of over 8' in length, plus
several shorter pieces--more than enough to complete the job. With
the rabbet cut, I completed the millwork by making two angled cuts,
which formed the top and bottom edges of the trapezoidal profile:
30 degrees at the top, and 45 degrees at the bottom. This left me
with a 5/8" wide flat section on the outer face, onto which my
3/8" brass half oval would eventually be secured. Using a
brand new thin kerf blade in my saw left very smooth cut lines, but I
sanded all the pieces lightly with 120 (by machine) and 220 (by hand) to
remove machine marks and to very slightly round the edges on the face of
the pieces. I ended up with 7 pieces of over 8' in length, plus
several shorter pieces--more than enough to complete the job.
|
|
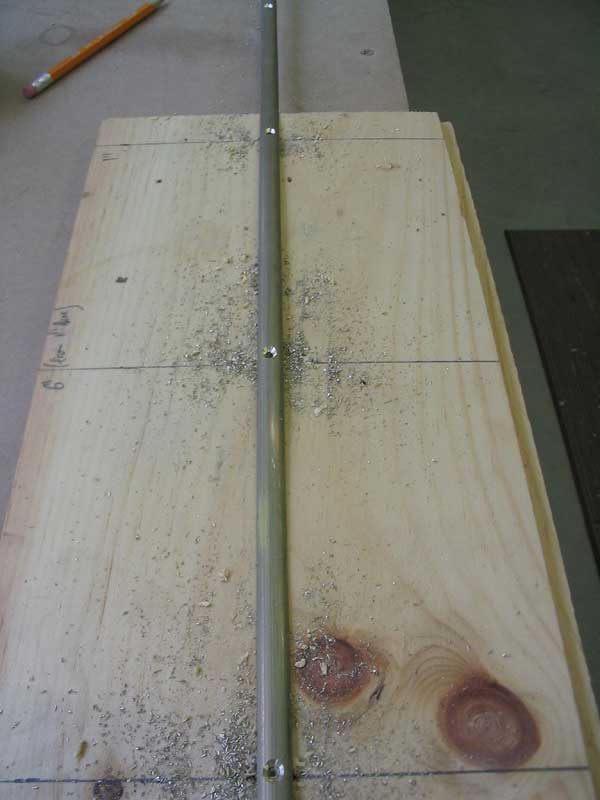
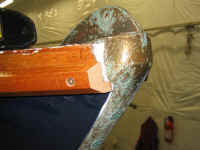
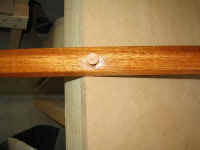
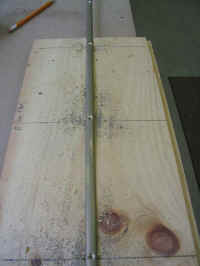
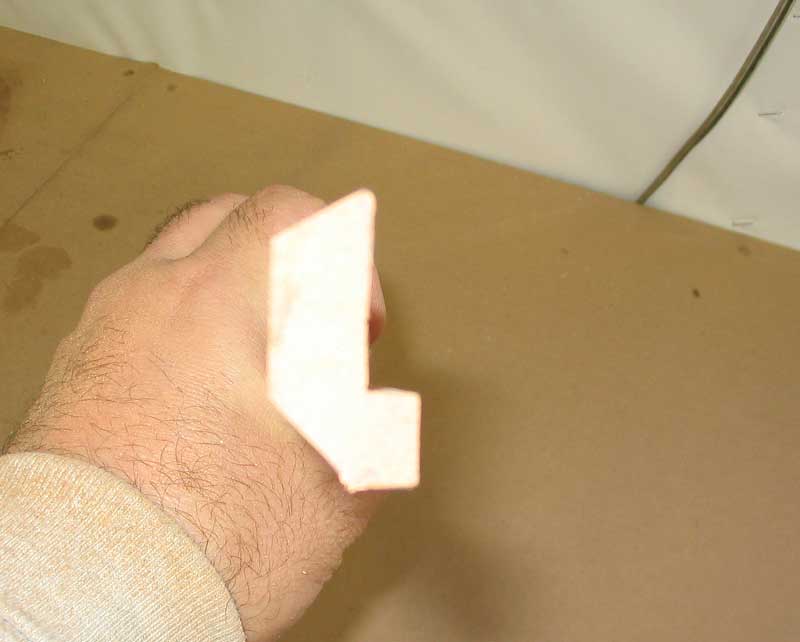
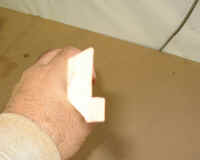 Here
you can see the general profile of the new rubrail. The rabbet, or
L-shaped groove, on the right side is where the new piece is designed to
rest upon and overlap the existing toerail edge. The top edge is
angled at 30 degrees for looks and to allow water runoff, while the 45
degree lower edge helps make a fine transition from the rubrail to the
hull beneath, and also makes the lower portion of the rail visually
disappear when the rail is viewed from a "normal" viewing
height--from above, that is, rather then from the ground 6' below.
The flat outer face is 5/8" wide, which will leave about a
1/8" reveal on each side of the brass half oval trim. Here
you can see the general profile of the new rubrail. The rabbet, or
L-shaped groove, on the right side is where the new piece is designed to
rest upon and overlap the existing toerail edge. The top edge is
angled at 30 degrees for looks and to allow water runoff, while the 45
degree lower edge helps make a fine transition from the rubrail to the
hull beneath, and also makes the lower portion of the rail visually
disappear when the rail is viewed from a "normal" viewing
height--from above, that is, rather then from the ground 6' below.
The flat outer face is 5/8" wide, which will leave about a
1/8" reveal on each side of the brass half oval trim.
|
|
I can hear you already: brass?
OK, I'd love for it to be bronze. But brass is what's available--I
couldn't find a source for bronze half oval and don't even know if it
exists--and, frankly, it doesn't matter a whit in this application,
since it's a completely cosmetic and non-structural installation.
It will tarnish and weather in a manner similar to that of bronze, and
will not interact with any other metals on board. I'll even
install the brass half oval with genuine (read: soft 'n' lousy)
brass screws. Ordinarily, I'd never choose brass for onboard
use. In this instance, I have no choice--and it makes no
difference.
Disclaimers aside, I
think the brass will be sharp. It should add that perfect classic
touch to the rubrail trim. I ordered several lengths from a local
supplier. |
|
 With
the rubrail pieces all milled, I decided to go ahead and apply a few
coats of varnish while they were still off the boat--plus, I was waiting
for bronze screws (with which to attach the wooden rubrail to the boat),
mahogany 5200 (with which to seal the wooden rubrail to the boat), and
the brass screws and half oval to arrive, so installation couldn't begin
anyway. After I got the first coat applied, I temporarily clamped
one of the sections onto the boat so I could see how it would
look. Nice! With
the rubrail pieces all milled, I decided to go ahead and apply a few
coats of varnish while they were still off the boat--plus, I was waiting
for bronze screws (with which to attach the wooden rubrail to the boat),
mahogany 5200 (with which to seal the wooden rubrail to the boat), and
the brass screws and half oval to arrive, so installation couldn't begin
anyway. After I got the first coat applied, I temporarily clamped
one of the sections onto the boat so I could see how it would
look. Nice!
|
|
 Once
my needed supplies arrived, I got right to work. I decided to
begin installation at the bow end, since it would be easier to remove
excess length at the transom end. Beginning on the starboard side,
I test fit one of the lengths of milled rail and, satisfied that the
whole process was going to work as anticipated, continued as
planned. To create a more finished end at the stem termination, I
cut a 45 degree angle on the forward end of the rubrail--and also at the
after end, since I planned to create angled scarf joints between the
pieces. With the cuts made, I clamped the piece in place and
prepared to install some screws. Once
my needed supplies arrived, I got right to work. I decided to
begin installation at the bow end, since it would be easier to remove
excess length at the transom end. Beginning on the starboard side,
I test fit one of the lengths of milled rail and, satisfied that the
whole process was going to work as anticipated, continued as
planned. To create a more finished end at the stem termination, I
cut a 45 degree angle on the forward end of the rubrail--and also at the
after end, since I planned to create angled scarf joints between the
pieces. With the cuts made, I clamped the piece in place and
prepared to install some screws.
|
 My
plan was to dry fit the rail on both sides with screws, then to remove
the pieces prior to final installation in a bed of mahogany-colored
5200. Testing on a scrap piece of the rail, I set up a tapered
drill bit and countersink to the appropriate depth for the #8 x1"
silicon bronze square-drive, bugle head screws that I had purchased for
the rail installation. Because the screws would ultimately be
covered with the brass half oval trim, I only planned to countersink the
heads flush, with no need to create counterbores and wooden bungs. My
plan was to dry fit the rail on both sides with screws, then to remove
the pieces prior to final installation in a bed of mahogany-colored
5200. Testing on a scrap piece of the rail, I set up a tapered
drill bit and countersink to the appropriate depth for the #8 x1"
silicon bronze square-drive, bugle head screws that I had purchased for
the rail installation. Because the screws would ultimately be
covered with the brass half oval trim, I only planned to countersink the
heads flush, with no need to create counterbores and wooden bungs. |
|
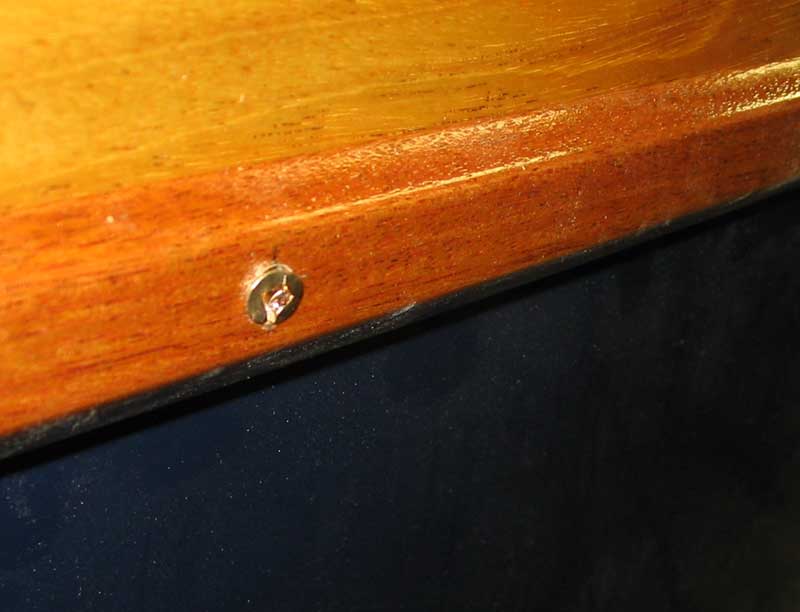
 Beginning
at the forward end, I predrilled and installed the screws every 12"
on center; first, though, I marked where the screws holding the existing
toerail in place were located, so that I wouldn't attempt to drill a new
screwhole directly above one of the existing screws. (This proved
to be a valuable step, as in a few locations the 12" OC spacing
ended up above the existing screws; knowing where they were located
allowed me to adjust the spacing accordingly.) Beginning
at the forward end, I predrilled and installed the screws every 12"
on center; first, though, I marked where the screws holding the existing
toerail in place were located, so that I wouldn't attempt to drill a new
screwhole directly above one of the existing screws. (This proved
to be a valuable step, as in a few locations the 12" OC spacing
ended up above the existing screws; knowing where they were located
allowed me to adjust the spacing accordingly.)
|
|
 In
this manner, I proceeded down the length of the boat, clamping,
predrilling, and screwing as I went. At the joints between
sections (each side required three 8' sections plus a shorter piece at
the transom end), I refrained initially from installing a screw directly
through the 45-degree joint, as I thought it would be better if I
secured this joint only during final installation. For each screw,
I measured 12" from the last location, then marked the center of
the flat outer face of the rail. This ensured that the brass trim
would be able to easily cover the screw heads, while remaining dead
center as designed. In
this manner, I proceeded down the length of the boat, clamping,
predrilling, and screwing as I went. At the joints between
sections (each side required three 8' sections plus a shorter piece at
the transom end), I refrained initially from installing a screw directly
through the 45-degree joint, as I thought it would be better if I
secured this joint only during final installation. For each screw,
I measured 12" from the last location, then marked the center of
the flat outer face of the rail. This ensured that the brass trim
would be able to easily cover the screw heads, while remaining dead
center as designed.
|
|
 The
dry fit proceeded smoothly for the most part, though in one location the
drill/driver managed to twist the head of one of the screws apart,
apparently because of defect in the screw casting, since this problem
only occurred the one time. The square head screws made power
driving a breeze; standard Phillips head screws would surely have
stripped out more frequently, and I don't even want to talk about
slotted screws. (Later removal of the damaged screw proved to be
difficult and resulted in some damage to the rubrail...read on for more
details.) The
dry fit proceeded smoothly for the most part, though in one location the
drill/driver managed to twist the head of one of the screws apart,
apparently because of defect in the screw casting, since this problem
only occurred the one time. The square head screws made power
driving a breeze; standard Phillips head screws would surely have
stripped out more frequently, and I don't even want to talk about
slotted screws. (Later removal of the damaged screw proved to be
difficult and resulted in some damage to the rubrail...read on for more
details.)
|
|
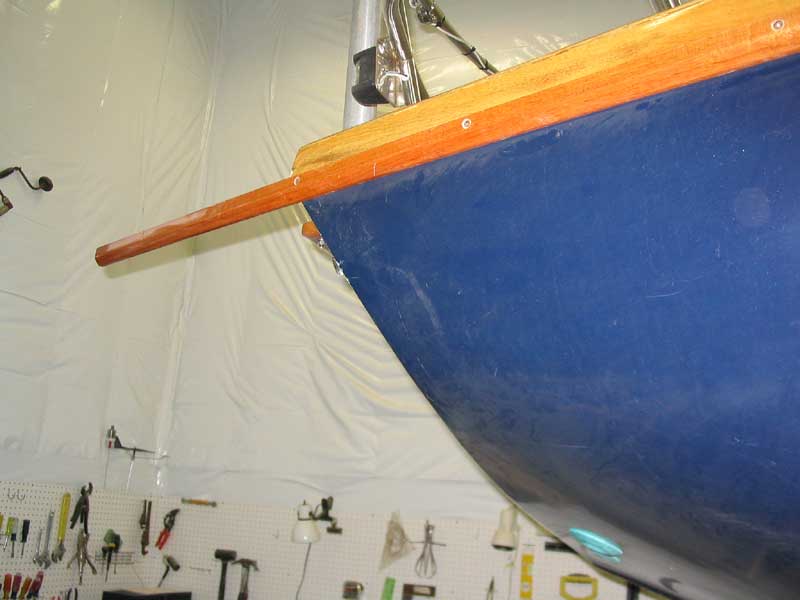
 At
the transom, I ran the last piece of the rubrail wild past the transom
end and, when it was secured, applied masking tape over the transom
surface before using a thin pull saw to cut the end flush with and at
the same angle as the transom. At
the transom, I ran the last piece of the rubrail wild past the transom
end and, when it was secured, applied masking tape over the transom
surface before using a thin pull saw to cut the end flush with and at
the same angle as the transom.
|
 With
one side complete, I duplicated the process on the other side.
Once all pieces had been dry fit, I began removing them in preparation
for final installation in a bed of 5200 adhesive. Before removing
each section, I applied masking tape along the top and bottom edges of
the rails, to help protect the hull and toerail during reinstallation
later, and marked each screw location on the tape for future reference
(if necessary). Then, I carefully backed out the screws--the sure
grip of the square drive sure made a difference here, though three or
four of the screws around the boat broke off during removal.
Nothing is ever easy, despite one's best efforts to make it
painless. With
one side complete, I duplicated the process on the other side.
Once all pieces had been dry fit, I began removing them in preparation
for final installation in a bed of 5200 adhesive. Before removing
each section, I applied masking tape along the top and bottom edges of
the rails, to help protect the hull and toerail during reinstallation
later, and marked each screw location on the tape for future reference
(if necessary). Then, I carefully backed out the screws--the sure
grip of the square drive sure made a difference here, though three or
four of the screws around the boat broke off during removal.
Nothing is ever easy, despite one's best efforts to make it
painless. |
|
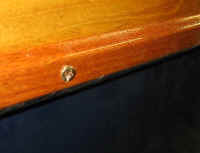
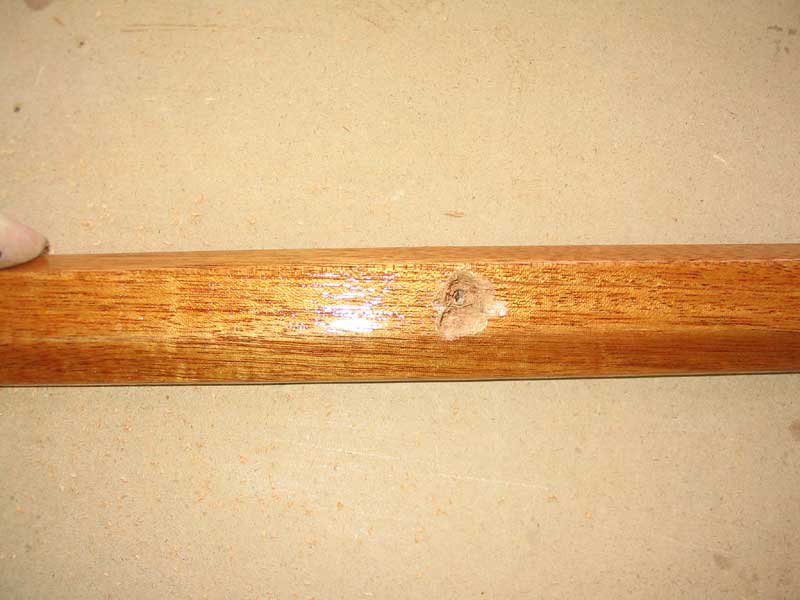
 When
I reached the screw with the twisted-off head on the starboard side, I
pondered how to remove it. Removal was necessary because I had to
get the rail off so I could apply some 5200 behind. I tried using
vice grips on the remains of the head, but the remaining portion was
already damaged and simply broke off under pressure. There wasn't
enough of the shank protruding to get a grip on--the screw had been
nearly all the way home when the head disintegrated. Fortunately,
there was a slight divot in the top of the shank, which looked like the
perfect size to cradle a drill bit for drilling out the screw. At
first, I did well, and drilled much of the screw out. But a
microsecond's distraction, and the drill bit slipped just off the metal
screw--and into the wood around. I stopped the drill instantly,
but the damage was done. Thunder crashed, livestock scattered,
unsettled, 'round the corral, and for a moment (just a moment),
the earth's rotation actually stopped upon hearing my cries of
displeasure. When
I reached the screw with the twisted-off head on the starboard side, I
pondered how to remove it. Removal was necessary because I had to
get the rail off so I could apply some 5200 behind. I tried using
vice grips on the remains of the head, but the remaining portion was
already damaged and simply broke off under pressure. There wasn't
enough of the shank protruding to get a grip on--the screw had been
nearly all the way home when the head disintegrated. Fortunately,
there was a slight divot in the top of the shank, which looked like the
perfect size to cradle a drill bit for drilling out the screw. At
first, I did well, and drilled much of the screw out. But a
microsecond's distraction, and the drill bit slipped just off the metal
screw--and into the wood around. I stopped the drill instantly,
but the damage was done. Thunder crashed, livestock scattered,
unsettled, 'round the corral, and for a moment (just a moment),
the earth's rotation actually stopped upon hearing my cries of
displeasure.
Unlike Superman, however,
I was unable to reverse the spin of the Earth--and thereby unable to
reverse the stupidity of my earlier actions--so I was forced to come up
with another way to deal with my damaged, brand-new rail without
replacing the whole section--something that I suppose could have been
possible, but was unsavory to say the least. The screw was still
firmly attached to the piece, so to get the section of rail off I was
forced to gouge out a bit around the screw remains with a small chisel
and a scratch awl, till the threads finally released their grip. I
set the section aside for a moment and removed the remaining rail
sections from the starboard side. |
|
 With
the rail sections removed, I scuffed up the varnish in the area where
the rubrails were to be reinstalled, to help the 5200 form its
ever-tenacious bond. I cleaned off the dust, and was ready for the
next step. With
the rail sections removed, I scuffed up the varnish in the area where
the rubrails were to be reinstalled, to help the 5200 form its
ever-tenacious bond. I cleaned off the dust, and was ready for the
next step.
|
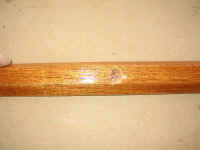
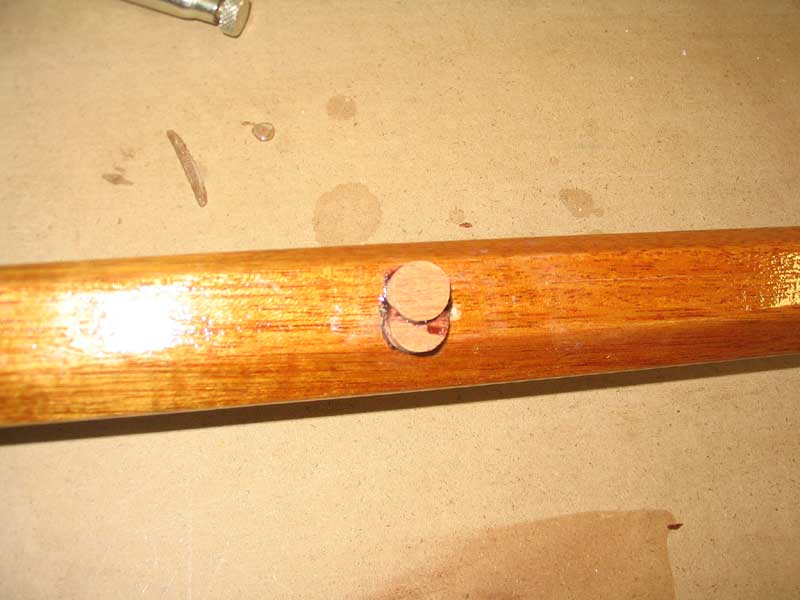
 First,
though, I wanted to address my damaged rail section. Fortunately,
most of the damaged area would eventually be covered by the half oval
brass, but portions of the damage were beyond the extent of the trim, so
I had to do something. My first, logical, thought was to create a
Dutchman to replace the damaged material. As I started looking at
the damage, I had the thought that perhaps I could simply bore out the
damage using a 1/2" bit and install a large bung.
Unfortunately, the damaged areas was a bit too large for a single plug,
but I thought that I could do it with two. I started by boring a
1/2" hole (really a circular mortise, in this case) covering much
of the damage, and installing a properly-sized bung in the opening with
Resorcinol glue. With the first bung installed, I bored a second
hole--taking a bite out of the first bung in the process, as they
overlapped--and glued in a second bung. I left this arrangement to
dry overnight before attempting to chisel the bungs flush with the rail. First,
though, I wanted to address my damaged rail section. Fortunately,
most of the damaged area would eventually be covered by the half oval
brass, but portions of the damage were beyond the extent of the trim, so
I had to do something. My first, logical, thought was to create a
Dutchman to replace the damaged material. As I started looking at
the damage, I had the thought that perhaps I could simply bore out the
damage using a 1/2" bit and install a large bung.
Unfortunately, the damaged areas was a bit too large for a single plug,
but I thought that I could do it with two. I started by boring a
1/2" hole (really a circular mortise, in this case) covering much
of the damage, and installing a properly-sized bung in the opening with
Resorcinol glue. With the first bung installed, I bored a second
hole--taking a bite out of the first bung in the process, as they
overlapped--and glued in a second bung. I left this arrangement to
dry overnight before attempting to chisel the bungs flush with the rail. |
|

|
|
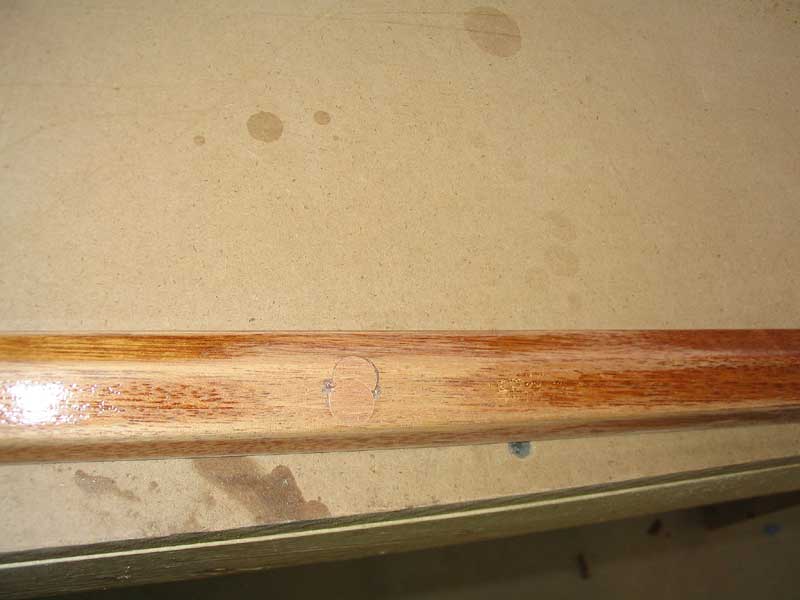
 The
next day, I chiseled and sanded the bungs flush. When the brass
trim is installed, the repair will barely be noticeable. The small
voids around the center portions of the two bungs will be completely
covered, leaving only the smooth, flush outer edges visible. The
next day, I chiseled and sanded the bungs flush. When the brass
trim is installed, the repair will barely be noticeable. The small
voids around the center portions of the two bungs will be completely
covered, leaving only the smooth, flush outer edges visible.
|
|
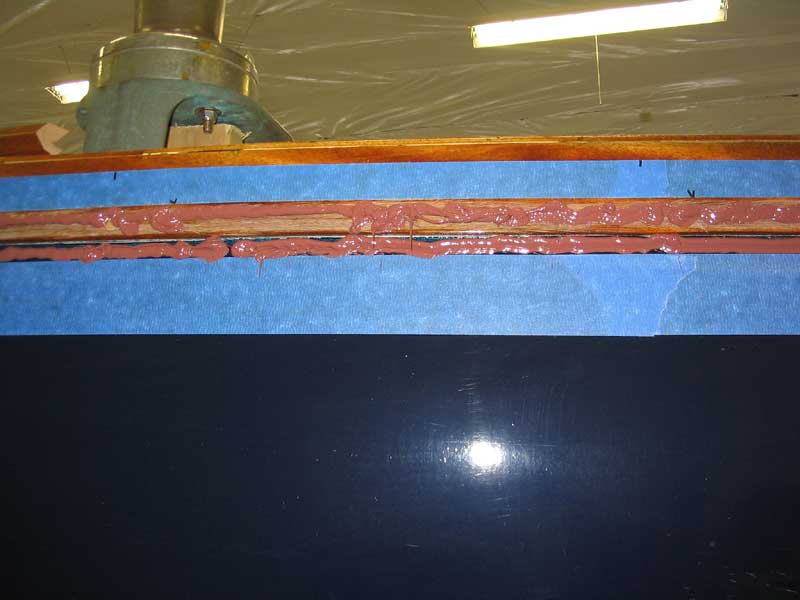
 Now came the fun part: final installation. I prepared my
little section of rolling staging with all the tools and equipment I'd
need: rags, rags, paper towels, screws, drills, rags, paint
thinner, and--oh yes--rags. 5200 is sticky, messy stuff, if
nothing else. Opening the first of 4 canisters of mahogany-colored
5200 I had on hand for the project, I applied heavy beads to the boat in
way of the first rubrail section on the port side. I carefully
installed the first screw, while clamping the section in place a bit
further down. In this manner, I secured all the screws in the
first section, drilling and installing two new screws near the stem to
replace two that had broken when I removed them. The additional
screw holes will be covered with the brass trim later, so I wasn't
worried about it.
Now came the fun part: final installation. I prepared my
little section of rolling staging with all the tools and equipment I'd
need: rags, rags, paper towels, screws, drills, rags, paint
thinner, and--oh yes--rags. 5200 is sticky, messy stuff, if
nothing else. Opening the first of 4 canisters of mahogany-colored
5200 I had on hand for the project, I applied heavy beads to the boat in
way of the first rubrail section on the port side. I carefully
installed the first screw, while clamping the section in place a bit
further down. In this manner, I secured all the screws in the
first section, drilling and installing two new screws near the stem to
replace two that had broken when I removed them. The additional
screw holes will be covered with the brass trim later, so I wasn't
worried about it.
 With the first section
secured, I began the arduous cleanup process. 5200 resists all
attempts at easy cleanup, so I used plenty of paper towels, rags, and
paint thinner to remove most of the excess that had spilled out beneath
the rail during installation, and to fill any voids on the underside of
the rail. When I finished the first section, I moved on down the
side of the boat in a similar manner, one section at a time.
(There are 3.5 sections on each side of the boat.) After the
initial adhesive cleanup, I removed the masking tape and did a final
cleanup, smoothing the exposed adhesive and ensuring that all areas were
clean. Ugh. I hate this stuff. With the first section
secured, I began the arduous cleanup process. 5200 resists all
attempts at easy cleanup, so I used plenty of paper towels, rags, and
paint thinner to remove most of the excess that had spilled out beneath
the rail during installation, and to fill any voids on the underside of
the rail. When I finished the first section, I moved on down the
side of the boat in a similar manner, one section at a time.
(There are 3.5 sections on each side of the boat.) After the
initial adhesive cleanup, I removed the masking tape and did a final
cleanup, smoothing the exposed adhesive and ensuring that all areas were
clean. Ugh. I hate this stuff.
|
|
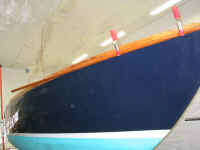
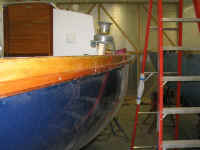
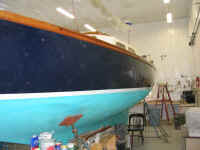
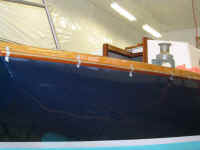
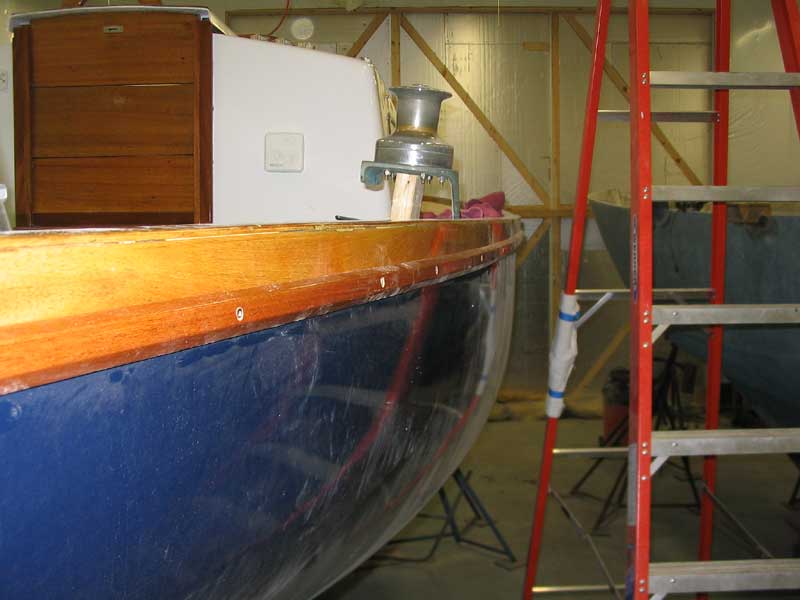
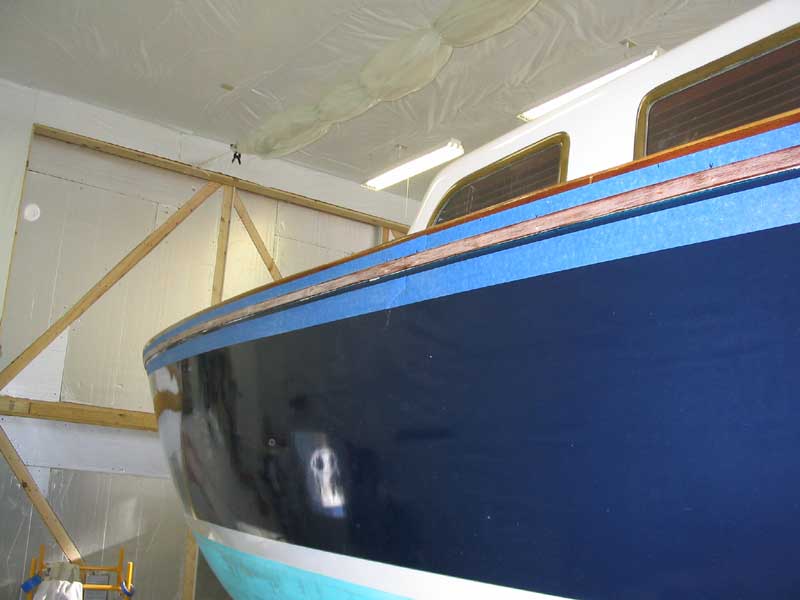
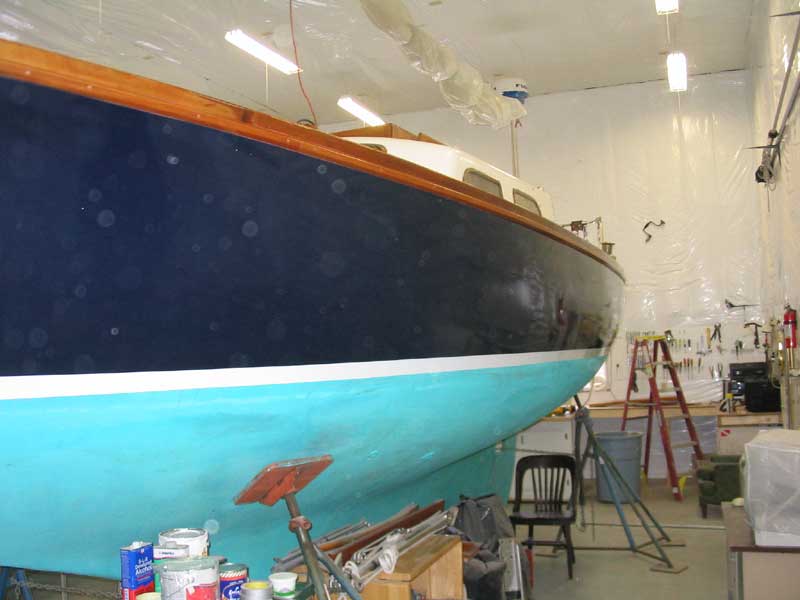
Over part of an afternoon and most of the next morning, I completed the
rubrail installation. I used nearly all of four tubes of 5200,
half a roll of paper towels, half a gallon of paint thinner, and several
rags. Fun stuff, this! I was pleased with the rubrail,
however. It really finished off the appearance of the toerail trim
and enhanced the overall appearance of the boat.
|
|
 With
the major work complete, I waited several days for the 5200 to fully cure, and then spent a week or so (elapsed) time
applying 4 additional coats of varnish to the toerails and new rubrail. The final coats of varnish helped to integrate
the new work with the old, making for a nearly seamless appearance. With
the major work complete, I waited several days for the 5200 to fully cure, and then spent a week or so (elapsed) time
applying 4 additional coats of varnish to the toerails and new rubrail. The final coats of varnish helped to integrate
the new work with the old, making for a nearly seamless appearance.
|
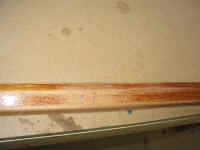
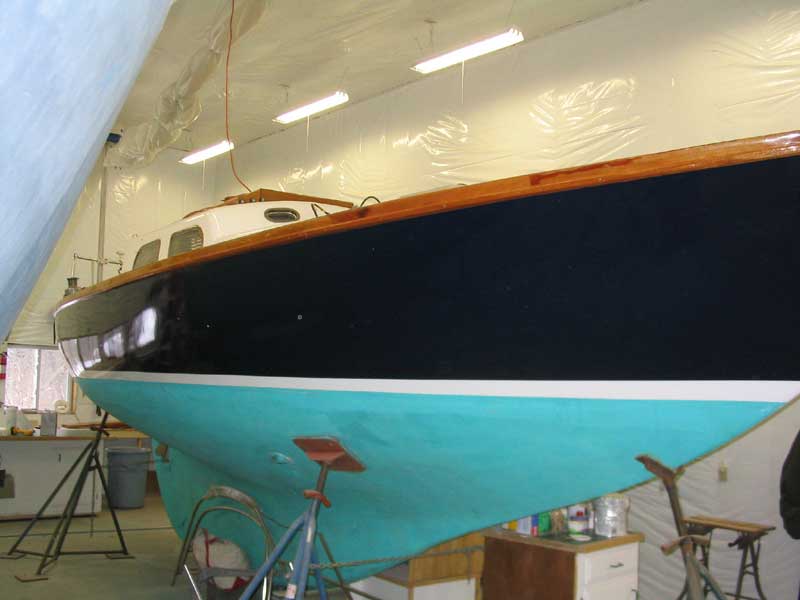
 Once
the varnish work was complete, I turned my attention to the final detail: the brass half oval trim. The material
comes undrilled, so my first step was to drill screwholes and countersinks in the brass. I intended to place the
screws 6" on center, so the first thing I did was to physically check the spacing on the wooden rubrails to ensure that
none of the new screws would end up spaced over the existing bronze screws securing the wood in place. Once this was
settled, I drilled the holes in the brass, which was easy enough--if tedious. To speed the process, I marked several
lines 6" apart on piece of scrap wood, onto which I laid the brass for milling. When the pilot holes were
drilled, I milled a countersink so that the screws would end up flush. I located the first screwhole 1" from the end;
when I reached the far end, I cut the brass off 1" beyond the last hole, so that the holes would be symmetrical on each
piece of the half oval. Once
the varnish work was complete, I turned my attention to the final detail: the brass half oval trim. The material
comes undrilled, so my first step was to drill screwholes and countersinks in the brass. I intended to place the
screws 6" on center, so the first thing I did was to physically check the spacing on the wooden rubrails to ensure that
none of the new screws would end up spaced over the existing bronze screws securing the wood in place. Once this was
settled, I drilled the holes in the brass, which was easy enough--if tedious. To speed the process, I marked several
lines 6" apart on piece of scrap wood, onto which I laid the brass for milling. When the pilot holes were
drilled, I milled a countersink so that the screws would end up flush. I located the first screwhole 1" from the end;
when I reached the far end, I cut the brass off 1" beyond the last hole, so that the holes would be symmetrical on each
piece of the half oval.
|
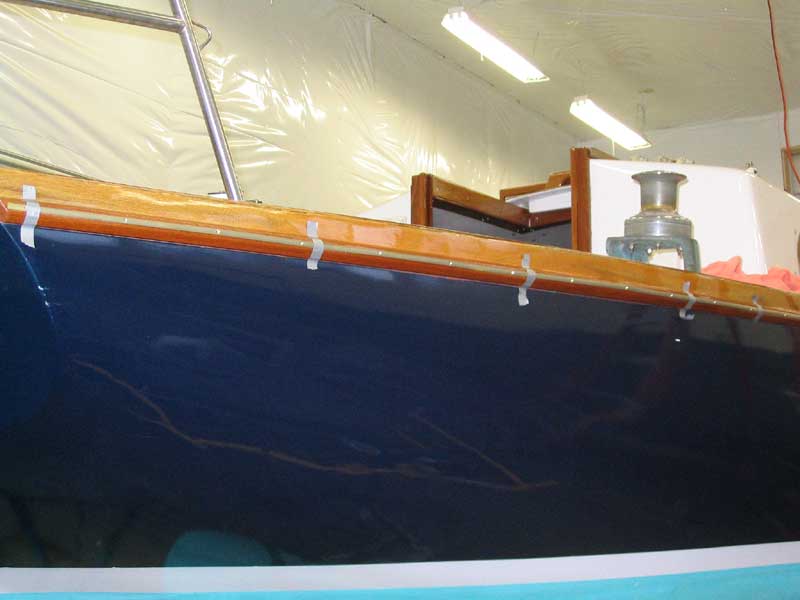
 Getting
each piece of brass from the bench up to the rubrail and secured in place was a bit tricky at first. The
3/8" half oval was floppy at best, but with the myriad holes drilled in it it became nearly unmanageable without
bending or breaking the material. Working alone, I figured out a way to temporarily secure it roughly in position with
tape, just to get it up there and supported. Once the whole length was supported, I could more easily adjust it to get
it into the proper position before beginning to secure it in place. Getting
each piece of brass from the bench up to the rubrail and secured in place was a bit tricky at first. The
3/8" half oval was floppy at best, but with the myriad holes drilled in it it became nearly unmanageable without
bending or breaking the material. Working alone, I figured out a way to temporarily secure it roughly in position with
tape, just to get it up there and supported. Once the whole length was supported, I could more easily adjust it to get
it into the proper position before beginning to secure it in place.
|
 Beginning
at the stern, I secured each section of brass with #4 x 3/4" brass oval head screws, predrilling the wooden rubrail for
each screw and threading them in by hand. In this manner I proceeded along the length of the boat. Each side
required two full lengths (12' each), plus a shorter section at the bow. My small rolling staging was a Godsend for
this project. Beginning
at the stern, I secured each section of brass with #4 x 3/4" brass oval head screws, predrilling the wooden rubrail for
each screw and threading them in by hand. In this manner I proceeded along the length of the boat. Each side
required two full lengths (12' each), plus a shorter section at the bow. My small rolling staging was a Godsend for
this project.
|
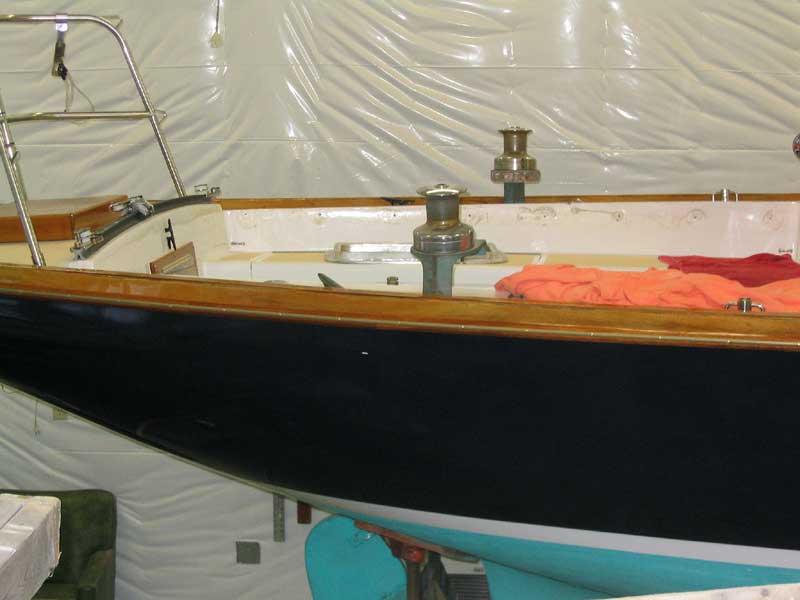
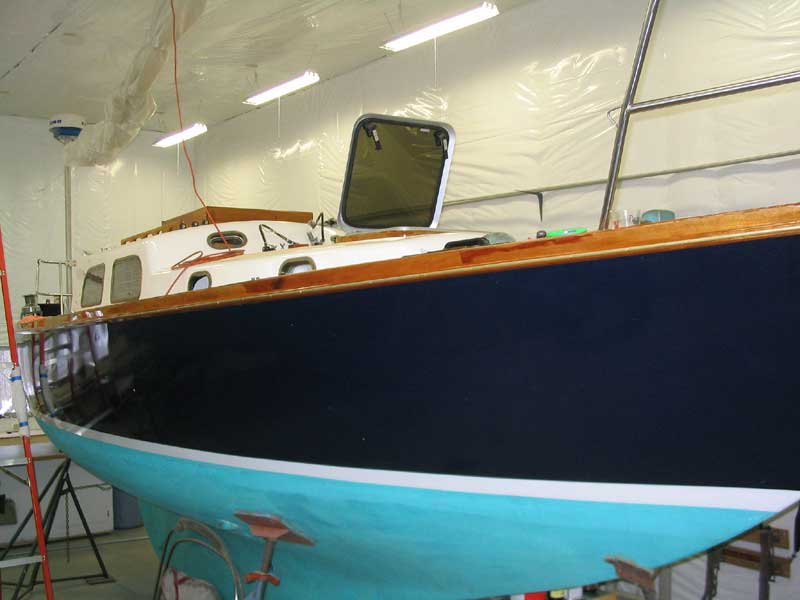
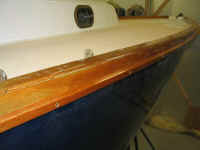
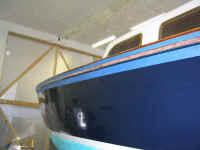
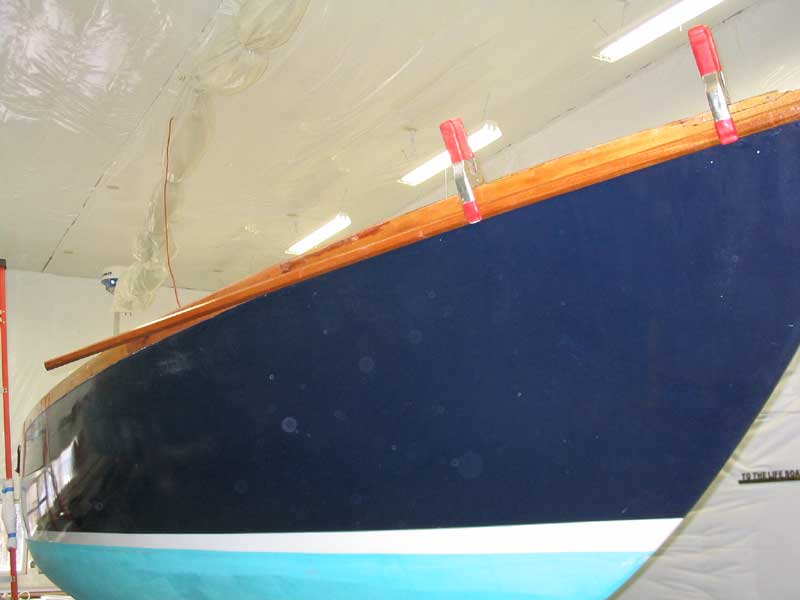
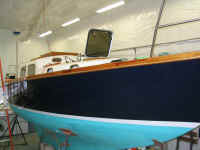 I
was pleased with how the brass turned out. It added a nice accent to the varnished toerail and rubrail, and will also
add a semblance of protection should the rail come up against another boat or a pier. The rubrail project had the
effect I had hoped for, and really added the needed finishing touch to the profile of the boat. It's subtle, and
doesn't overtly show up in these photos. But trust me when I say that in person, it looks divine, and as if it had
always been there. I
was pleased with how the brass turned out. It added a nice accent to the varnished toerail and rubrail, and will also
add a semblance of protection should the rail come up against another boat or a pier. The rubrail project had the
effect I had hoped for, and really added the needed finishing touch to the profile of the boat. It's subtle, and
doesn't overtly show up in these photos. But trust me when I say that in person, it looks divine, and as if it had
always been there.
Project complete. If you're good, I'll post some additional photos when the boat is in
the water.
|
|


 With
With