|
A Cockpit Table
This page was last
updated
on 27 October 2008.
|
A cockpit table sure is nice when
cruising. Without one, you are always searching for a place for
that plate of hors d'oeuvres, your cocktail, dinner, coffee, or
lunch. Or just some random junk you might want close at hand for a
relaxing day at anchor.
However, like most things, there is no
simple answer. Boats with steering pedestals have an advantage, as
the front of the pedestal often makes an ideal mounting location for a
folding table. With a tiller, obviously any table needs to be
easily removable. There are lots of complicated or otherwise
unsuitable brackets available out there, all of which were either too
expensive, too bulky, or somehow just plain wrong for us.
I considered and rejected a host of table
designs, each with its own merits, but also with insurmountable reasons
against its favor. The criteria in my mind included low cost, ease
of setup and removal, weather resistance, simple storage possibilities,
little or no hardware left behind when the table was removed, and a
lightweight construction that would be stable, strong, and steady when
set up.
At some point in the winter during a
brainstorming session in the shop with Nathan, owner of Dasein,
Triton #668, we came up with the idea to use a threaded fill plate (like
your fuel fill or water fill plate) in the cockpit sole as a table base,
into which a leg could be threaded and a table placed on top.
Don't ask me how we came around to this idea--it was many months ago,
and the genesis was, like most ideas, surely roundabout in nature. |
What the raw idea eventually morphed and evolved into is presented
here. I began with a white Marelon water tank deck fill, which
could be purchased inexpensively, was strong, and featured a threaded
cap that, when removed, would provide the necessary threaded socket for
the table leg. When the table was removed, the cap would keep the
installation watertight (more on this later), and the whole thing
presented a rather flush appearance that would be less cumbersome in the
cockpit sole.
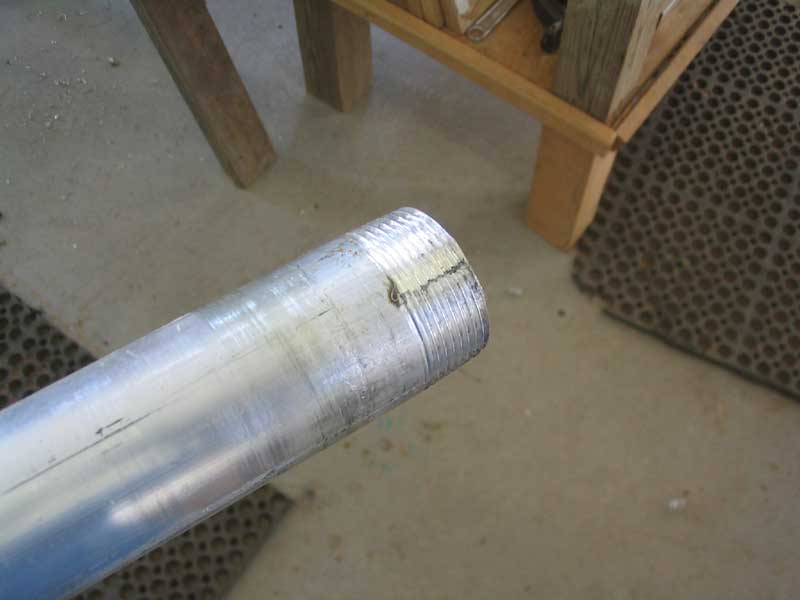
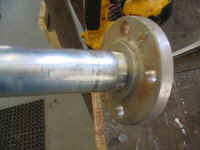
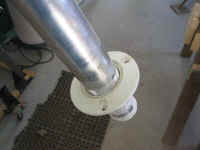
 The threaded deck fill was 1-1/2" in
diameter, so I searched for a length of aluminum pipe (for lightness)
that could be threaded to suit. I found the raw materials needed
at McMaster-Carr, where I purchased a length of aluminum pipe 3' in
length, as well as an aluminum threaded flange that I could use on the
bottom of the tabletop. OK, so maybe this job was becoming something
other than cheap (big surprise there), but it made the table that I
wanted, so there you have it. The threaded deck fill was 1-1/2" in
diameter, so I searched for a length of aluminum pipe (for lightness)
that could be threaded to suit. I found the raw materials needed
at McMaster-Carr, where I purchased a length of aluminum pipe 3' in
length, as well as an aluminum threaded flange that I could use on the
bottom of the tabletop. OK, so maybe this job was becoming something
other than cheap (big surprise there), but it made the table that I
wanted, so there you have it.
|
|
|
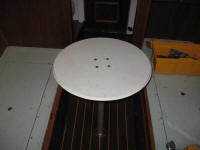
 For the table top, I chose very high molecular weight (VHMW)
polyethylene--known commercially as Starboard. I found that the
price was nearly 50% less at McMaster than the typical retail marine
store prices, and have since discovered that many plastics shops carry
this product as well. I ordered a sheet that was large enough for
two tabletops.
For the table top, I chose very high molecular weight (VHMW)
polyethylene--known commercially as Starboard. I found that the
price was nearly 50% less at McMaster than the typical retail marine
store prices, and have since discovered that many plastics shops carry
this product as well. I ordered a sheet that was large enough for
two tabletops. |
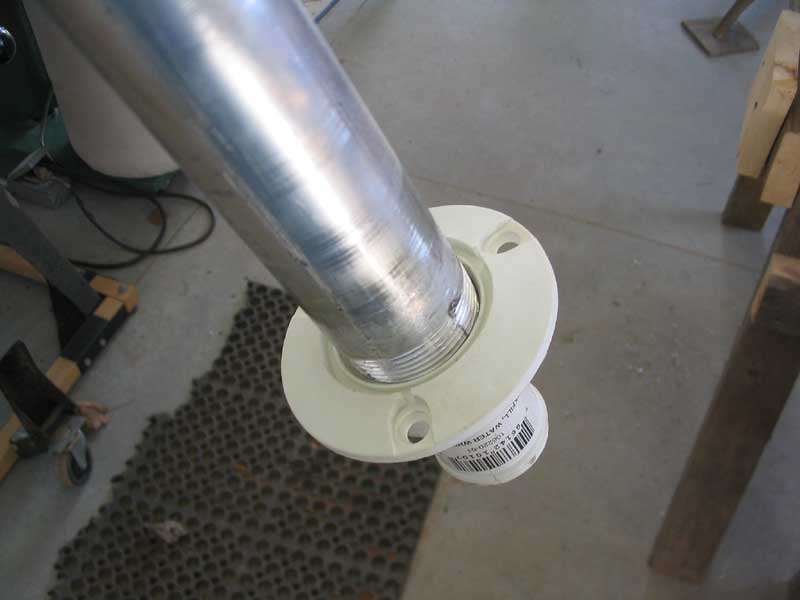
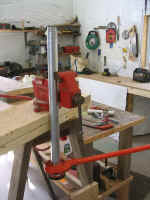
 Now that I had all the raw materials needed for the job, I got to
work. I began with the Marelon deck fitting. In the cockpit,
I played around with various measurements and determined an appropriate
mounting location for the fitting, just forward of the tiller. I
wanted the aft location because we often sit at the aft end of the
cockpit, and also because it would keep the forward end of the cockpit
clear for easier access to and from the cabin with the table
setup. Once I had confirmed the location, I cut a hole of the
appropriate size in the deck with a hole saw. As with all deck
openings, I took the time to ream out the balsa core in the cockpit sole
around the hole, and then filled the void with thickened epoxy to
prevent any possibility of water ingress. I also filled the
screwhole locations, which I had previously marked and drilled.
Now that I had all the raw materials needed for the job, I got to
work. I began with the Marelon deck fitting. In the cockpit,
I played around with various measurements and determined an appropriate
mounting location for the fitting, just forward of the tiller. I
wanted the aft location because we often sit at the aft end of the
cockpit, and also because it would keep the forward end of the cockpit
clear for easier access to and from the cabin with the table
setup. Once I had confirmed the location, I cut a hole of the
appropriate size in the deck with a hole saw. As with all deck
openings, I took the time to ream out the balsa core in the cockpit sole
around the hole, and then filled the void with thickened epoxy to
prevent any possibility of water ingress. I also filled the
screwhole locations, which I had previously marked and drilled. |
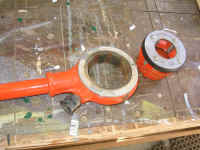
 Before installing the fitting, I sealed the bottom end (which was
designed to accept a hose) with fiberglass to prevent any leakage into
the bilge should the O-ring seal on the cap be compromised for any
reason. I used a couple layers of lightweight cloth and simply
rubber-banded them in place try, then saturated them with epoxy resin
from inside and out before covering them with plastic and tape as a sort
of "clamp". I left the assembly to cure, and then, when
complete, removed the molded lettering on the cap and flange that read
"Water" to avoid future confusion. When the fitting was ready,
I installed it in the sole in a thick bed of polysulfide caulk.
Before installing the fitting, I sealed the bottom end (which was
designed to accept a hose) with fiberglass to prevent any leakage into
the bilge should the O-ring seal on the cap be compromised for any
reason. I used a couple layers of lightweight cloth and simply
rubber-banded them in place try, then saturated them with epoxy resin
from inside and out before covering them with plastic and tape as a sort
of "clamp". I left the assembly to cure, and then, when
complete, removed the molded lettering on the cap and flange that read
"Water" to avoid future confusion. When the fitting was ready,
I installed it in the sole in a thick bed of polysulfide caulk. |
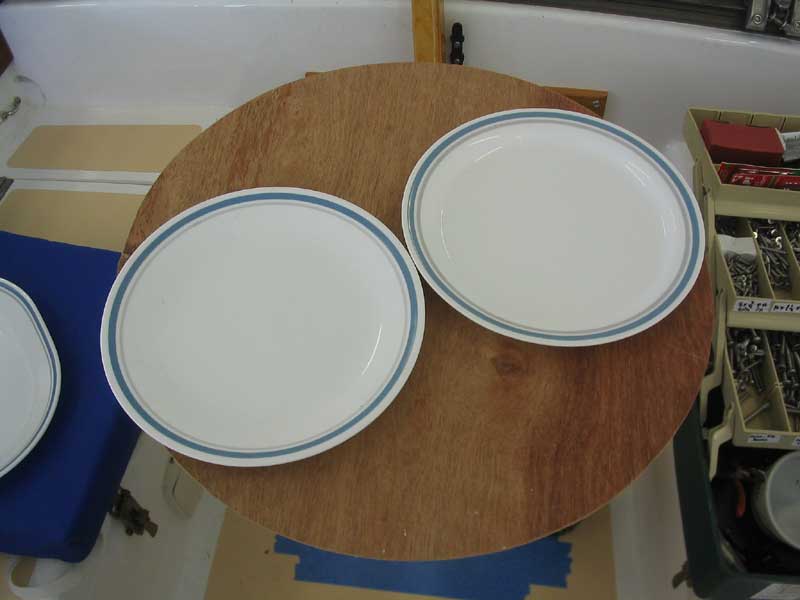
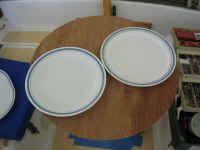 Now I considered the size and shape of the table top. I thought
round was the best bet, and after some guesswork I cut a 20" test
piece out of a scrap of Lauan, using my jigsaw glued to a stick as a
simple circle-cutting jig. The 20" diameter was almost right,
but I found that two of our dinner plates would not quite fit inside the
circle, so I increased the size to 21" diameter, which was just
right. I also used this opportunity to determine the proper height
for the aluminum leg, which I then cut to size and threaded the other
end. Once I had confirmed the size of the top, I cut the final
piece out of the VHMW plastic.
Now I considered the size and shape of the table top. I thought
round was the best bet, and after some guesswork I cut a 20" test
piece out of a scrap of Lauan, using my jigsaw glued to a stick as a
simple circle-cutting jig. The 20" diameter was almost right,
but I found that two of our dinner plates would not quite fit inside the
circle, so I increased the size to 21" diameter, which was just
right. I also used this opportunity to determine the proper height
for the aluminum leg, which I then cut to size and threaded the other
end. Once I had confirmed the size of the top, I cut the final
piece out of the VHMW plastic. |
|
|
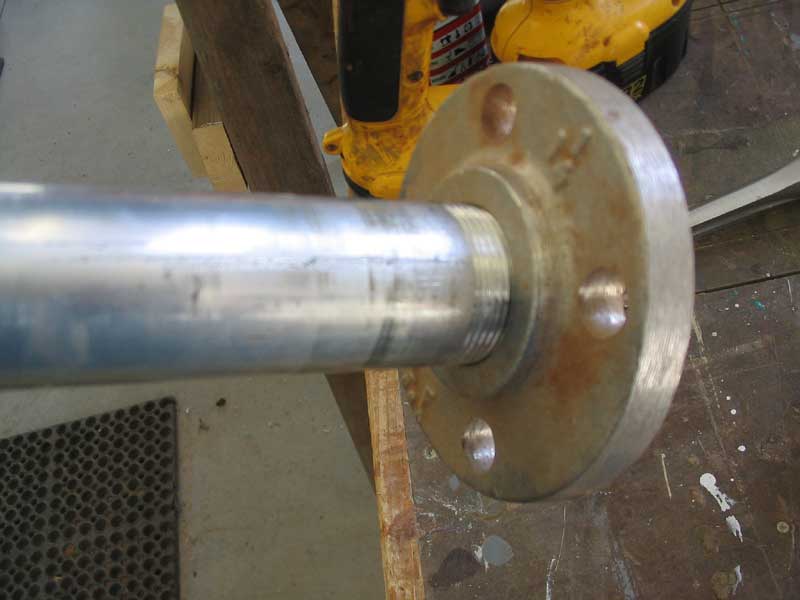
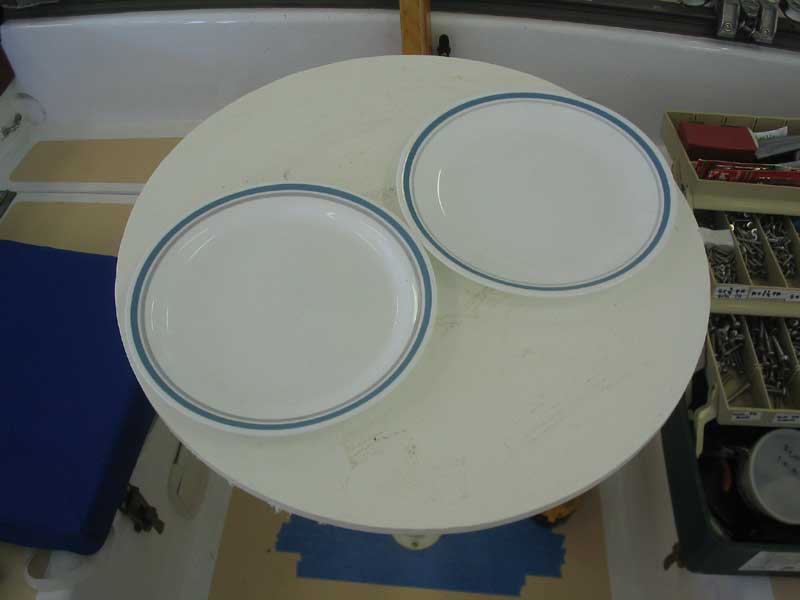
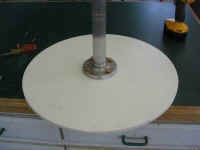 I had hoped to install a wooden fiddle around the edge of the tabletop,
and tried bending a thin strip of mahogany around dry--nope. So I
soaked a thin strip in water for a few days, hoping that it would become
more malleable. It almost worked, and would have worked if I had
used a steam box (which I don't have, though building one is on my
list). I managed to get the strip bent and secured nearly the
whole way round the top before it split near a weak spot in the
wood. I was sick of the process by that point, so I decided to
remove the wood (a fiddle wasn't strictly necessary anyway) and instead
routed a Roman ogee profile on the tabletop. I installed the
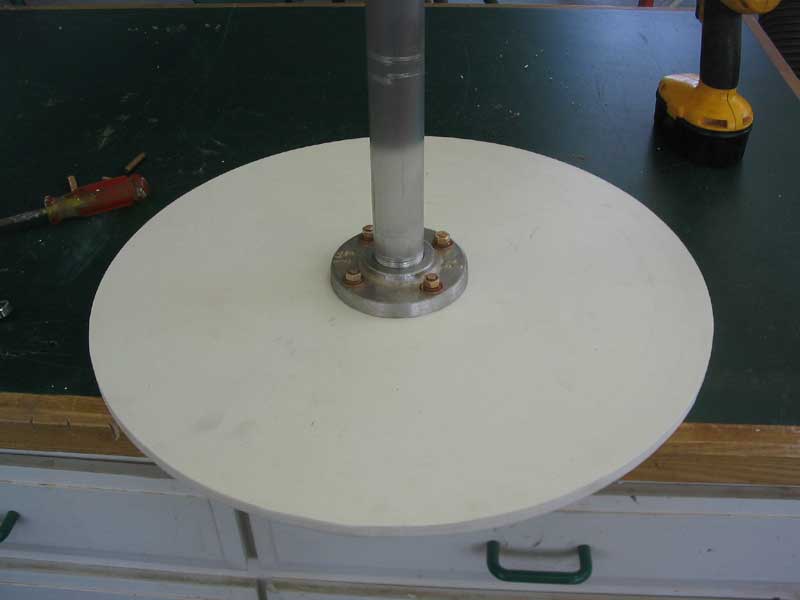
aluminum flange to the underside of the table with four bronze bolts
that I had on hand, which I countersunk into the table top for a clean
appearance.
I had hoped to install a wooden fiddle around the edge of the tabletop,
and tried bending a thin strip of mahogany around dry--nope. So I
soaked a thin strip in water for a few days, hoping that it would become
more malleable. It almost worked, and would have worked if I had
used a steam box (which I don't have, though building one is on my
list). I managed to get the strip bent and secured nearly the
whole way round the top before it split near a weak spot in the
wood. I was sick of the process by that point, so I decided to
remove the wood (a fiddle wasn't strictly necessary anyway) and instead
routed a Roman ogee profile on the tabletop. I installed the
aluminum flange to the underside of the table with four bronze bolts
that I had on hand, which I countersunk into the table top for a clean
appearance. |
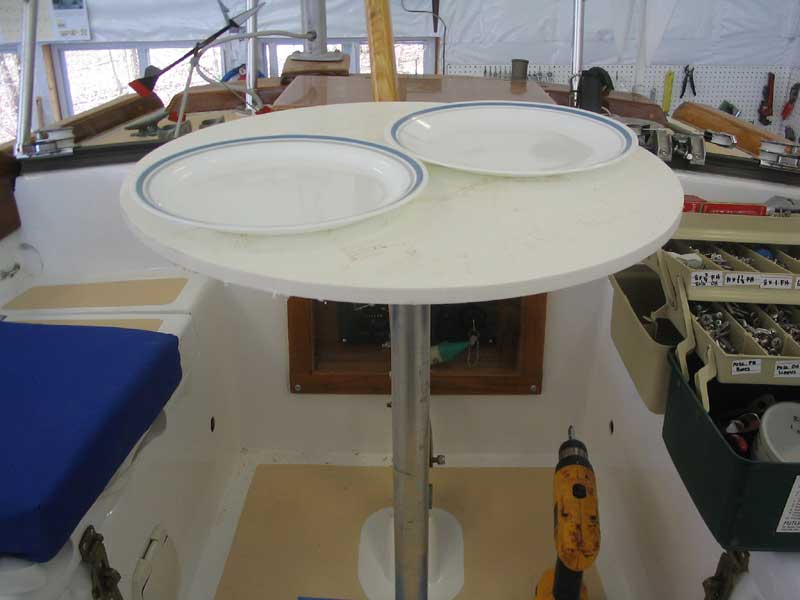
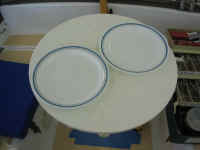
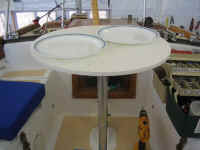 The end result was a simple, clean, weatherproof, lightweight table that
was easy to set up and dismantle, required stowage of only a short
length of pipe (which fit nicely into a nook in a cockpit locker) and
the 21" tabletop, which, if need be, could easily be stored
strapped to the stern pulpit. I also found it fit nicely in a
cockpit locker and stored it there, at least for the time being.
When set up, the table is quite unobtrusive to moving about the cockpit,
and provided adequate space for two large plates and other appurtenances.
Setup and breakdown was a snap by just unscrewing the leg and stowing it
all away. Using the table below (or anywhere else) would be
possible by simply installing a second deck fill plate, an idea which is
under consideration. The end result was a simple, clean, weatherproof, lightweight table that
was easy to set up and dismantle, required stowage of only a short
length of pipe (which fit nicely into a nook in a cockpit locker) and
the 21" tabletop, which, if need be, could easily be stored
strapped to the stern pulpit. I also found it fit nicely in a
cockpit locker and stored it there, at least for the time being.
When set up, the table is quite unobtrusive to moving about the cockpit,
and provided adequate space for two large plates and other appurtenances.
Setup and breakdown was a snap by just unscrewing the leg and stowing it
all away. Using the table below (or anywhere else) would be
possible by simply installing a second deck fill plate, an idea which is
under consideration. |
Is it the ultimate table? No, of course not. It suits our
needs and criteria. The cost was not as low as hoped, but then
what is? But it meets all the other criteria quite well. |
Update: 2008/09
As it turns out, this is pretty much the ultimate table for this
situation. We absolutely love this table. Erecting the table
is one of the first things we do each day while cruising--it's part of
the list of items that we do whenever we've anchored in a new place for
the day, along with putting on the sail cover, coiling sheets, and
installing the cockpit awning. The table lives in the cockpit, and
it sure is nice not having to worry about it being out in the weather,
or getting food or drink spilled on it, or hurting it while stowing it
in the cockpit locker.
The little
table has become an indispensable part of our onboard life. It's
fantastic: strong, durable, and sturdy, thanks to its aluminum
threaded hardware. There is plenty of room to get around the
table, particularly since it leaves the forward end of the cockpit
clear. The Marelon deck plate fitting has worked well,
and though I briefly considered replacing it with a metal version, I
ultimately decided to leave it alone.
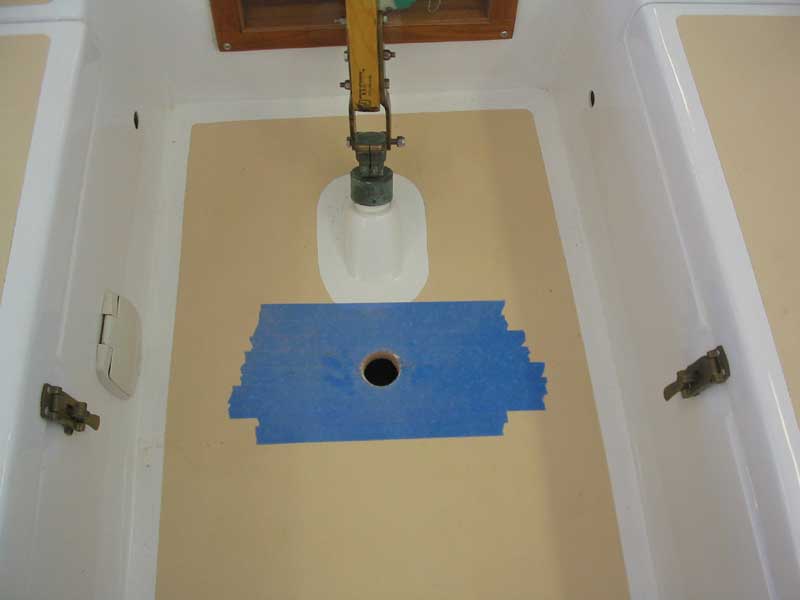
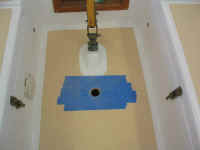
In February 2009, I finally got around to
installing a deck plate in the cabin sole, so that we could use the
table belowdecks as well as in the cockpit. While I didn't expect
to often use the table below, it would be nice to have the possibility,
since we don't have any other table arrangements in the cabin.
Click here
for details on this simple job.
|
 |
|